

Risk Acceptances (Pro)
Risk Acceptances are a special status that can be applied to Findings using either Full Risk Acceptance objects or the Simple Risk Acceptance workflow. Risk Acceptances are used to formally document and operationalize the decision to acknowledge a vulnerable Finding without immediately remediating it.
DefectDojo Pro includes enhanced Risk Acceptance capabilities to scale risk management decisions, including:
- Cross-Asset Risk Acceptances: A single Risk Acceptance can be applied across multiple Assets, allowing you to bundle all instances of the same or similar Findings throughout your entire portfolio of Assets into a single Risk Acceptance object.
- Bulk Risk Acceptance Management: Filter and search for specific Findings of vulnerability IDs and apply Risk Acceptance to all results simultaneously regardless of the Asset they belong to.
Accessing Risk Accepted Findings
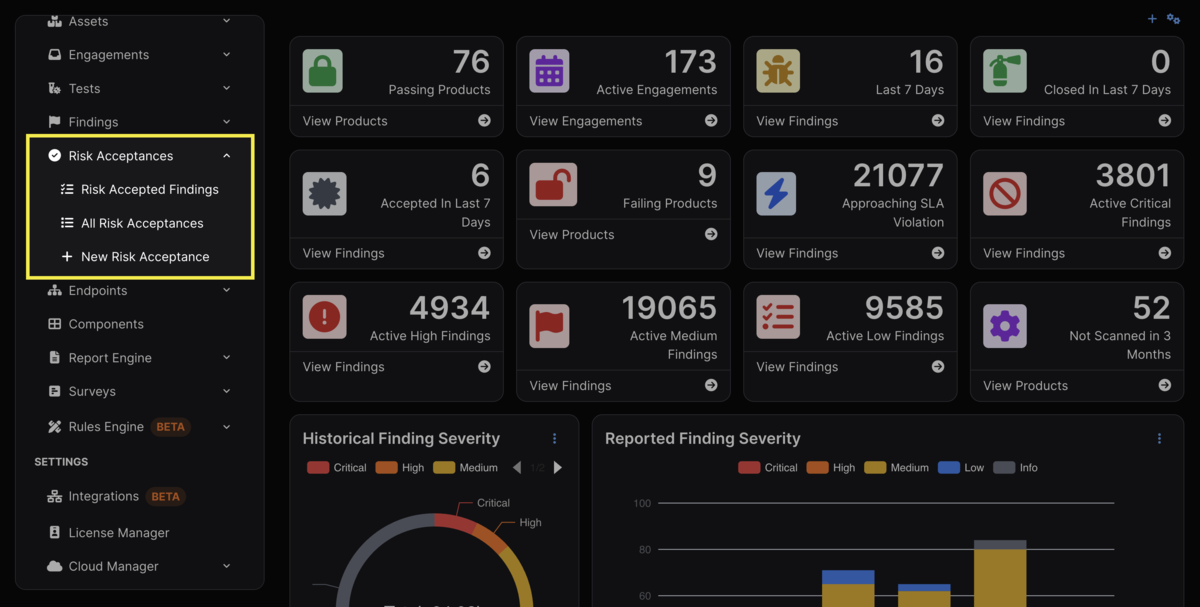
Risk Acceptances have their own entry in the sidebar, and risk-accepted Findings have their own Findings list:
- Act > Explore > Findings > Risk Accepted
- This page includes a table of all Findings that have been risk accepted, whether through as a part of a Full Risk Acceptance object or using the Simple Risk Acceptance workflow.
- Act > Risk Acceptances
- This page includes a table of all Full Risk Acceptance objects, arranged in chronological order.
- Clicking New Risk Acceptance on this page will start the workflow to create a Full Risk Acceptance object.
Finding Risk Acceptances by host
The All Risk Acceptances table includes a Host column listing the hosts covered by each
Risk Acceptance’s accepted Findings, and that column’s filter narrows the table to the Risk
Acceptances covering a given host. The filter matches on part of a host, so filtering on
example.com returns every Risk Acceptance covering a subdomain of it.
This answers the question that comes up when a host is being decommissioned, handed to another team, or reviewed in an audit: what has already been accepted here, and by whom. A Risk Acceptance covering several Findings on the same host lists that host once, and one covering Findings on several hosts lists each of them.
The same filter is available on the API as finding_host:
GET /api/v2/risk_acceptance/?finding_host=api.example.comCreating Risk Acceptances
When a Finding is Risk Accepted, the following will occur:
- The Finding’s status will no longer be “Active”.
- The Finding’s status will be changed to “Risk Accepted.”
- The Finding will no longer be counted toward Metrics, but will still appear within the Test it originated from.
Findings can be Risk Accepted in one of two ways: They can either be added to Full Risk Acceptance objects, or by using the Simple Risk Acceptance workflow.
Full Risk Acceptances
A Full Risk Acceptance allows Users to accept the risk of multiple Findings while bundling them into a single object, regardless of the Asset, Engagement, or Test they originated from.
If organizational policy requires formal, documented risk acceptances, or Users want to have risk acceptances automatically expire after a certain date, Full Risk Acceptance is the best choice, as they capture the internal decision-making process and can serve as a source of truth.
Each Full Risk Acceptance adds additional context to Risk Acceptance, such as:
- The name of the Risk Acceptance object.
- The owner of the Risk Acceptance object.
- The security recommendation and decision regarding how to handle the Finding(s).
- Any proof associated with the recommendation or decision.
- Details regarding the recommendation or decision.
- The User who accepts the risk associated with the decision.
- The expiration date.
- Whether the Finding’s status will return to “Active” upon expiration.
- Whether the SLA will restart upon expiration.
Expiration is unique to Full Risk Acceptance objects, and allows any Findings that have been Risk Accepted to be re-examined at an appropriate time. Once a Risk Acceptance expires, any Findings will be set to Active again.
If you don’t specify a date, the Default Risk Acceptance / Default Risk Acceptance Expiration days will be used from the System Settings page.
How to Complete a Full Risk Acceptance
A Full Risk Acceptance object can be made in three different ways:
- Using the New Risk Acceptance button on the Act > Risk Acceptances page.
- Using the Add Risk Acceptance button on an individual Finding.
- Clicking the Risk Acceptance Actions button that appears after selecting a Finding/multiple Findings from within a table.
New Risk Acceptance (Risk Acceptances page)
Clicking New Risk Acceptance on the Act > Risk Acceptances page will open a page in which the User can establish the data and details associated with a new Full Risk Acceptance object. The second page will allow the User to filter and select the Findings to be added to that object.
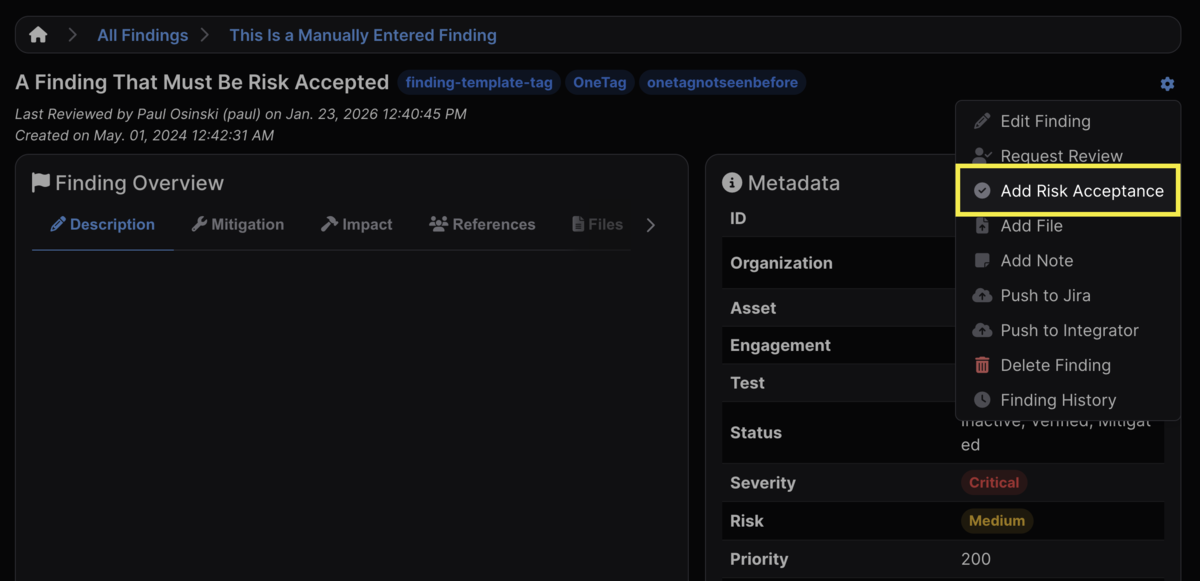
Add Risk Acceptance (Individual)
Having opened an individual Finding, click the gear icon in the top right corner of the view and select Add Risk Acceptance. From there, you will be able to either add the Finding to an existing Full Risk Acceptance object, or create a new object.
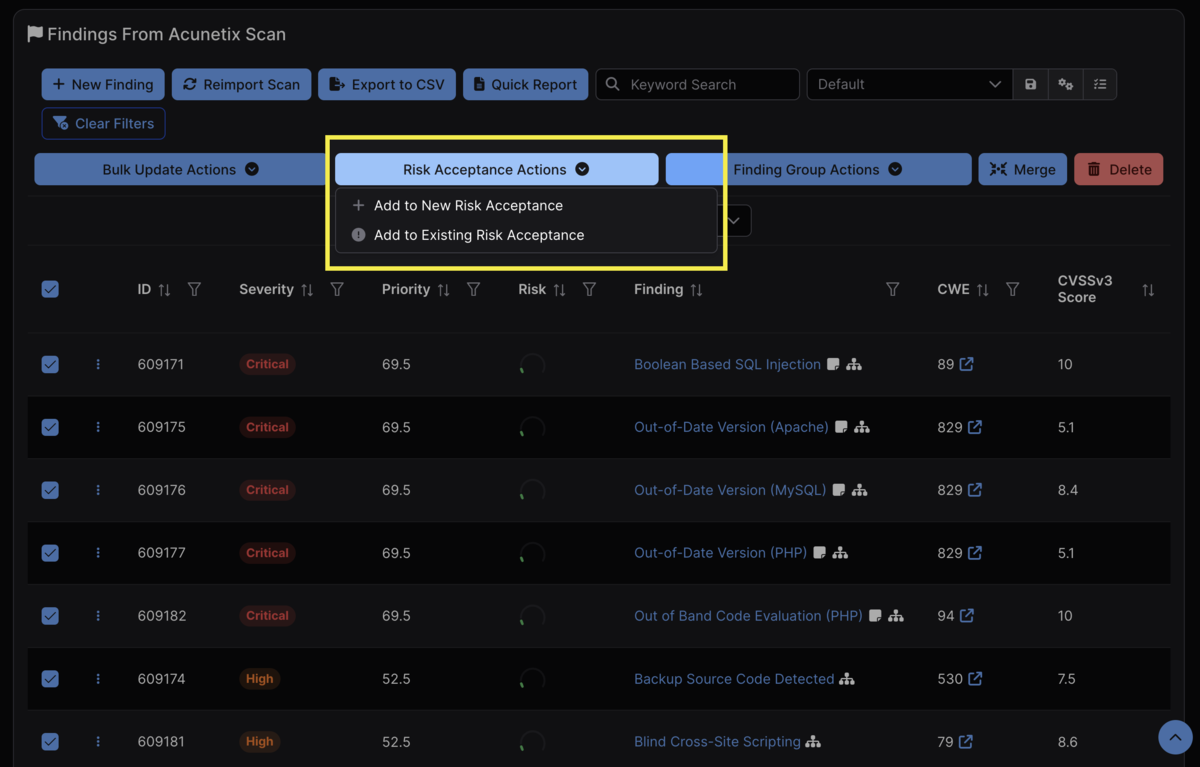
Risk Acceptance Actions (Table)
Having selected a Finding/Findings from within a table, click the Risk Acceptance Actions button that appears at the top and select either Add to New Risk Acceptance Object or Add to Existing Risk Acceptance Object and fill out the required fields.
Findings can only be added to a single Risk Acceptance at once. If the Risk Acceptance Actions button is unclickable, it’s likely because one of the selected Findings has already been added to a Full Risk Acceptance object.
Editing Full Risk Acceptances
Once a Full Risk Acceptance object has been created, you can edit the details of the object, upload a file with proof of the Risk Acceptance, or delete the object entirely by clicking the gear icon in the top right of the object’s view.
Findings can also be added and removed from the object using the same menu. Alternatively, Findings can be removed from the object by clicking the ⋮ kebab menu next to an individual Finding, clicking Bulk Update Actions, and selecting Unaccept Risk from the Simple Risk Acceptance Status dropdown menu.
Finally, if you add any Findings to a Full Risk Acceptance object and then subsequently delete that object, the Findings within will have their status automatically reverted to “Active.”
Simple Risk Acceptances
Simple Risk Acceptances do not have any associated metadata or expiration date. They are most appropriate for when tracking risk-accepted Findings is still required for compliance, but there is no associated need for an object to track or to change the status of the affected Findings.
Simple Risk Acceptance is not enabled by default, but it can be toggled in the Optional Fields portion of the Asset’s settings after clicking the gear icon in the top right of the Asset view.
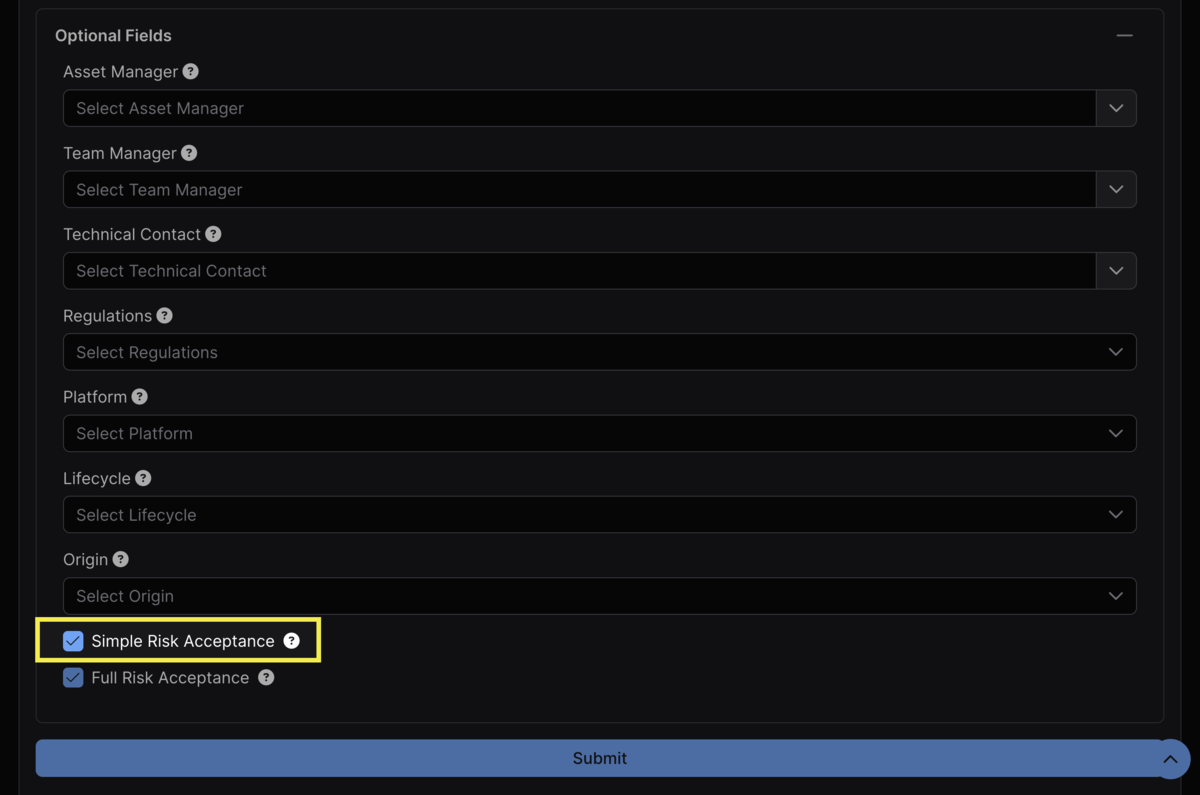
Once enabled, Simple Risk Acceptance can be run from the table of Findings within a Test view.
How to Complete a Simple Risk Acceptance
You can complete the Simple Risk Acceptance workflow from either the All Findings table (Act > Explore > Findings > All in the sidebar) or from the table of Findings within a specific test. The workflow is identical between the two.
Select the Findings you wish to Risk Accept and click the Bulk Update Actions button that appears at the top of the table. From there, select Accept Risk from the Simple Risk Acceptance Status dropdown. Because the Findings have been Simple Risk Accepted, there is no associated Full Risk Acceptance object. The Findings that were Risk Accepted are accessible from Act > Explore > Findings > Risk Accepted in the sidebar.
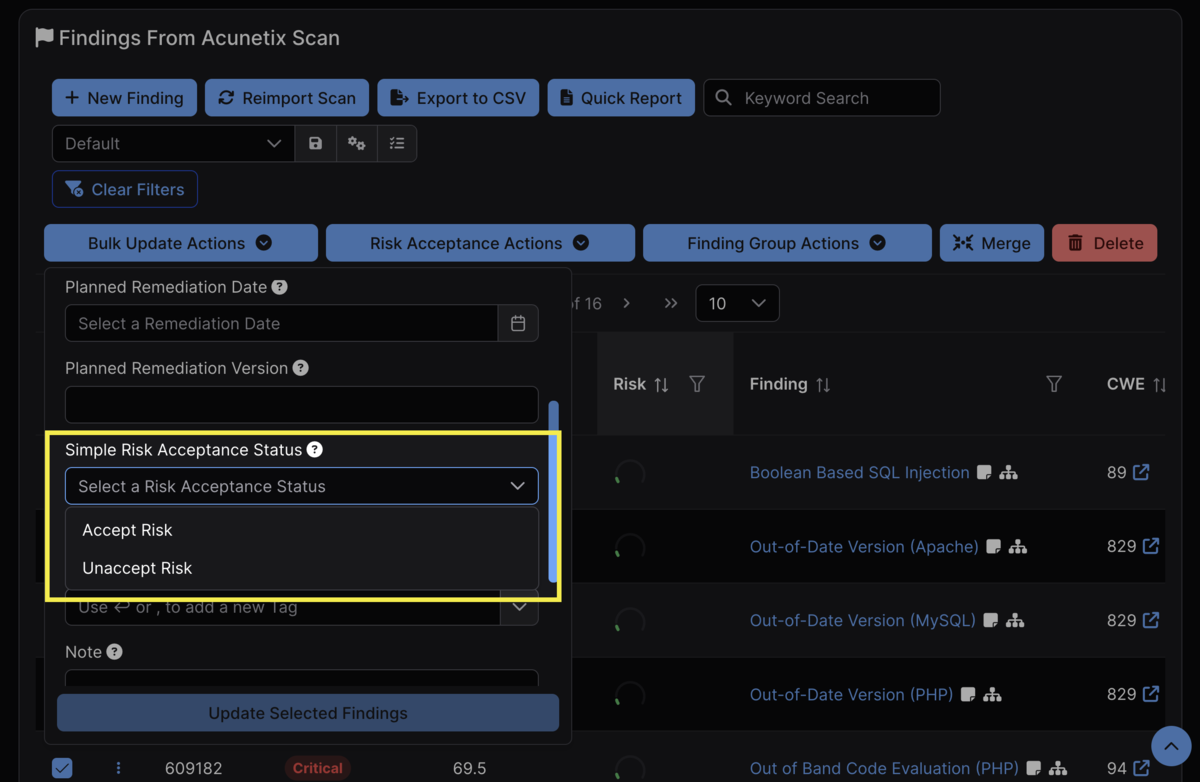
Conversely, if you wish to unaccept the risk for any Findings that had been previously Risk Accepted, select Unaccept Risk. If a Finding has been Simple Risk Accepted, the risk must be unaccepted prior to adding it to a Full Risk Acceptance object.
Risk Acceptance Permissions and Visibility
Risk Acceptance visibility is gated by a distinct minimum permission from Finding visibility. A user who can view a Finding does not automatically have permission to view a Risk Acceptance that contains that Finding.
Minimum role for Risk Acceptance actions
| Action | Minimum role on the parent Asset |
|---|---|
| View a Risk Acceptance | Writer |
| Add or Edit a Risk Acceptance | Writer |
For the complete role-permission chart that lists Risk Acceptance permissions alongside other Asset-level actions, see Action permission charts.
Expiring and Reinstating a Risk Acceptance
A Risk Acceptance that has expired is labelled Expired next to its expiration date in the Risk Acceptances table, so you can tell at a glance which ones are no longer suppressing their Findings.
The gear menu on a Risk Acceptance — in the table or on its detail page — offers whichever of these applies:
- Expire Risk Acceptance, on one that is still live. It expires immediately rather than waiting for its expiration date, and its Findings are reactivated according to its Reactivate Expired Findings and Restart SLA Expired settings.
- Reinstate Risk Acceptance, on one that has expired. Its Findings are accepted again, and it expires after the number of days in the Risk Acceptance Form Default Days setting.
Both require the same permission as editing the Risk Acceptance, and both ask for confirmation first. To reinstate for a specific length of time instead of the default window, edit the expiration date rather than using the Reinstate action — see below.
When a Risk Acceptance Expiration Date is Changed
A Risk Acceptance’s expiration date can be edited at any time after creation. How DefectDojo responds depends on whether the Risk Acceptance is currently active or has already expired.
Editing the date on an active Risk Acceptance
If a Risk Acceptance has not yet expired — its expiration date is in the future, or has just passed but the periodic expiration job has not yet processed it — editing the date is straightforward:
- The new date is saved as-is. If the user chose
2027-01-15, the Risk Acceptance stores2027-01-15. - Linked Findings stay Risk Accepted.
- The Risk Acceptance object stays active.
Pushing the date forward on an already-expired Risk Acceptance
If the Risk Acceptance has already expired — meaning the periodic job has processed its expiration, the linked Findings have been set back to Active per the Risk Acceptance’s expiration settings, and the Risk Acceptance is in the expired state — editing the expiration date to a future value triggers a reinstate workflow:
- The Risk Acceptance is reinstated and is no longer in the expired state.
- Every Finding that was linked to the Risk Acceptance and is currently Active is re-accepted (set back to Risk Accepted / Inactive).
- Endpoint statuses on those Findings are updated to reflect the re-acceptance.
- A comment is posted to any linked Jira issues recording the reinstate.
The date you enter is the date that is saved. The system setting Risk Acceptance Form Default Days (default: 180) is only used when you did not ask for a particular date — for example when you use the Reinstate action, which reinstates the Risk Acceptance without editing its expiration date, and therefore sets it to today + N days.
Moving the date backwards or to a date still in the past
Moving the expiration date to an earlier-but-still-future date has no special behavior — the Risk Acceptance stays active and the new date is saved.
Moving the date to a date in the past does not immediately expire the Risk Acceptance from the edit form; the next periodic expiration job will pick it up and apply the standard expiration behavior (Findings reactivated according to the Risk Acceptance’s Reactivate Expired Findings setting, SLA restart applied if Restart SLA Expired is set).
What the API exposes
API consumers can observe expiration state on the Risk Acceptance object via the expiration_date, expiration_date_handled, and expiration_date_warned fields:
expiration_dateis the configured date.expiration_date_handledisnullwhile the Risk Acceptance is active, and is set to a timestamp when the periodic job has processed the expiration. A Risk Acceptance is “expired” precisely whenexpiration_date_handledis non-null.expiration_date_warnedis set when the system has sent the expiration-warning notification.
When a reinstate happens, both expiration_date_handled and expiration_date_warned are cleared back to null, and expiration_date holds the date you sent — or today + N days when the reinstate was triggered without a new date. Tooling that watches Risk Acceptances for state changes can use the expiration_date_handled field as the canonical “is this Risk Acceptance currently expired?” flag.
Expiring and reinstating are also available directly, so you do not have to drive them by editing expiration_date:
POST /api/v2/risk_acceptance/{id}/expire/expires it now. Returns400if it has already expired.POST /api/v2/risk_acceptance/{id}/reinstate/reinstates an expired one, re-accepting the Findings it covers. Returns400if it has not expired. Sendexpiration_dateto choose how long for; omit it to use today + N days.
Both accept an optional reason, which is recorded as a note on the Risk Acceptance along with who performed the action. Both require the same permission as editing the Risk Acceptance.
Risk Acceptances 2.0 (Beta)
By default, a Risk Acceptance has one state: as soon as it exists, the Findings it covers are accepted. That works when one person decides. It does not describe an organization where somebody requests an exception, somebody else approves it, and an auditor later asks who agreed to what and why.
Risk Acceptances 2.0 adds that shape. Enable Risk Acceptances 2.0 on the Feature Flags settings page. It is off by default, and while it is off nothing changes: every Risk Acceptance behaves exactly as described above.
The lifecycle
A Risk Acceptance moves through these states:
| State | What it means | Are the Findings suppressed? |
|---|---|---|
| Proposed | Somebody has asked for the exception. Nobody has answered. | No |
| Under Review | A reviewer has picked it up. | No |
| Approved | The decision is yes, but it has not been switched on yet. | No |
| Rejected | The decision is no. | No |
| Active | The acceptance is in force. | Yes |
| Expired | It ran out, or somebody ended it. | No |
Only Active suppresses anything. A Finding in a Proposed, Under Review or Approved Risk Acceptance stays Active and keeps counting — because it is still active, and nobody has agreed to accept it yet.
The moves allowed between states:
Proposed ──→ Under Review ──→ Approved ──→ Active ──→ Expired
    │              │              │                      │
    └──────────────┴──────────────┴──→ Rejected          └──→ Active (reinstated)
                                          │
                                          └──→ Proposed (reworked and resubmitted)
Two shapes worth calling out:
- An Active acceptance cannot be Rejected. Once it is in force, the way to end it is to expire it, which puts its Findings back the way expiry always has. “Rejected” means the request was declined before it ever suppressed anything, and using it for both would make the record untrue.
- A Rejected acceptance can go back to Proposed. A declined request can be reworked and resubmitted instead of recreated, which would throw away its history.
Every move is recorded: which state it left, which it entered, who made it, when, and why. That sequence is the approval chain, and it is never edited or deleted.
Who can do what
Requesting an exception and deciding one are separate permissions, so the person who asks is not automatically the person who agrees.
| Move | Permission required | Minimum role on the Asset |
|---|---|---|
| Propose, submit for review, resubmit | Risk Acceptance Edit | Writer |
| Approve, Reject | Risk Acceptance Approve | Maintainer |
| Activate an approved acceptance | Risk Acceptance Approve | Maintainer |
| Expire | Risk Acceptance Edit | Writer |
Activating is an approval because it is the moment suppression starts. Reinstating an expired acceptance is the same move, and needs the same permission.
Reinstating needs an approver, by every route. Open source treats reinstating an expired Risk
Acceptance as an edit — which is right when there is no review to respect. With Risk Acceptances 2.0
enabled there is one, so POST .../reinstate/ and changing the expiration date on an expired Risk
Acceptance (which reinstates it as a side effect) both require Risk Acceptance Approve. Editing
any other field on an expired Risk Acceptance is still an ordinary edit.
The requester cannot be the approver. Holding the approve permission is not the same as being
a second pair of eyes, so whoever requested a Risk Acceptance cannot approve or activate it
themselves — the API returns 403 and says so. Rejecting your own request is still allowed; that
is a withdrawal, and needs nobody’s agreement.
An administrator can turn this off with Block Self-Approval of Risk Acceptances in System Settings (on by default). Turning it off is for a team small enough that one person is the whole approval chain, where the alternative is that nobody uses the workflow at all.
A read-only auditor
An ERM or audit reader needs to see what has been accepted and who agreed, and needs to change
nothing. Give them a custom role holding Risk Acceptance View and nothing else, then add them
as a member of the Assets they audit.
With that role they can:
- list and open Risk Acceptances, including the reasoning
- read the lifecycle state, the transition history and the finding records
- read the backlog metrics
and they cannot create, edit, delete, or decide anything — every write answers 403.
Two things worth knowing. Visibility is scoped like every other read, so an auditor added to one Asset sees that Asset’s exceptions and no others. And no built-in role changes: a plain Reader still cannot see Risk Acceptances, because acceptance visibility is deliberately a separate grant from Finding visibility — seeing a Finding does not entitle you to the reasoning behind its exception.
Extending an expired acceptance
An expiration date exists because somebody wanted the risk looked at again on that date. So by default an expired Risk Acceptance cannot simply be switched back on — it has to go back through review:
- Move it to proposed (Risk Acceptance Edit). This is the “please extend this” step.
- It is approved or rejected as any other request is (Risk Acceptance Approve).
- Approving and activating it puts the suppression back.
Trying to move an expired Risk Acceptance straight to active returns 409 with a message saying
it has to be reviewed again — including through POST .../reinstate/, so the older route is not a
way around the review. 409 rather than 403 because the caller may hold every permission there
is; what is wrong is the state, and asking for a review is a move they can make.
An administrator can turn this off with Require Review to Extend an Expired Risk Acceptance in System Settings (on by default), for teams whose expiry dates are a reminder rather than a gate.
This governs what a person may ask for through the API. If expiry is cleared by any other path, the lifecycle still follows it — open source remains the authority on whether a Risk Acceptance has expired, and Pro records the consequence rather than arguing with it.
Finding what needs attention
Two list filters on /api/v2/risk_acceptance/ answer the questions people actually ask of this
data:
| Filter | Answers |
|---|---|
expiring_within_days=7 | What lands on somebody’s desk this week. Bounded at both ends — already-expired Risk Acceptances are excluded, because those are a different queue (workflow_state=expired) |
finding_host=api.example.com | What have we accepted on this host — the question asked when a host is decommissioned, handed to another team, or turns up in an audit. Matches part of a host, and matches the host of the Finding’s Location (or its Endpoint, on installs that have not moved to Locations) |
Combine them with workflow_state to build a review queue: ?workflow_state=proposed&workflow_state=under_review
is everything nobody has decided yet.
The review thread
The Approvals tab shows the decisions and the discussion as one conversation, oldest first: every state change with the reason recorded against it, interleaved with comments people have added.
They are two different records — a reason belongs to the move that carried it, a comment belongs to nobody’s decision — but a reviewer reads one thread. Kept apart, “why was this approved?” is answered by a reason in one place and the argument that produced it in another, with nothing saying which came first.
Comments are ordinary Risk Acceptance notes, so anything written before this existed is already in the thread, and anything written here is visible to every other view of those notes. Line breaks are preserved.
In reports
Risk Acceptance report blocks can print the approval chain, not just the decision:
| Column | Shows |
|---|---|
| Workflow State | Where the Risk Acceptance is in its lifecycle. Also available as a sort field |
| Approved By | Who made the decision — the person who approved or rejected it |
| Approved On | When they made it |
| Decision Reason | What they said at the time (detail blocks only) |
These read from the review history, so they are filled for Risk Acceptances decided through the
workflow and empty for ones accepted before it existed. That is deliberate: falling back to the
Accepted By field would present something somebody typed as though it were a recorded approval.
Moves that are not decisions — submitting, activating, expiring — are ignored, so the column names whoever agreed rather than whoever last touched the record.
Is the backlog being managed?
GET /api/v2/risk_acceptance/exception_metrics/?expiring_within_days=30A count of Risk Acceptances does not answer the question an auditor asks. Fifty active exceptions that are all dated and reviewed is a healthy program; three that lapsed a year ago is not. This reports the numbers that distinguish them, for the Risk Acceptances you can see:
| Field | Means |
|---|---|
active, expired, rejected | Where things currently stand. Risk Acceptances predating the feature count as active, which is what they are |
awaiting_decision | Requests nobody has answered — proposed and under review together, because “waiting” is one queue however it is labelled |
oldest_waiting_days | How long the longest-waiting request has waited, measured from the move that asked |
average_days_to_decision | How long requests typically wait for an answer. Only decided requests count; including open ones would make the number fall every time somebody files a request |
expiring_soon | Expiring within expiring_within_days (default 30) |
overdue | Past its date and still suppressing findings. Not the same as expired — this is the set nobody has dealt with |
average_age_days | How long the exceptions in force have been in force |
never_expires | Active Risk Acceptances with no expiration date at all — the shape of “we accepted this and forgot” |
expiring_within_days must be a whole number; a value that is not is refused rather than ignored,
because a figure that quietly answers a different question than the one asked is worse than an
error.
Requested exceptions in your metrics
The problem this solves: a team asks for an exception and waits — on a change board, on a vendor, on somebody outside DefectDojo entirely. Until now the only options were to accept the Finding before anyone agreed (which hides it, and is not true), or to leave it counting as unaddressed work (which is what customers describe as their Active numbers being polluted).
With Risk Acceptances 2.0 enabled, a Finding in an undecided Risk Acceptance is reported in its own status band, Exception Requested, instead of Active:
- The Finding is not hidden and not suppressed. Its own status is still Active.
- Charts and status splits show Exception Requested as its own slice, so the total still adds up and you can see how much work is sitting in a queue waiting on a decision.
- Findings waiting on a decision carry an Exception Requested badge in Finding tables, alongside their real status — the Finding is still Active, and the badge says somebody is waiting.
- Finding tables offer an Exception Requested column, hidden by default: turn it on from the
column picker and filter it to Yes to build that queue directly in the table. The same filter is
available on the API as
has_pending_exception. - Filter Risk Acceptances on
workflow_state=proposed&workflow_state=under_reviewto see the requests waiting for a reviewer.
When the acceptance is activated, its Findings become Risk Accepted as normal. When it is rejected, they simply stay Active.
The record of what was accepted
DefectDojo has always tracked which Findings a Risk Acceptance covers as a live membership list, and Findings leave that list for ordinary reasons: the acceptance expires, or a re-import stops seeing the Finding. Both are correct, and both used to remove the only evidence that the Finding was ever accepted.
With Risk Acceptances 2.0 enabled, DefectDojo Pro keeps a durable record per Finding per Risk Acceptance. When a Finding leaves the acceptance, its record is closed, not deleted, and it records:
- whether it was removed (a person’s decision), expired (the clock), or superseded (a scan stopped reporting the Finding),
- who added it and who closed it, and when the acceptance took effect and stopped,
- a per-Finding justification, separate from the acceptance’s overall recommendation — auditors ask about individual Findings, and the answer is rarely the same for every Finding in a batch.
Records are not backfilled. A Risk Acceptance created before you enabled the feature can be seeded from the Findings it still covers, but Findings whose membership was already severed cannot be recovered — that history was not kept.
Standing acceptances
The ask this answers: we accepted this base-image CVE once — stop asking us again on every asset and every rescan. Adding Findings by hand cannot, because the Findings that need accepting do not exist yet; they arrive with the next scan.
So a Risk Acceptance can carry criteria describing the Findings it covers. A new Finding that matches is added to the acceptance as it is imported, exactly as if somebody had added it, and its record says the criteria covered it rather than naming a person.
{
    "acceptance_criteria": {
        "scope": { "type": "product", "ids": [12] },
        "vulnerability_ids": ["CVE-2021-44228"],
        "component_name": "*log4j-core*",
        "component_version": "2.14.*"
    }
}
Matchable attributes — all optional, and all of the ones present must match:
| Key | Matches on |
|---|---|
vulnerability_ids | any of the Finding’s vulnerability IDs (or its cve), case-insensitive |
cwes | the Finding’s CWE |
severities | the Finding’s severity, case-insensitive |
component_name, component_version | glob patterns — the same component is named differently by different scanners, and versions come in ranges |
title_pattern | a glob against the title |
scope is required and is what stops an acceptance reaching Findings its author has no business
accepting. type is engagement, product, product_type or global.
You can leave ids empty and DefectDojo fills them in from the Findings the Risk Acceptance already
covers — so a client can say “this asset” without hunting for an id. That cannot widen anything: the
ids come from where the acceptance is already accepting. If there is nothing to derive from, the
criteria are refused rather than quietly broadened.
From the UI: Edit Standing Criteria on the Risk Acceptance menu. It asks how far the acceptance should reach — this engagement, this asset, this asset’s type, or everywhere — rather than asking you to pick ids, and refuses to save until both a scope and at least one matchable attribute are set.
Three rules keep this safe to leave switched on:
- Only while the acceptance is Active. Expiry and rejection stop it — there is no second lifetime to manage, and a lapsed decision cannot keep suppressing new Findings. This is what the lifecycle in front of it is for.
- Only inside its scope. A Finding outside the scope never matches, however well its vulnerability lines up.
- Criteria with nothing to match are refused. A scope with no matchable attribute would mean
“every Finding in this Asset”, so the API returns
400rather than accepting it. An acceptance with no criteria at all is fine and covers exactly what was added to it — which is every Risk Acceptance that existed before this feature.
Applying criteria never fails an import: if it cannot run, the Finding is imported unaccepted and the next reimport tries again.
Notifications and webhooks
Two events fire on the review, and they go to different people because they answer different questions:
| Event | Fires when | Goes to |
|---|---|---|
| Risk Acceptance Requested | somebody submits a Risk Acceptance for review | the named reviewers, or everybody subscribed to the event if none are named |
| Risk Acceptance Decided | it is approved or rejected | whoever requested it |
Both are ordinary notification events, so each user picks their own channels — alert, mail, Slack, Teams or webhook — under Settings > Notifications > Personal Notifications.
Activation, expiry and reinstatement are deliberately silent here. They are not somebody waiting on somebody else, expiry already has its own long-standing notification, and mailing about every state change is how people learn to ignore the ones that matter.
The webhook body carries the state change itself, so a subscriber does not have to parse a sentence:
risk_acceptance:
    id: 42
    name: "Accepted pending the Q4 platform upgrade"
    from_state: "under_review"
    to_state: "approved"
    actor: "someone"
    reason: "the compensating control is adequate"
    url_ui: "https://your-instance/ui/risk-acceptance/42"
Notifications are reinforcement, not the mechanism: every state change is already visible on the Risk Acceptance, in its Approvals tab and in the review queue, whether or not a message is sent or ever arrives. A send that fails is logged and does not undo the decision.
Triage Engine conditions
With both features enabled, a rule can condition on what an acceptance is doing, not just on the
Risk Accepted flag:
| Condition path | Type | Says |
|---|---|---|
finding.has_pending_exception | boolean | Somebody has asked for this Finding to be accepted and nobody has answered |
finding.risk_acceptance_state | select | The state of the Risk Acceptance covering it (a picker, drawn from the lifecycle’s own states) |
finding.risk_acceptance_expiration_date | string | When that acceptance expires, ISO-8601 |
finding.risk_acceptance_days_to_expiry | number | Days until it expires — negative once the date has passed, so “expired 3 days ago” is expressible |
finding.risk_acceptance_is_global | boolean | Whether that acceptance spans more than one Asset |
What this makes possible, for example: notify an owner when an acceptance covering their Findings is
within a week of expiring (risk_acceptance_days_to_expiry <= 7), or chase requests that have sat
unanswered (has_pending_exception == true).
All of these read empty while Risk Acceptances 2.0 is off — false for the boolean and null
for the rest — so a rule written against them matches nothing rather than acting on a lifecycle the
install does not use.
Where a Finding is covered by more than one Risk Acceptance, these describe the earliest one it was accepted under.
How severe a Finding a rule may accept
The Accept Risk action takes a limit — Accept Without Review Up To. Anything more severe than that is not accepted by the rule.
Those Findings are not dropped. The rule matched them for a reason, so they are put into a Risk Acceptance awaiting review, named for the rule that asked and carrying why. They stay active and counted the whole time, exactly like any other requested exception, and a person decides.
| Setting | What the rule does with a Critical |
|---|---|
| No limit (default) | Accepts it |
| Accept up to High | Leaves it active and raises a Risk Acceptance for review |
Two details worth knowing. A severity the rule cannot recognise counts as over the limit — if it cannot be ranked it cannot be called safe. But a limit that cannot be recognised is ignored rather than blocking everything, because a rule that silently stops working is harder to notice than one that keeps going.
With Risk Acceptances 2.0 off there is no review state to put them in, so they are simply left alone. They are never accepted anyway; that is the one thing the limit exists to prevent. A rule preview creates nothing, as with every other action.
API
GET  /api/v2/risk_acceptance/{id}/state/
POST /api/v2/risk_acceptance/{id}/transition/
state/ reports where a Risk Acceptance is and which moves are available from there, so a client
can offer the actions that exist rather than guessing:
{"workflow_state": "under_review", "allowed_next_states": ["approved", "proposed", "rejected"]}transition/ makes a move:
{"to_state": "rejected", "reason": "a fix is scheduled for the next release"}reasonis required when moving torejectedorexpired. Both are refusals of risk somebody accepted, and “why” is the whole content of the record.400if the move is not allowed from the current state — the response says which move was refused.403if you may not make that particular move, for example a Writer trying to approve.- Moving to
activeaccepts the Findings, exactly as accepting them any other way does.
Both endpoints return 403 with an explanatory message while the feature flag is off.
workflow_state is also readable on the Risk Acceptance object itself, and is read-only there: the
state changes only through transition/, so that every change is validated and recorded. Risk
Acceptances created before the feature existed report active, which is what they are.
Asking for an exception
From the UI: Request Security Exception on a Finding’s action menu, or on the Risk Acceptance menu after selecting several Findings in a table — bulk is the normal case.
POST /api/v2/risk_acceptance/request/{
"findings": [1234, 1235],
"name": "Waiting on the Q4 platform upgrade",
"reason": "the fix requires a platform version we upgrade to in Q4",
"justification": "compensating control in the gateway",
"expiration_date": "2027-01-15T00:00:00Z"
}Creates a Risk Acceptance that starts in Proposed and does not accept its Findings. This has its own endpoint because creating a Risk Acceptance the ordinary way accepts its Findings immediately — which is the one thing a request must not do — and an Active Risk Acceptance deliberately cannot move back to Proposed, so there is no transition that would undo it.
reason is required: a request with no argument cannot be reviewed. justification is optional and
is recorded against every Finding in the request, where it can be edited per Finding afterwards.
Requesting needs the same permission as editing a Risk Acceptance, plus permission to view every Finding named. Deciding the request needs Risk Acceptance Approve, which is what keeps the request and the decision two different acts.
Reading the history
GET /api/v2/risk_acceptance/{id}/transitions/
GET /api/v2/risk_acceptance/{id}/finding_records/
GET /api/v2/findings/{id}/acceptance_history/transitions/is the approval chain, oldest first: which state each move left and entered, who made it, when, and why.finding_records/is what the Risk Acceptance has covered — including Findings that have since left it, which the accepted-findings list cannot show.acceptance_history/is the same records from the Finding’s side: every Risk Acceptance this Finding has been part of. This is the endpoint that answers “was this ever accepted, and by whom” about a Finding whose membership was severed months ago. The Finding page shows it as an Acceptance History tab.
acceptance_history/ only lists Risk Acceptances you may see in your own right. Risk Acceptance
visibility is a separate grant from Finding visibility, so being able to read the Finding does not
show you the exceptions raised against it.
Risk Acceptance Best Practices
While it is possible to affect Findings within Full Risk Acceptance objects using Simple Risk Acceptance workflows (and vice versa), it is generally preferable to default to either process exclusively rather than having both enabled at once.
For example, if Full Risk Acceptance objects are the default approach, if a Finding is Simple Risk Accepted, it may cause confusion if there is no associated object that contains the affected Finding. Similarly, if Findings are typically Simple Risk Accepted, it may create similar confusion to then add some Findings to a Full Risk Acceptance object when there are no such objects for most other Findings.