

Set Up Sensei (Pro)
Note: Sensei is a DefectDojo Pro-only feature and is currently in BETA.
Setting up Sensei has two parts: connect a source-control provider, then onboard the repositories you want to scan. You need a global Maintainer or Owner role to do this. Sensei supports:
- GitHub: a GitHub App (github.com or GitHub Enterprise Server).
- GitLab: an access token (gitlab.com or self-managed).
- Bitbucket: Cloud or Server/Data Center, via OAuth (recommended), an Atlassian API token, or an access token.
- Azure DevOps: a Personal Access Token.
Onboarding, configuration, scanning, and fixing are the same for every provider; only the initial connection differs. This page covers connecting a GitHub App, GitHub Enterprise Server, GitLab, Bitbucket, and Azure DevOps; the Select repositories step onward is shared.
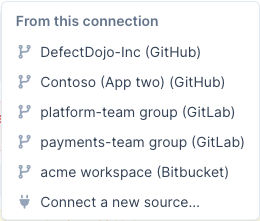
Add Repositories on the Sensei hub is the entry point for both. It opens a menu listing each connection by name: pick one to choose repositories from it, or choose Connect a New Source to set up a provider you haven’t connected yet. With nothing connected, it goes straight to the connect flow.
Connections
A connection is one configured source-control identity: a GitHub App registration, a GitLab token, a Bitbucket workspace, or an Azure DevOps organization. You onboard repositories from a connection, and manage or disconnect it, from the Connections page (the Connections button on the Sensei hub).
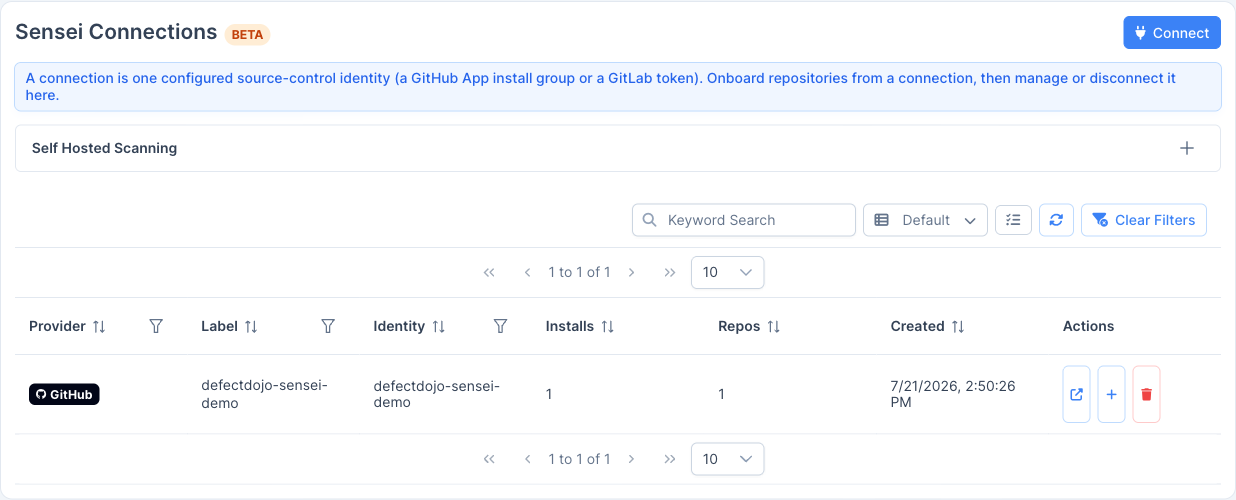
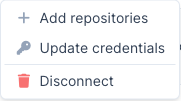
The table lists each connection’s label, identity, number of onboarded repos, creation date, and provider. Use the row actions (the menu on the left of each row) to manage the connection on its provider, add repositories from that connection, open it for editing (Update credentials, or Manage App & installations for GitHub), or disconnect it.
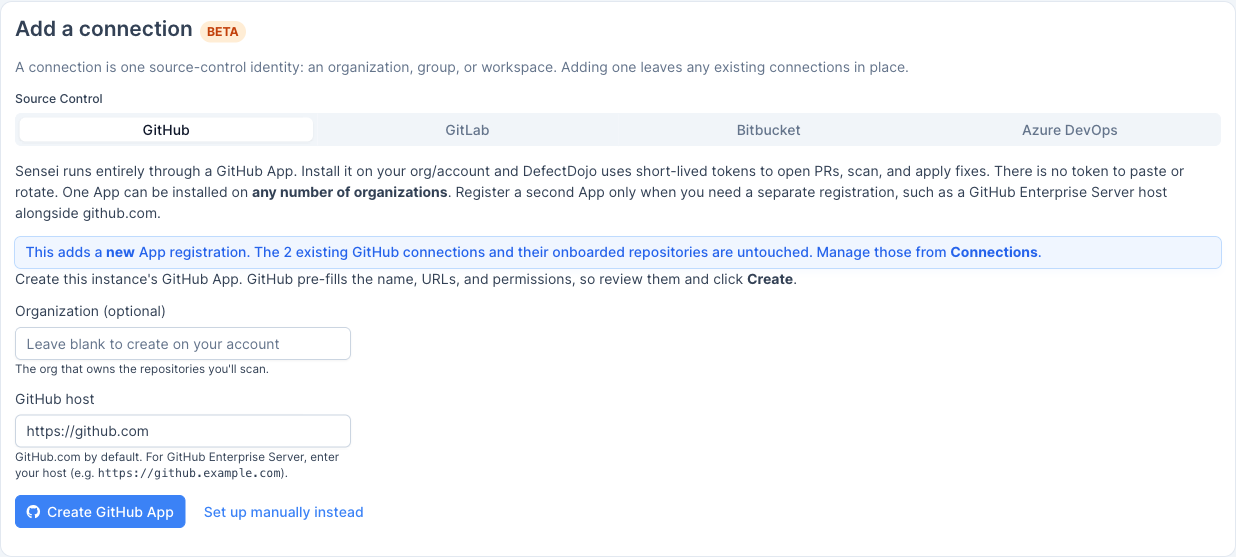
 Add a Connection never shows an existing connection’s details. Everything about a connection you already have is on its own screen, reached from its row.
Several organizations per provider
An instance can hold as many connections as you need, for every provider, one per organization, group, or workspace:
- GitHub: install the App on each organization or user account (Install on another account). One App registration covers them all. To keep separate registrations, such as a GitHub Enterprise Server host alongside github.com, use Register Another GitHub App. An App’s own state (its installations, permission approvals, Install on another account, and Disconnect This App) lives on that connection’s screen, opened with Manage App & installations on its row. With more than one registration, a picker there switches between them.
- GitLab: one connection per group or project token, including several on the same host (
gitlab.complus self-managed). - Bitbucket: one connection per workspace.
- Azure DevOps: one connection per organization, since a PAT is org-scoped.
Each pass through Connect on the Connections page adds a connection, so connecting a second group or workspace never replaces the first. Give each one a Connection Label to tell them apart in the table. Each repository records the connection it was onboarded through, and its scans, pull requests, and fixes use that connection’s credential. When more than one connection exists for a provider, onboarding asks which one to use instead of choosing for you.
To rotate a token, PAT, or app password, use Update credentials on that connection’s row. The screen that opens is about a single connection: it is titled Edit connection: <label> and saving updates that connection instead of adding another. Reaching it from Connect instead titles it Add a Connection. (GitHub App credentials are managed on GitHub.)
A provider’s webhook URL is shared by all of its connections, and each connection verifies its own secret, so you do not need a different URL per group, workspace, or organization.
⚠️ Disconnecting is destructive: disconnecting a connection removes it and every repository onboarded through it. This cannot be undone.
Choose a source-control provider
From the Sensei hub, choose Add Repositories → Connect a New Source (or Connect on the Connections page) to open Add a Connection, then pick your source-control provider: GitHub (including GitHub Enterprise Server), GitLab, Bitbucket, or Azure DevOps. Each provider’s connect flow is described below.
Connect a GitHub App
Sensei runs entirely through a GitHub App. Install it on your org/account and DefectDojo uses short-lived tokens to open PRs, scan, and apply fixes. Nothing to paste, nothing to rotate.
From the Sensei hub, choose Add Repositories → Connect a New Source (or Connect on the Connections page) to open Add a Connection.
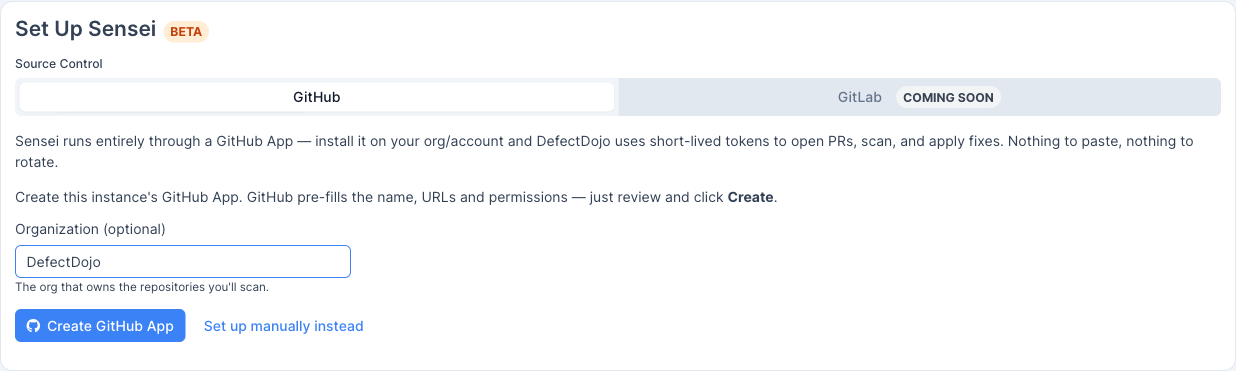
Step 1: Create the App
Enter the organization that owns the repositories you want to scan (leave blank to create the App on your personal account), then click Create GitHub App. GitHub pre-fills the app name, URLs, and permissions, so review them and confirm.
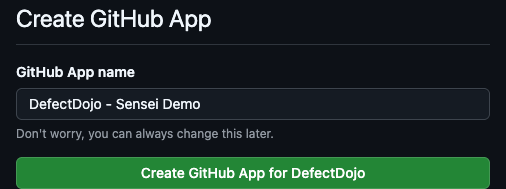
GitHub opens a confirmation page. Click Create GitHub App for <org> to register the app under that organization.
🔑 Tip: Create the App on the same organization that owns the repositories you plan to scan. The App owner is set at creation time.
Step 2: Install the App
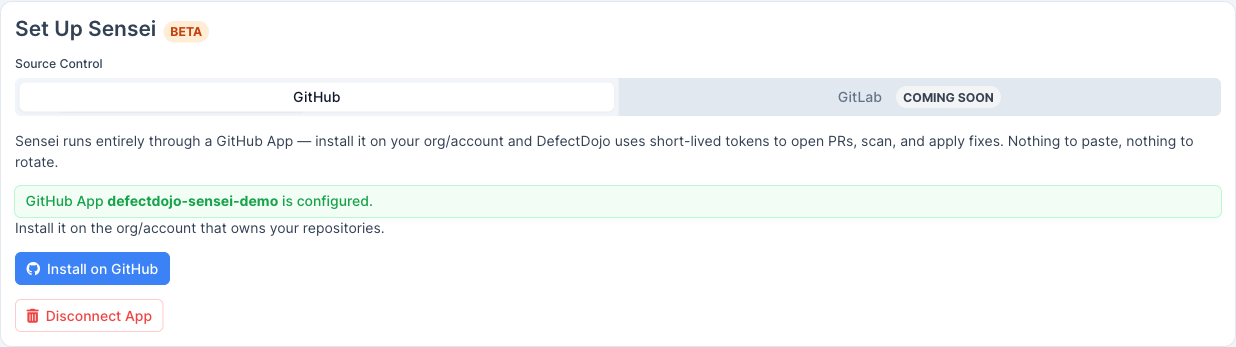
Back in DefectDojo, the app shows as configured. Click Install on GitHub to install it on your organization.
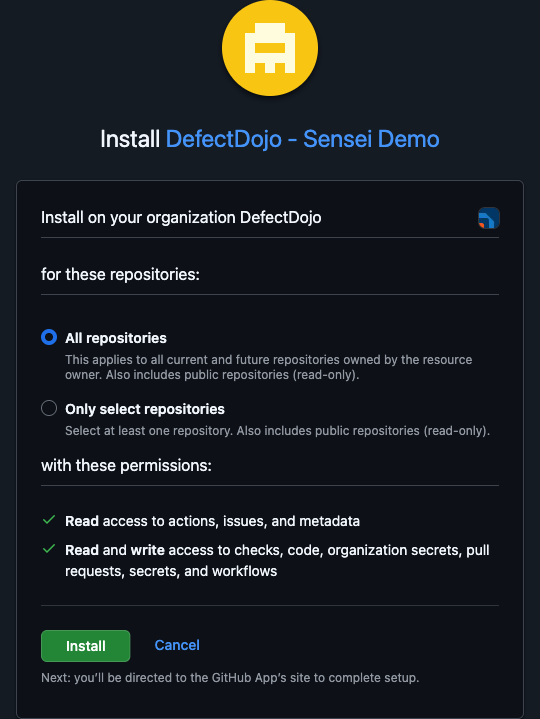
On GitHub, confirm the installation location (your organization), choose All repositories or Only select repositories, and review the requested permissions. Sensei needs read access to actions, issues, and metadata, and read/write access to checks, code, pull requests, secrets, and workflows so it can scan and open fix PRs. Click Install.
Connect GitLab
Sensei also supports GitLab, both gitlab.com and self-managed instances. Instead of a GitHub App, GitLab connects with a project or group access token plus a webhook; Sensei uses that token to scan, open merge requests, and apply fixes.
From the Sensei hub, choose Add Repositories → Connect a New Source (or Connect on the Connections page) to open Add a Connection, then select GitLab as the source-control provider.
Step 1: Create an access token
In GitLab, open the project (or group) you want to scan and go to Settings → Access tokens → Add new token:
- Role: Developer, enough to push fix branches and open merge requests. Choose Maintainer if the project’s push rules require it.
- Scopes:
apiandwrite_repository.
Create the token and copy the generated glpat-… value (GitLab shows it only once).
🔑 Tip: A group access token onboards any project in that group; a project access token is scoped to the single project.
Step 2: Connect
Back in Add a Connection with GitLab selected, fill in:
- GitLab Base URL:
https://gitlab.com, or your self-managed instance URL (for examplehttps://gitlab.example.com). - Access Token: the
glpat-…token from Step 1. - Webhook Secret: leave blank to auto-generate (recommended). You’ll add this secret to the webhook in the next step.
Click Add GitLab Connection. DefectDojo validates the token, stores it encrypted, and can then list projects, open merge requests, and run scans.
Step 3: Add the webhook
So DefectDojo receives push, merge-request, and comment events, add a webhook to each GitLab project you plan to onboard (Settings → Webhooks → Add new webhook):
- URL: the webhook URL shown on the connection screen (
https://<your-defectdojo-host>/sensei/gitlab/webhooks). - Secret token: the webhook secret from Step 2.
- Trigger events: enable Push events, Merge request events, and Comments.
Leave SSL verification enabled, click Add webhook, then use Test → Push events to confirm DefectDojo responds with HTTP 200.
After connecting, click Choose Projects and continue with Select repositories; onboarding, configuration, and scanning work the same as GitHub.
GitLab equivalents: where this guide says pull request, GitLab uses a merge request; the pull-request status check is posted as a GitLab commit status on the merge request’s head commit.
Connect GitHub Enterprise Server
Sensei works with GitHub Enterprise Server (GHES) using the same GitHub App model as github.com. Only the host differs. Because the App-manifest auto-create flow is github.com-only, on GHES you create the App manually on your enterprise host and then enter its credentials plus the host in DefectDojo.
Step 1: Create the App on your GHES host
On your GitHub Enterprise Server instance, go to Settings → Developer settings → GitHub Apps → New GitHub App and create an App with the same permissions Sensei uses on github.com: read for actions, issues, and metadata, and read/write for checks, code, pull requests, secrets, and workflows. Point its webhook at https://<your-defectdojo-host>/sensei/webhooks. Generate and download a private key, and note the App ID (and the OAuth Client ID/Secret if you set them).
Step 2: Connect manually
On the connection screen with GitHub selected, click Set Up Manually Instead and fill in:
- App ID and Private Key (PEM) from Step 1 (plus Client ID/Secret and Webhook Secret if configured).
- GitHub Enterprise host: your instance host, for example
https://github.example.com. DefectDojo derives the API (/api/v3) and web origins from it. Leave blank for github.com.
Click Save App Credentials. DefectDojo validates them against your enterprise host, then install the App and continue with Select repositories.
🔑 Tip: The host must be reachable from DefectDojo (and DefectDojo reachable from GHES for webhooks). Internal-only hosts are fine as long as both can reach each other on your network.
Connect Bitbucket
Sensei supports Bitbucket Cloud (bitbucket.org) and Bitbucket Server / Data Center (self-hosted). Three non-deprecated auth methods are offered; OAuth is recommended.
From the Sensei hub, choose Add Repositories → Connect a New Source (or Connect on the Connections page), then select Bitbucket and your deployment (Cloud or Server/Data Center) and authentication type.
Step 1: Create the credential
OAuth (Recommended): in Bitbucket, open Workspace settings → OAuth consumers → Add consumer:
- Callback URL: the one shown on the connection screen (
https://<your-defectdojo-host>/sensei/bitbucket/oauth/callback). - Permissions: Account: Read, Repositories: Read + Write, Pull requests: Read + Write (add Webhooks: Read + Write if you’ll manage webhooks via the API).
Save it, then copy the consumer’s Key (Client ID) and Secret.
API token: create an Atlassian API token at id.atlassian.com (Account settings → Security → API tokens). Use it with your Atlassian account email.
Access token: create a repository or workspace Access Token in Bitbucket and use it as a bearer credential.
Step 2: Connect
Back on the connection screen with Bitbucket selected:
- OAuth: paste the Client ID and Client Secret, then click Connect With Bitbucket. Approve the consent screen; DefectDojo stores the resulting tokens encrypted and refreshes them automatically.
- API token / Access token: enter your Workspace (Cloud), your email (API-token auth only), and the token. For Server/Data Center, enter your host Base URL.
DefectDojo validates the credential and can then list repositories, open pull requests, and run scans.
Step 3: Add the webhook
Add a webhook to each Bitbucket repository (Repository settings → Webhooks → Add webhook):
- URL: the webhook URL shown on the connection screen (
https://<your-defectdojo-host>/sensei/bitbucket/webhooks). - Secret: the webhook secret shown on the page (used for HMAC-SHA256
X-Hub-Signatureverification). - Triggers: Repository push, Pull request (created, updated, merged, declined), and Pull request comment created (for
/fixcomments).
After connecting, click Choose Repositories and continue with Select repositories.
Bitbucket specifics: repositories are addressed as
workspace/repo(Cloud) orPROJECTKEY/repo(Server). The pull-request status check is posted as a Bitbucket build status on the head commit. OAuth is the recommended method because it is user-context (no workspace/username quirks) and refreshes automatically; app passwords are deprecated and not supported.
Connect Azure DevOps
Sensei supports Azure DevOps Repos using a Personal Access Token (PAT). Repositories live in an organization → project → repository hierarchy.
From the Sensei hub, choose Add Repositories → Connect a New Source (or Connect on the Connections page), then select Azure DevOps.
Step 1: Create a PAT
In Azure DevOps, open User settings → Personal access tokens → New Token:
- Organization: the organization whose repositories you want to scan.
- Scopes: Code (Read, Write, & Manage), which covers cloning, pushing fix branches, and opening pull requests.
Create the token and copy it (Azure DevOps shows it only once).
Step 2: Connect
Back on the connection screen with Azure DevOps selected, fill in:
- Base URL:
https://dev.azure.com, or your Azure DevOps Server collection URL. - Organization: your organization name.
- Personal Access Token: the token from Step 1.
Click Connect. DefectDojo validates the PAT against …/_apis/projects, stores it encrypted, and can then list repositories, open pull requests, and run scans.
Step 3: Add the service hook
Azure DevOps authenticates its Service Hooks with HTTP Basic, and uses one subscription per event type. In Project settings → Service hooks → Create subscription → Web Hooks, create a subscription for each of Code pushed, Pull request created, Pull request updated, and Pull request merged, all with:
- URL: the webhook URL shown on the connection screen (
https://<your-defectdojo-host>/sensei/azure/webhooks). - Basic authentication username / password: the values shown on the page.
After connecting, click Choose Repositories and continue with Select repositories.
Azure DevOps specifics: repositories are addressed as
project/repo(the organization is stored on the connection). The pull-request status check is posted as a Git commit status on the head commit.
Select repositories
After the App is installed, DefectDojo shows the repositories it can access. Only repositories Sensei has push access to are listed; remediation works by pushing a branch and opening a pull request, so repositories without push access are hidden. A pull request is opened against each repository’s default branch.
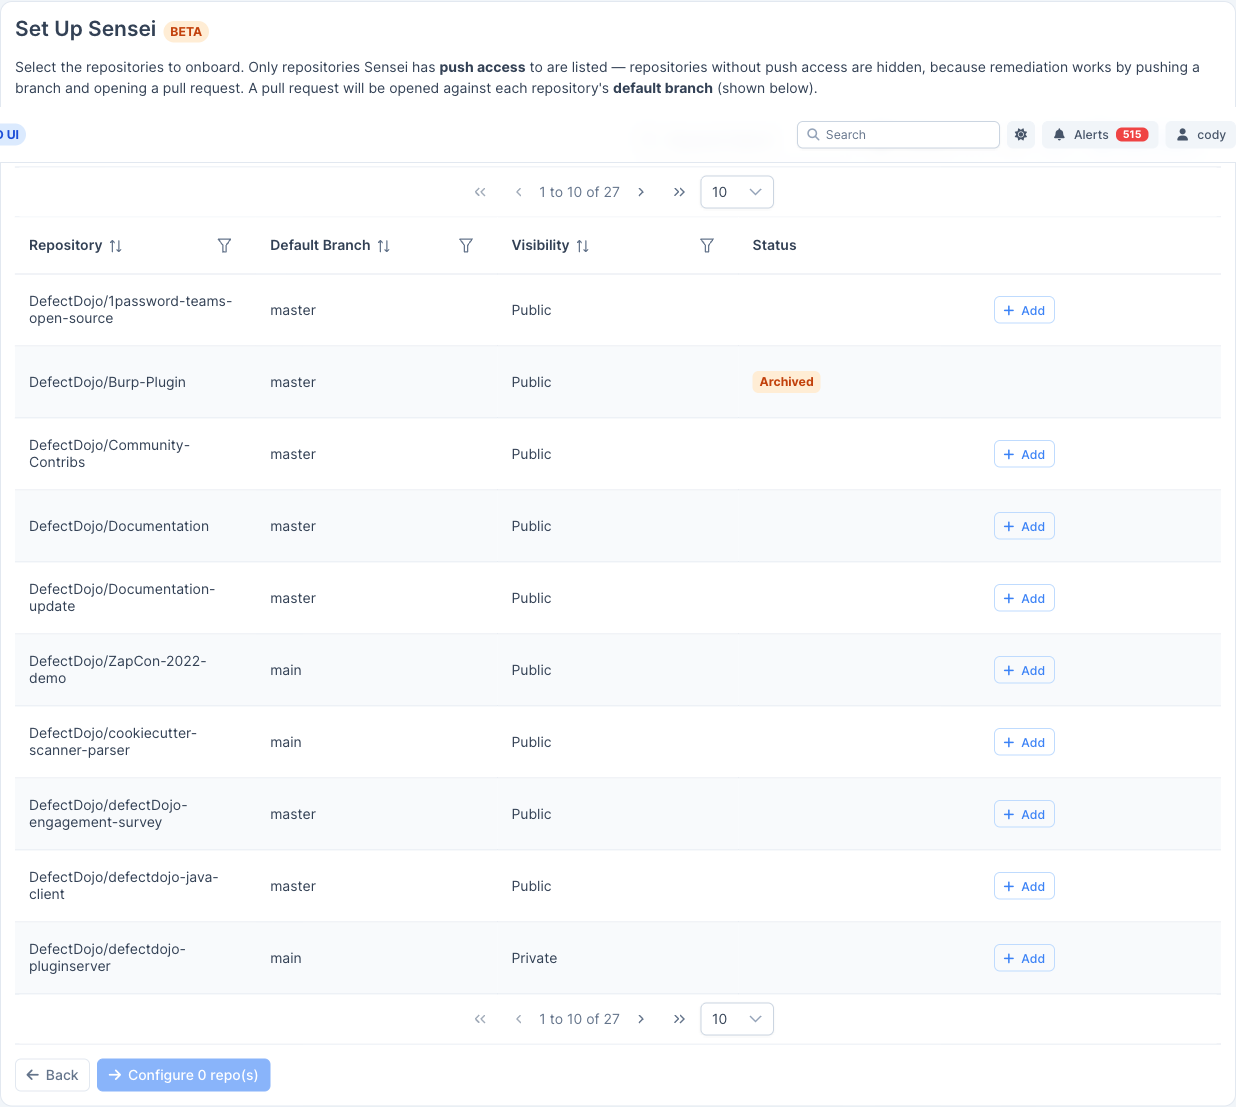
Use Add to select one or more repositories, then click Configure N repo(s). Repositories already onboarded are marked Configured and cannot be added twice.
A repository isn’t listed
The picker only shows repositories the connection was granted. A repository you never gave Sensei access to will not appear. If the connection covers a single repository that is already onboarded, the list looks like there is nothing to add. Widen what the connection can see, then return to this step:
- GitHub: use Manage repository access for <account> to open that installation’s page on GitHub, where you can add repositories to the installation. Use Install on another account to install the App on a second organization or user account.
- GitLab, Bitbucket, Azure DevOps: the list is scoped by the credential you connected. Grant the token, app password, or PAT access to the project (a GitLab group token covers every project in the group), or add a second connection for another group, workspace, or organization.
Configure a repository
The Configure Repository form controls how Sensei scans and reports on the repository.
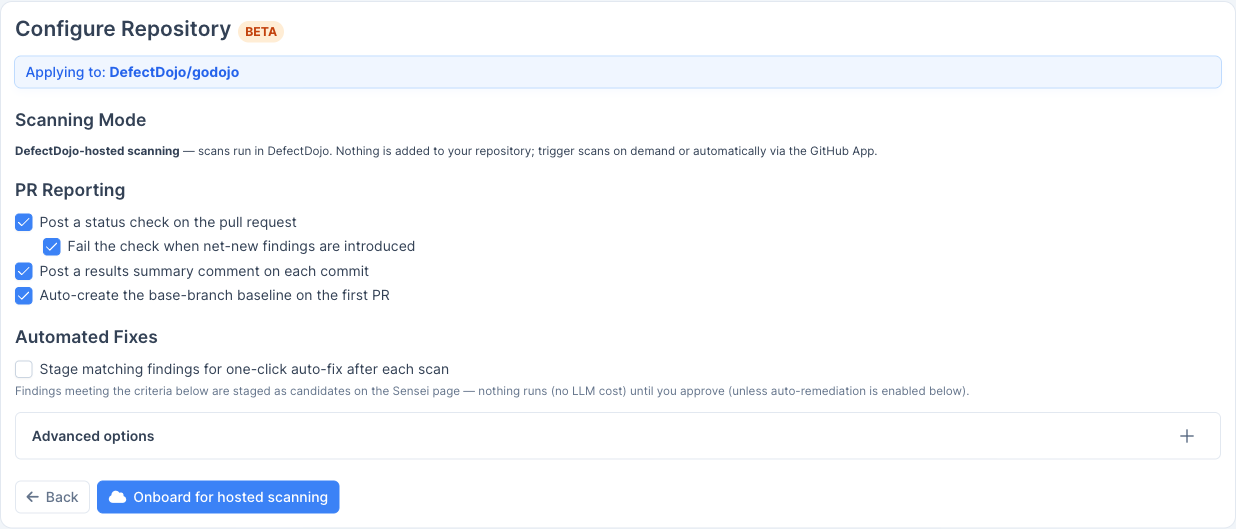
- Scanning Mode (DefectDojo-hosted): scans run in DefectDojo. Nothing is added to your repository; trigger scans on demand or automatically via the GitHub App.
- PR Reporting: choose what Sensei posts back on pull requests:
- Post a status check on the pull request.
- Fail the check when net-new findings are introduced.
- Post a results summary comment on each commit.
- Auto-create the base-branch baseline on the first PR.
- Automated Fixes: enable Stage matching findings for one-click auto-fix after each scan to have Sensei stage candidates automatically (see below).
Automated fix criteria
When automated fixes are enabled, findings that meet your criteria are staged as candidates on the Sensei page after each scan. Nothing runs (and no LLM cost is incurred) until you approve, unless you enable automatic remediation.
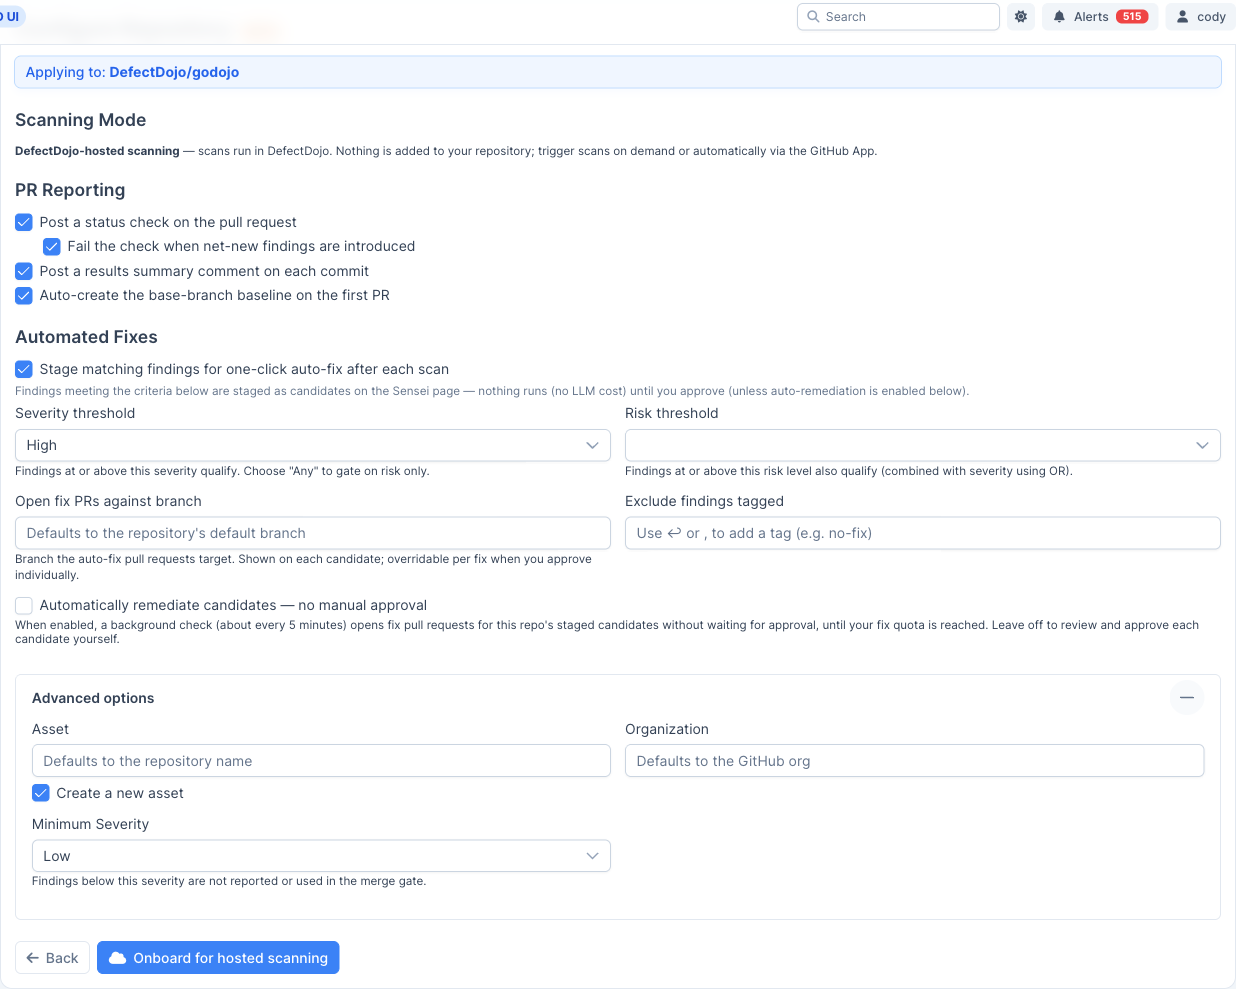
- Severity Threshold: findings at or above this severity qualify (choose Any to gate on risk only).
- Risk Threshold: findings at or above this risk level also qualify (combined with severity using OR).
- Open Fix PRs Against Branch: the branch auto-fix pull requests target; overridable per fix when you approve individually.
- Exclude Findings Tagged: skip findings carrying the tags you list (e.g.
no-fix). - Automatically remediate candidates: when enabled, a background check (about every 5 minutes) opens fix pull requests for this repo’s staged candidates without waiting for approval, until your fix quota is reached. Leave off to review and approve each candidate yourself.
Under Advanced Options you can link the repository to an existing Asset/asset or create a new one, set the organization, and set a minimum severity below which findings are neither reported nor used in the merge gate.
Onboard
Click Onboard for Hosted Scanning. The repository appears on the Sensei hub with a status of Active, ready to scan. From here, continue to Fixing findings with Sensei.