

Cloud Security Posture (CSPM) (Pro)
Note: Sensei is a DefectDojo Pro-only feature and is currently in BETA.
Sensei has two capabilities that share one hub. AppSec scans and fixes source-code repositories (see About Sensei). Cloud Security Posture (CSPM) does the same for cloud accounts: connect an AWS account, Azure subscription, or GCP project; Sensei scans it for misconfigurations with Prowler, imports the results as DefectDojo findings, and remediates them — either by opening an infrastructure-as-code pull request or by applying a reversible change to the live cloud resource.
🧭 One hub, two capabilities. Open Sensei from the left-hand navigation and choose the CSPM capability card (or AppSec, or All to see every target together). A cloud account is the CSPM analog of an onboarded repository: it is the thing you scan and fix, and it is linked to a DefectDojo Asset so its findings live alongside the rest of your data.
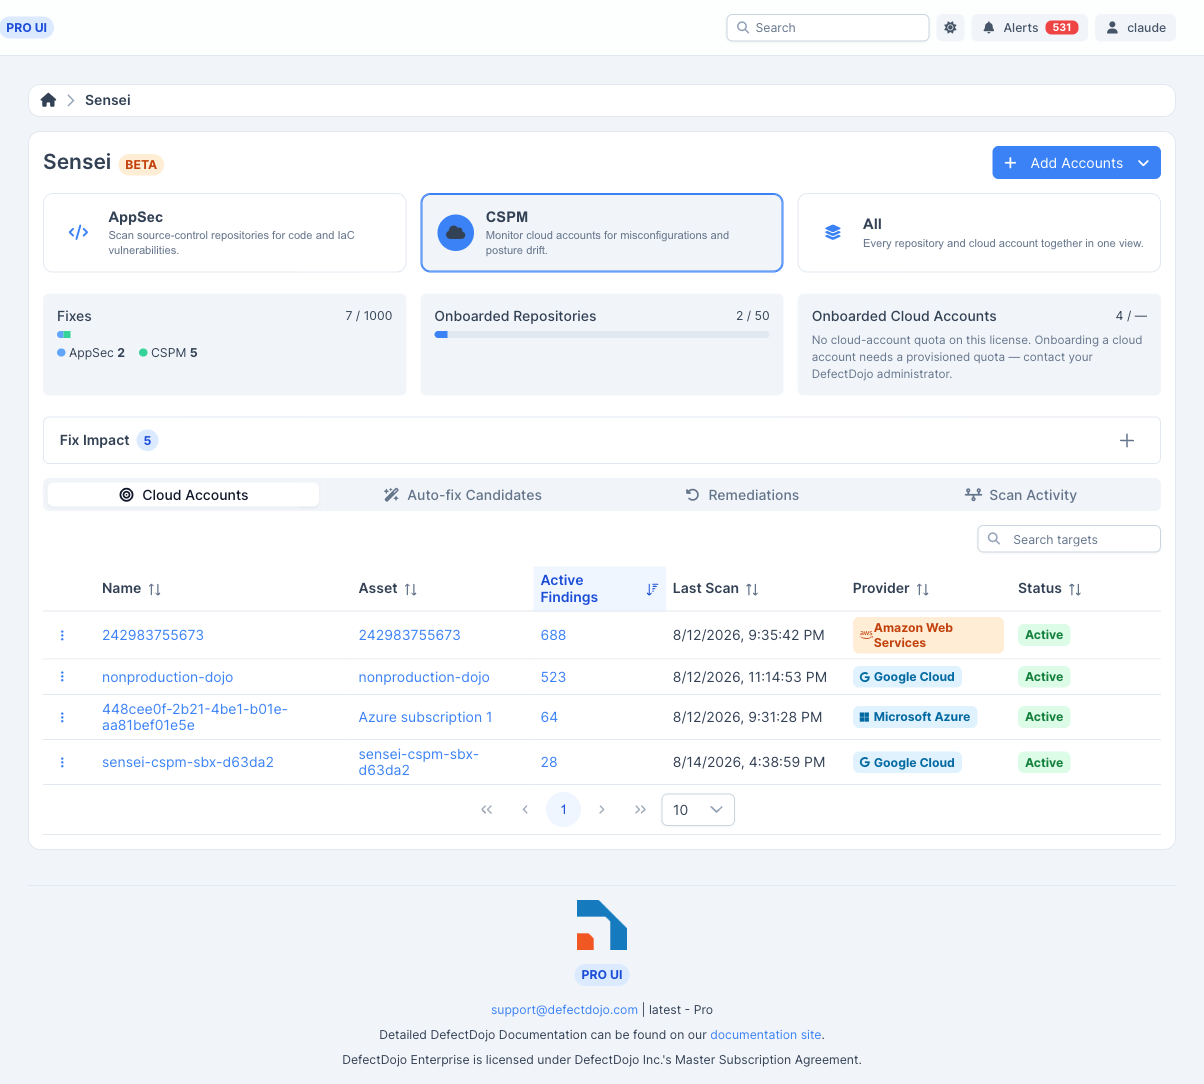
How CSPM works
- Connect a cloud provider with a read-only credential, either once per account or once for many accounts via a Cloud Connection.
- Onboard a cloud account (an AWS account, an Azure subscription, or a GCP project) and link it to an Asset.
- Sensei scans the account with Prowler, on demand from the hub, and imports each misconfiguration as a DefectDojo finding recorded against the cloud resource it concerns.
- Remediate a finding two ways: open an IaC pull request on a linked repository, or apply a direct, reversible fix to the live resource (“Fix in Cloud”).
Requirements
- A DefectDojo Pro license that includes the Sensei feature, with a cloud-account quota (
sensei_cloud_account_limit). - The Locations feature enabled — a cloud finding is identified by the cloud resource it concerns rather than a file and line, and Locations is what records that. Without Locations, cloud onboarding is not offered (see Troubleshooting). CSPM itself needs no feature flag: it is part of Sensei, so the Sensei license unlocks it.
- A read-only scan credential for each provider (details below).
- To onboard accounts and manage connections: a global Maintainer or Owner role. To run a direct fix or revert one: at least Writer access to the finding’s Asset — a direct fix mutates live cloud state, so it is an edit of the finding.
Cloud connections
A Cloud Connection holds one shared credential and, optionally, an organization/folder scope. From a single connection Sensei can discover every account the credential can see and onboard many of them at once — the cloud analog of a source-control connection that lists many repositories. Reach connections from Add Accounts → Manage Connections in the hub header, or the Connections page.
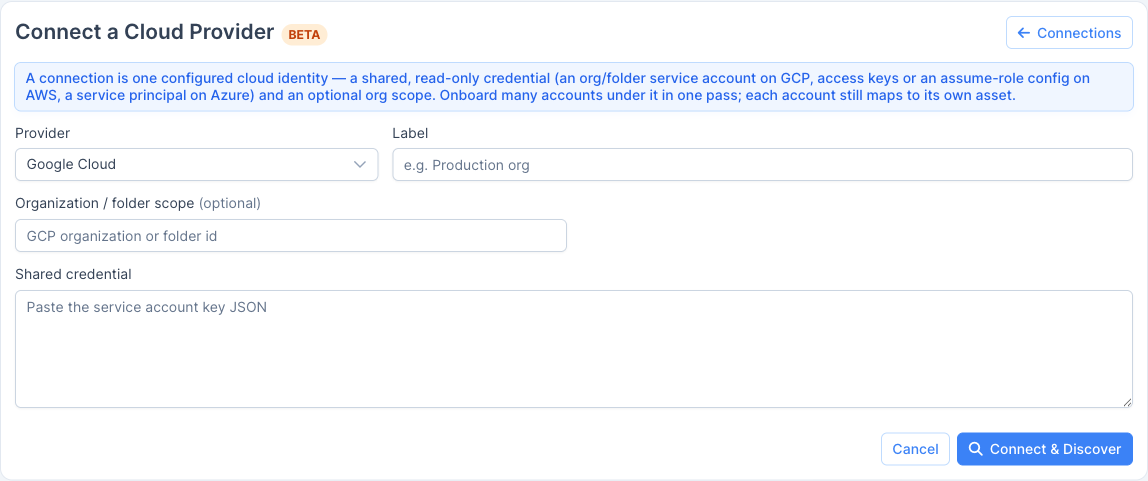
The setup wizard walks three steps:
- Connect — choose the provider (AWS, Azure, or GCP), give the connection a label, and paste the credential and (optionally) an org/folder scope.
- Discover — Sensei enumerates the accounts the credential can reach (AWS Organizations member accounts, Azure subscriptions, or GCP projects) and proposes an Asset name for each, mapping to an existing Asset by name where one matches.
- Onboard — pick which discovered accounts to onboard; each becomes a cloud account linked to its Asset.
🔑 One credential, many accounts. A connection’s credential is reused by every account onboarded under it (
effective_credential). Onboarding a single account without a connection is also supported — see below — in which case the account carries its own credential.
Onboard a cloud account
To onboard one account directly, use Add Accounts → Onboard a single account in the hub header, choose the provider, and supply the account identifier and its read-only scan credential.
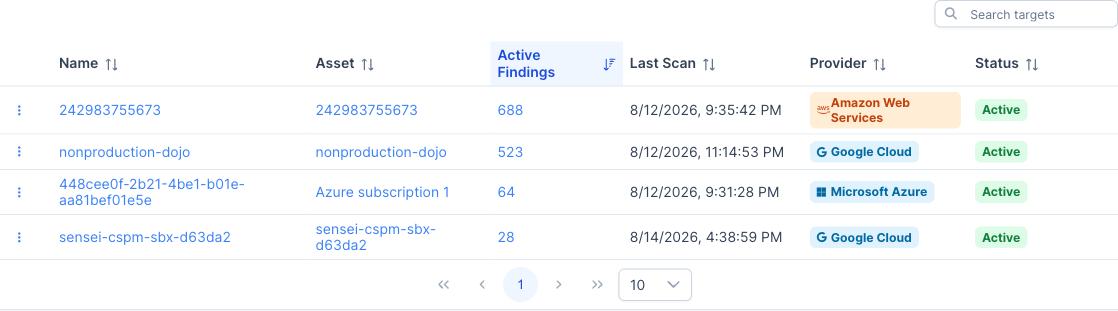
The Cloud Accounts list mirrors the AppSec repository list: the account identifier links out to the provider console, and each row shows its provider, linked Asset, Active Findings (linking to that Asset’s findings), last scan time, and a row menu (Scan now, Configure, Remove).
Provider identity and scan credentials
A no-key method is the recommended way to authenticate a scan. There is no key to create, store, or rotate, and no service-account-key org-policy exception. Which one depends on where DefectDojo runs: on a self-hosted install it is Keyless authentication (your host’s own identity); on DefectDojo Cloud it is Connect DefectDojo Cloud (DefectDojo Cloud’s own per-tenant identity). The static credentials in the table below (a GCP service-account key, AWS access keys, an Azure service principal) are the backup you can use on any deployment.
The scan credential should be read-only — Sensei only needs to read posture to scan. (Applying a direct fix uses a separate write credential; see Fix in Cloud.)
| Provider | Account identity | Read-only scan credential (backup) |
|---|---|---|
| AWS | The 12-digit account ID (resource ARNs derive from it). | Access keys for a principal with SecurityAudit + ViewOnlyAccess. Base access keys are required; organization-wide scanning additionally assumes a role (role_arn / organizations_role_arn) on top of those keys. |
| Azure | The subscription ID. | A service principal (client ID, client secret, tenant ID) with Reader + Security Reader, plus the Microsoft Graph read permissions Prowler needs (Directory.Read.All, Policy.Read.All, UserAuthenticationMethod.Read.All). |
| GCP | The project ID. | A service-account key for an SA with roles/viewer + roles/iam.securityReviewer. |
🔐 Credentials are encrypted at rest. Every credential — connection or account, scan or write — is stored with DefectDojo’s encrypted field storage. Enter it once; there is nothing to paste again.
Keyless authentication (self-hosted only)
A long-lived key is a liability, and some organizations forbid creating exportable service-account keys at all. On a self-hosted DefectDojo you can authenticate a scan with your DefectDojo host’s own workload identity instead, so there is no key to create, store, or rotate. Choose a no-key method when you onboard an account or a connection, and fill in the identifiers rather than pasting a key. You do not need to know the term “federation”: pick the method labelled recommended, and the wizard shows a copy-paste setup script for it (see The wizard writes the setup script).
| Provider | Keyless method | What DefectDojo does | What you set up |
|---|---|---|---|
| GCP | Workload Identity Federation | Authenticates with an external_account config whose token comes from the host’s own identity. | A Workload Identity Pool and provider that trust your DefectDojo host’s identity, the read-only scan roles granted to the federated principal, then paste the external_account config JSON. |
| GCP | Service-account impersonation | The host’s identity mints a short-lived token for a target service account; you enter only that SA’s email, and no key is stored. | Grant your DefectDojo host’s identity roles/iam.serviceAccountTokenCreator on the scan service account, and grant that SA the read-only scan roles. |
| GCP | Application Default Credentials | Uses the host’s ambient credentials directly (GKE Workload Identity or an attached GCE service account); nothing to enter. | Run DefectDojo with a workload identity that holds the read-only scan roles on the target project. |
| AWS | Web identity (OIDC) | Assumes an IAM role with the host’s projected OIDC token (for example EKS IRSA), with no access keys; you enter the role ARN and the token-file location. | An IAM OIDC identity provider trusting your cluster’s issuer, and a role with a web-identity trust policy carrying the read-only scan permissions. |
🔒 Keyless authentication is self-hosted only. These methods authenticate as your DefectDojo instance’s own identity. On DefectDojo Cloud that identity belongs to DefectDojo rather than to your tenant, so keyless methods are offered and accepted only on a self-hosted install, and only when the operator sets
SENSEI_ALLOW_AMBIENT_CLOUD_AUTH=trueon the Sensei engine (the Helm chart sets it for you on self-hosted values). On DefectDojo Cloud, use one of the scan credentials from the table above.
The wizard writes the setup script
When you pick a no-key method, the onboarding form shows a ready-to-run gcloud or Terraform snippet that grants DefectDojo read-only access, with a Copy button. The recommended GCP method — a read-only service account DefectDojo uses without a key — produces this (run it in Cloud Shell as a project owner):
PROJECT_ID=<PROJECT_ID>
DEFECTDOJO_IDENTITY=<DEFECTDOJO_SERVICE_ACCOUNT_EMAIL>   # the identity DefectDojo runs as

# 1) Create a read-only service account for DefectDojo to scan as
gcloud iam service-accounts create defectdojo-cspm \
  --project="$PROJECT_ID" --display-name="DefectDojo CSPM (read-only)"
SCAN_SA="defectdojo-cspm@$PROJECT_ID.iam.gserviceaccount.com"

# 2) Give it read-only access to the project
gcloud projects add-iam-policy-binding "$PROJECT_ID" \
  --member="serviceAccount:$SCAN_SA" --role="roles/viewer"
gcloud projects add-iam-policy-binding "$PROJECT_ID" \
  --member="serviceAccount:$SCAN_SA" --role="roles/iam.securityReviewer"

# 3) Let DefectDojo use this account without a key
gcloud iam service-accounts add-iam-policy-binding "$SCAN_SA" \
  --member="serviceAccount:$DEFECTDOJO_IDENTITY" \
  --role="roles/iam.serviceAccountTokenCreator"

echo "$SCAN_SA"   # paste this into "Target service account"
<DEFECTDOJO_SERVICE_ACCOUNT_EMAIL> is the identity DefectDojo itself runs as (its GKE Workload Identity or attached GCE service account). When DefectDojo runs in Google Cloud, the wizard detects this automatically and fills it in (it reads the runtime service account from the host metadata server); the placeholder only remains when it cannot be detected, in which case ask whoever installed DefectDojo. To scan a whole organization or folder, grant the same two read-only roles at that level instead of per project. The AWS “read-only role” method produces the equivalent Terraform (an IAM role with a web-identity trust policy plus SecurityAudit + ViewOnlyAccess); on AWS the wizard shows the account and identity DefectDojo runs as (from STS) as context.
The credential is stored as a small JSON document. The onboarding form assembles it for you from the keyless fields; if you drive the API directly, the shapes are:
// GCP service-account impersonation (no key)
{"auth_method": "gcp_impersonation", "impersonate_service_account": "scan-sa@my-project.iam.gserviceaccount.com"}

// GCP Application Default Credentials (host identity)
{"auth_method": "gcp_ambient"}

// GCP Workload Identity Federation: the standard external_account config
{"type": "external_account", "audience": "//iam.googleapis.com/projects/.../locations/global/workloadIdentityPools/...", "...": "..."}

// AWS web identity (no access keys)
{"auth_method": "aws_web_identity",
 "role_arn": "arn:aws:iam::123456789012:role/defectdojo-cspm",
 "web_identity_token_source": {"type": "file", "path": "/var/run/secrets/eks.amazonaws.com/serviceaccount/token"}}
Connect DefectDojo Cloud (cloud only)
On DefectDojo Cloud you don’t paste a key either. Instead you authorize DefectDojo Cloud’s own identity to scan your account, scoped to your tenant. It is the recommended path on DefectDojo Cloud, and the inverse of keyless: keyless uses your host’s identity (self-hosted only), while Connect DefectDojo Cloud uses DefectDojo Cloud’s per-tenant identity (cloud only). Pick the method labelled recommended when you onboard an account or a connection; the wizard shows a copy-paste setup script that grants the trust.
| Provider | Delegated method | What DefectDojo Cloud does | What you set up |
|---|---|---|---|
| GCP | Connect DefectDojo Cloud | DefectDojo Cloud’s per-tenant identity impersonates your read-only scan service account; no key is stored. | Create a read-only scan service account and grant DefectDojo Cloud’s identity roles/iam.serviceAccountTokenCreator on it; the wizard’s script does both. |
| AWS | Connect DefectDojo Cloud | DefectDojo Cloud assumes an IAM role you create, and only with a unique external ID that scopes the trust to your tenant; no access keys. | Create a read-only IAM role whose trust policy allows DefectDojo Cloud’s principal to sts:AssumeRole only with your external ID (shown after you save), plus SecurityAudit + ViewOnlyAccess. |
| Azure | Connect DefectDojo Cloud | DefectDojo Cloud’s multi-tenant application authenticates against your Entra tenant with Reader on the subscription; no secret is stored. | Consent to the DefectDojo Cloud application in your tenant and assign it Reader on the subscription; the wizard’s script does both. |
🔒 Per-tenant isolation. Delegated methods run as DefectDojo Cloud’s own identity, scoped so one tenant can never reach another tenant’s account: AWS requires your unique external ID on every role assumption, GCP uses a distinct per-tenant identity for the token-creator grant, and Azure is scoped to your tenant id. They are offered and accepted only on DefectDojo Cloud, and only when the operator sets
SENSEI_ALLOW_DELEGATED_CLOUD_AUTH=trueon the Sensei engine (the Helm chart sets it for you on DefectDojo Cloud values). On a self-hosted install, use keyless authentication instead.
For AWS, the external ID is generated when you save the connection and shown both in the form and in the setup script. Your role’s trust policy must require exactly that value, which is what stops any other tenant from assuming your role. The wizard fills DefectDojo Cloud’s own identity (the GCP service account, the AWS principal, the Azure application id) into the script automatically where it can.
If you drive the API directly, the delegated blob shapes are:
// GCP: DefectDojo Cloud impersonates your read-only scan service account
{"auth_method": "gcp_delegated_impersonation", "impersonate_service_account": "scan-sa@my-project.iam.gserviceaccount.com"}

// AWS: DefectDojo Cloud assumes your role. external_id is minted by the server, not supplied here
{"auth_method": "aws_delegated_role", "role_arn": "arn:aws:iam::123456789012:role/DefectDojoCloudScan"}

// Azure: your Entra tenant (and, optionally, subscription). The platform app is configured server-side
{"auth_method": "azure_delegated", "tenant_id": "00000000-0000-0000-0000-000000000000"}
Scan a cloud account
Open a cloud account’s row menu and choose Scan now. Sensei runs Prowler against the account and imports the results. A large account is scanned in shards (by service group) when a single scan would run long; the shards are reconciled into one set of findings.
Each imported finding is a cloud-posture finding recorded against the cloud resource it concerns (an S3 bucket, a security group, a storage account, and so on) rather than a file. Its identity comes from Prowler’s own per-finding id, so re-scanning the account updates the same findings rather than duplicating them, and a resource that reports several distinct checks produces several distinct findings.
🕒 Scan activity. Cloud scans appear on the hub’s Scan Activity ledger alongside repository scans, with their status and duration.
Fixing a cloud finding
A cloud finding has two remediation paths, and the right one depends on how the resource is managed:
- IaC pull request — when the resource is provisioned by infrastructure-as-code, Sensei can open a pull request on a linked IaC repository, exactly like an AppSec fix. This is the same Fix with Sensei flow described in Fixing findings with Sensei; for a cloud finding it opens the PR on the account’s linked IaC repository. The finding stays open until the change is applied and the next scan sees it, because the scanner reads the account, not your repository.
- Fix in Cloud (direct remediation) — a live, reversible change applied straight to the cloud resource through the provider API, with no repository and no deploy. This is the fastest path for click-ops resources that no IaC provisions.
Fix in Cloud (direct remediation)
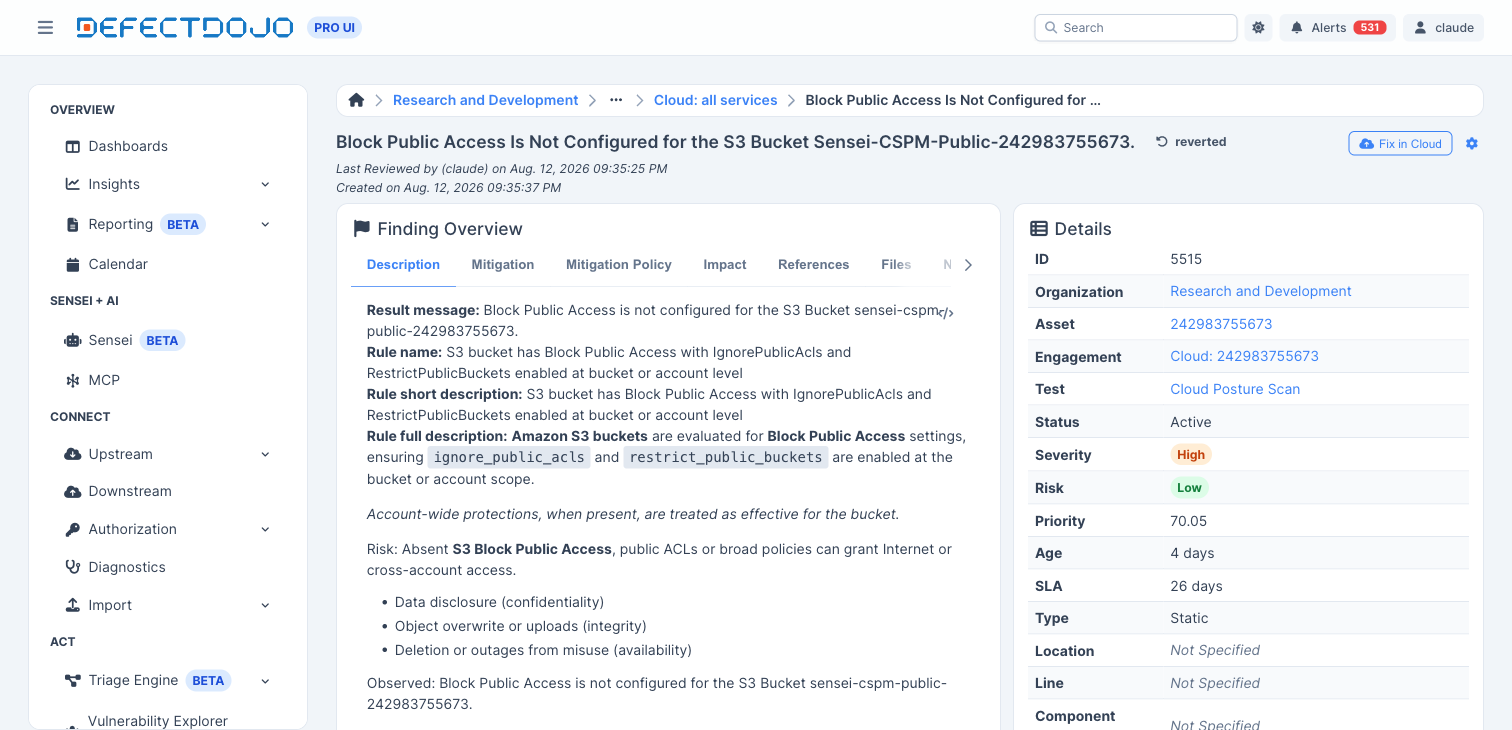
When a finding is directly remediable and the account is set up for it, the fix button reads Fix in Cloud (with a cloud icon) instead of the AppSec Fix / Configure Asset label. Clicking it opens the Apply Direct Fix dialog.
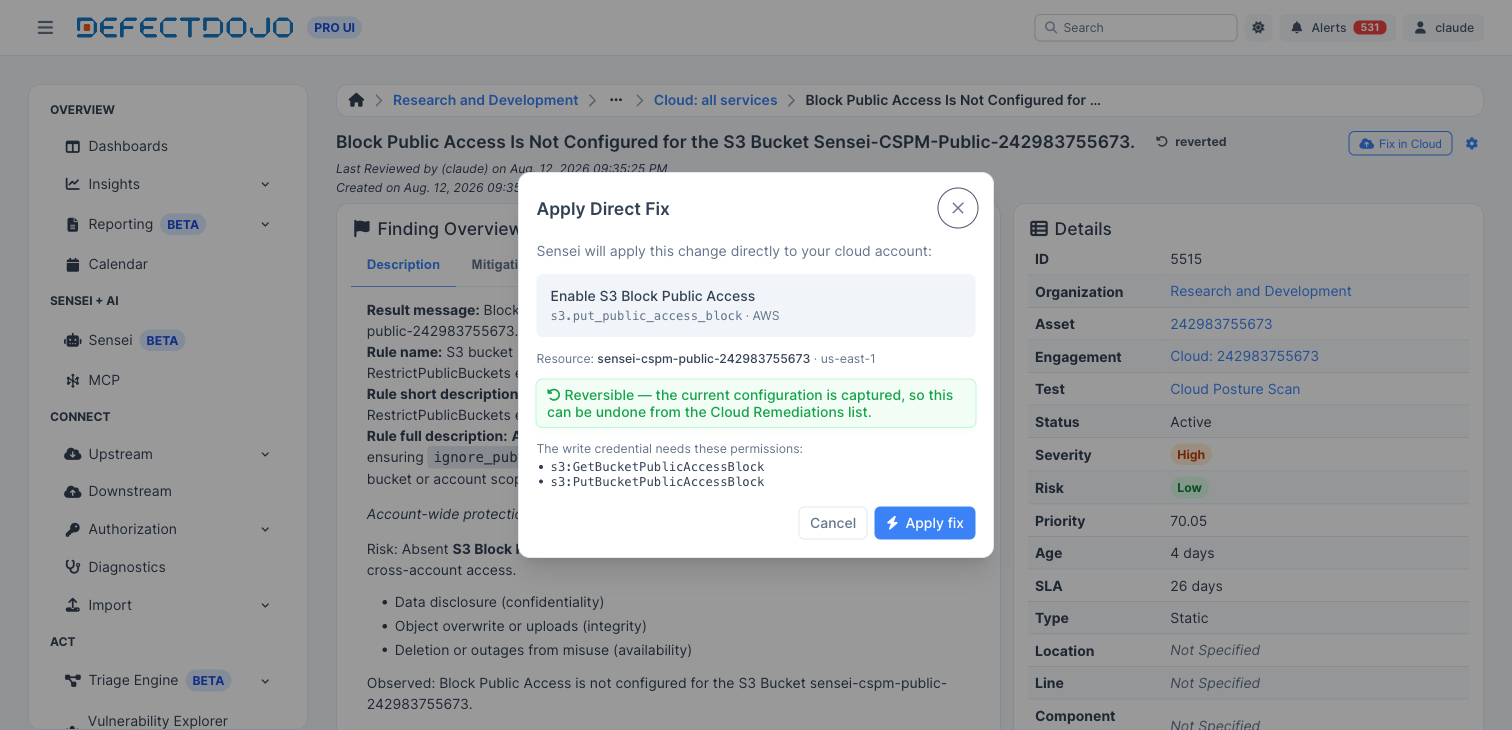
The dialog is an approval preview: it states the exact action, the resource it will change, whether the change is reversible, and the cloud permissions the action requires, so you can confirm the write credential can perform it before anything runs. Approving dispatches the change; the finding’s fix badge moves to Applied in Cloud once the provider confirms it.
Direct remediation is v1-limited to non-destructive, reversible actions. Destructive changes stay on the IaC-pull-request path. The v1 actions are:
| Provider | Action | What it does |
|---|---|---|
| AWS | Block S3 public access | Enables the bucket-level public-access block. |
| AWS | Revoke public security-group ingress | Removes an internet-facing (0.0.0.0/0) ingress rule. |
| Azure | Disable public blob access | Sets allowBlobPublicAccess = false on the storage account. |
| GCP | Remove public bucket IAM | Removes the allUsers / allAuthenticatedUsers binding from a GCS bucket. |
To enable direct remediation on an account, turn on remediation for it and supply a write credential — separate from, and never widening, the read-only scan credential:
- AWS — an assume-role or a scoped write principal with the action’s permissions (for example
s3:PutBucketPublicAccessBlock+s3:GetBucketPublicAccessBlock, orec2:RevokeSecurityGroupIngress+ec2:DescribeSecurityGroups+ec2:AuthorizeSecurityGroupIngressfor revert). - Azure — a service principal with a write role scoped to the resource group (for example Contributor on the RG).
- GCP — a service-account key with
roles/storage.adminon the project.
↩️ Every direct fix is reversible and human-approved. Sensei captures the resource’s prior state before it changes anything and records a revert plan, so a direct fix can be undone. It also fingerprints the resource before and after: if the live state has drifted since the fix, a revert refuses rather than clobbering an out-of-band change. There is always a human in the loop — nothing is applied without the approval dialog.
Cloud Remediations ledger
The CSPM hub adds a Cloud Remediations tab (alongside Cloud Accounts, Auto-fix Candidates, and Scan Activity) — the audit ledger of every direct fix. Each row shows the action, the resource, the provider, its status, and who applied it. An Applied in Cloud row that is still reversible offers a Revert button.
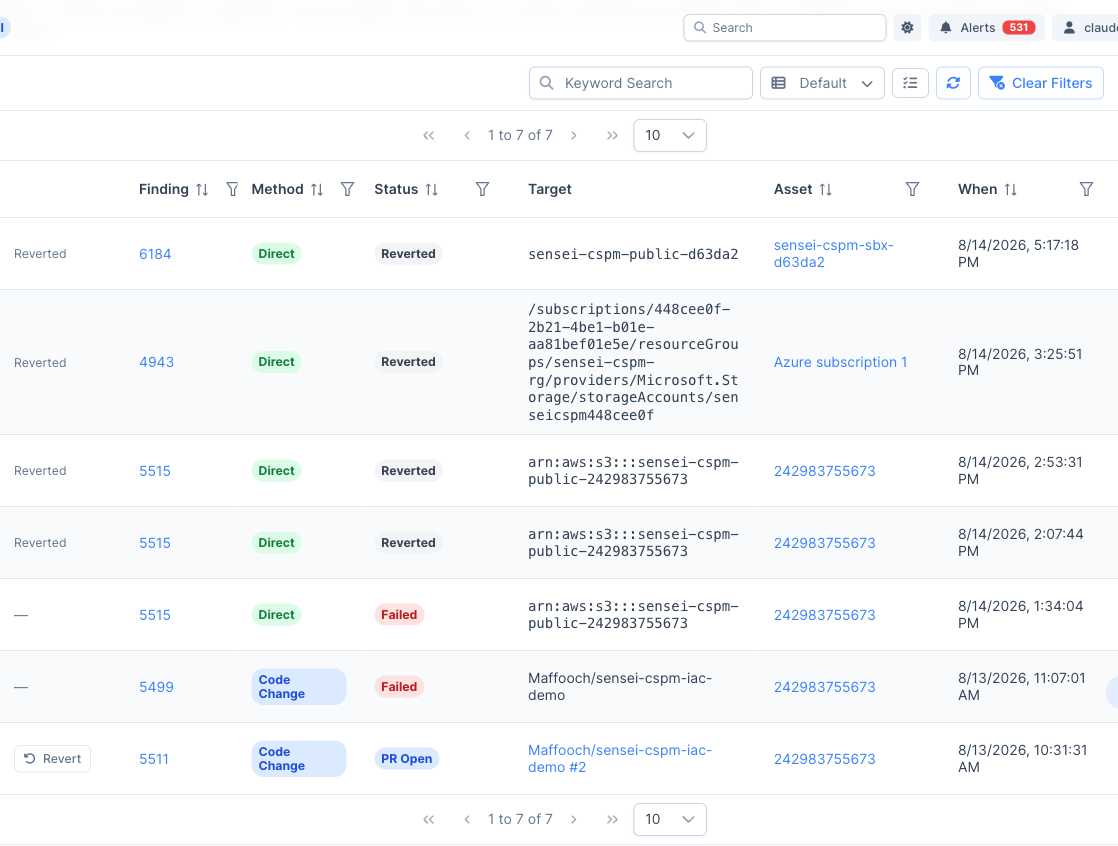
Direct-remediation statuses:
| Status | Meaning |
|---|---|
| In Progress | The change has been dispatched to the provider and is being applied. |
| Applied in Cloud | The provider confirmed the change; the prior state and fingerprints are recorded. This is the direct-path analog of an AppSec fix’s PR open — a landed fix, without a pull request. |
| Revert in Progress | A revert was requested and is being applied. |
| Reverted | The prior state was restored (drift-checked first). |
| Failed | The change could not be applied (or the revert refused because the resource drifted). |
Quotas
CSPM meters against two quotas, both shown as cards at the top of the hub:
- Onboarded Cloud Accounts — the number of cloud accounts onboarded against your cloud-account limit (
sensei_cloud_account_limit), the CSPM analog of the onboarded-repositories meter. Onboarding is blocked when the limit is reached. - Fixes — the shared Sensei fix quota (
sensei_fix_limit). A fix is a fix: a cloud remediation — whether an IaC pull request or a direct in-cloud change — consumes from the same fix pool as an AppSec fix. The Fixes card breaks the total down by capability (AppSec vs CSPM) so you can see the split against the one limit.
Troubleshooting
- Cloud onboarding is not offered. CSPM requires the Locations feature. A cloud finding has no identity without a resource location, so with Locations off, onboarding is refused (the CSPM capability itself still appears). Enable Locations on the Settings > Feature Flags page — the Sensei hub links there from the prompt — then onboard a cloud account.
- “No cloud-account quota is available.” Your license carries no
sensei_cloud_account_limit, or it is used up. Contact your DefectDojo administrator to raise it. - The fix button shows “Fix” or “Configure Asset” on a cloud finding, not “Fix in Cloud.” The finding is not directly remediable — either the account has no write credential / remediation is not enabled, or the finding’s check has no v1 direct action. It can still be fixed by an IaC pull request.
- A revert failed with a drift error. The live resource changed out-of-band since the fix was applied, so the recorded prior state no longer matches. Reconcile the resource manually; Sensei refuses to overwrite an unexpected state.
- A direct fix says the credential lacks a permission. The Apply Direct Fix dialog lists the permissions each action needs. Grant them to the account’s write credential (not the read-only scan credential) and try again.
- Keyless authentication is not offered, or a keyless account will not scan. Keyless methods (Workload Identity Federation, service-account impersonation, Application Default Credentials, AWS web identity) are self-hosted only. Confirm this is a self-hosted install, that the operator set
SENSEI_ALLOW_AMBIENT_CLOUD_AUTH=trueon the Sensei engine, and that the DefectDojo host’s own identity is configured (a GKE/GCE workload identity orGOOGLE_APPLICATION_CREDENTIALSon GCP, a projected OIDC token on AWS) and granted the required access on the target (GCP:roles/iam.serviceAccountTokenCreatoron the scan SA for impersonation; AWS: a role trust policy for web identity). On DefectDojo Cloud, use Connect DefectDojo Cloud (or a scan credential) instead. - “Connect DefectDojo Cloud” is not offered, or a delegated account will not scan. The delegated methods are DefectDojo Cloud only. Confirm this is a DefectDojo Cloud instance and that the operator set
SENSEI_ALLOW_DELEGATED_CLOUD_AUTH=trueon the Sensei engine. Then check the trust you granted (GCP: DefectDojo Cloud’s identity hasroles/iam.serviceAccountTokenCreatoron your scan SA and the SA has the read-only roles; AWS: your role’s trust policy allows DefectDojo Cloud’s principal tosts:AssumeRoleand requires exactly the external ID shown on the connection, which is the most common cause of failure; Azure: the DefectDojo Cloud application is consented in your tenant and holdsReaderon the subscription). On a self-hosted install, use keyless authentication instead.