📋 Jira Integration Guide (Pro)
DefectDojo’s Jira integration can be used to push Finding data to one or more Jira Spaces. By doing so, you can integrate DefectDojo into your standard development workflow. Here are some examples of how this can work:
- The AppSec team can selectively push Findings to a Jira Space used by developers, so that issue remediation can be appropriately prioritized alongside regular development. Developers on this board don’t need to access DefectDojo - they can keep all their work in one place.
- DefectDojo can push ALL Findings to a bidirectional Jira Space which the AppSec team uses, which allows them to split up issue validation. This board keeps in sync with DefectDojo and allows for complex remediation workflows.
- DefectDojo can selectively push Findings from separate Products &/or Engagements to separate Jira Spaces, to keep things in their proper context.
Setting Up Jira
Setting Up Jira requires the following steps:
- Connect a Jira Instance, either with a username / password or an API token. Multiple instances can be linked.
- Add that Jira Instance to one or more Products or Engagements within DefectDojo.
- If you wish to use bidirectional sync, create a Jira Webhook which will send updates to DefectDojo.
Step 1: Connect a Jira Instance
Connecting a Jira Instance is the first step to take when setting up DefectDojo’s Jira integration. Please note Jira Service Management is currently not supported.
Required information from Jira
Atlassian uses different ways of authentication between Jira Cloud and Jira Data Center.
for Jira Cloud, you will need:
- a Jira URL, i.e. https://yourcompany.atlassian.net/
- an account with permissions to create and update issues in your Jira instance. This can be:
- A standard username / password combination
- A username / API Token combination
for Jira Data Center (or Server), you will need:
- a Jira URL, i.e. https://jira.yourcompany.com
- an account with permissions to create and update issues in your Jira instance. This can be:
- A standard username / password combination
- A emailaddress / Personal Access Token combination
Optionally, you can map:
- Jira Transitions to trigger Re-Opening and Closing Findings
- Jira Resolutions which can apply Risk Acceptance and False Positive statuses to Findings (optional)
Multiple Jira Spaces can be handled by a single Jira Instance connection, as long as the Jira account / token used by DefectDojo has permission to create Issues in the associated Jira Space.
Add a Jira Instance
If you have not already done so, navigate to the System Settings page and check the box on Enable Jira Integration.
Navigate to the Enterprise Settings > Jira Instances > + New Jira Instance page from the DefectDojo sidebar.
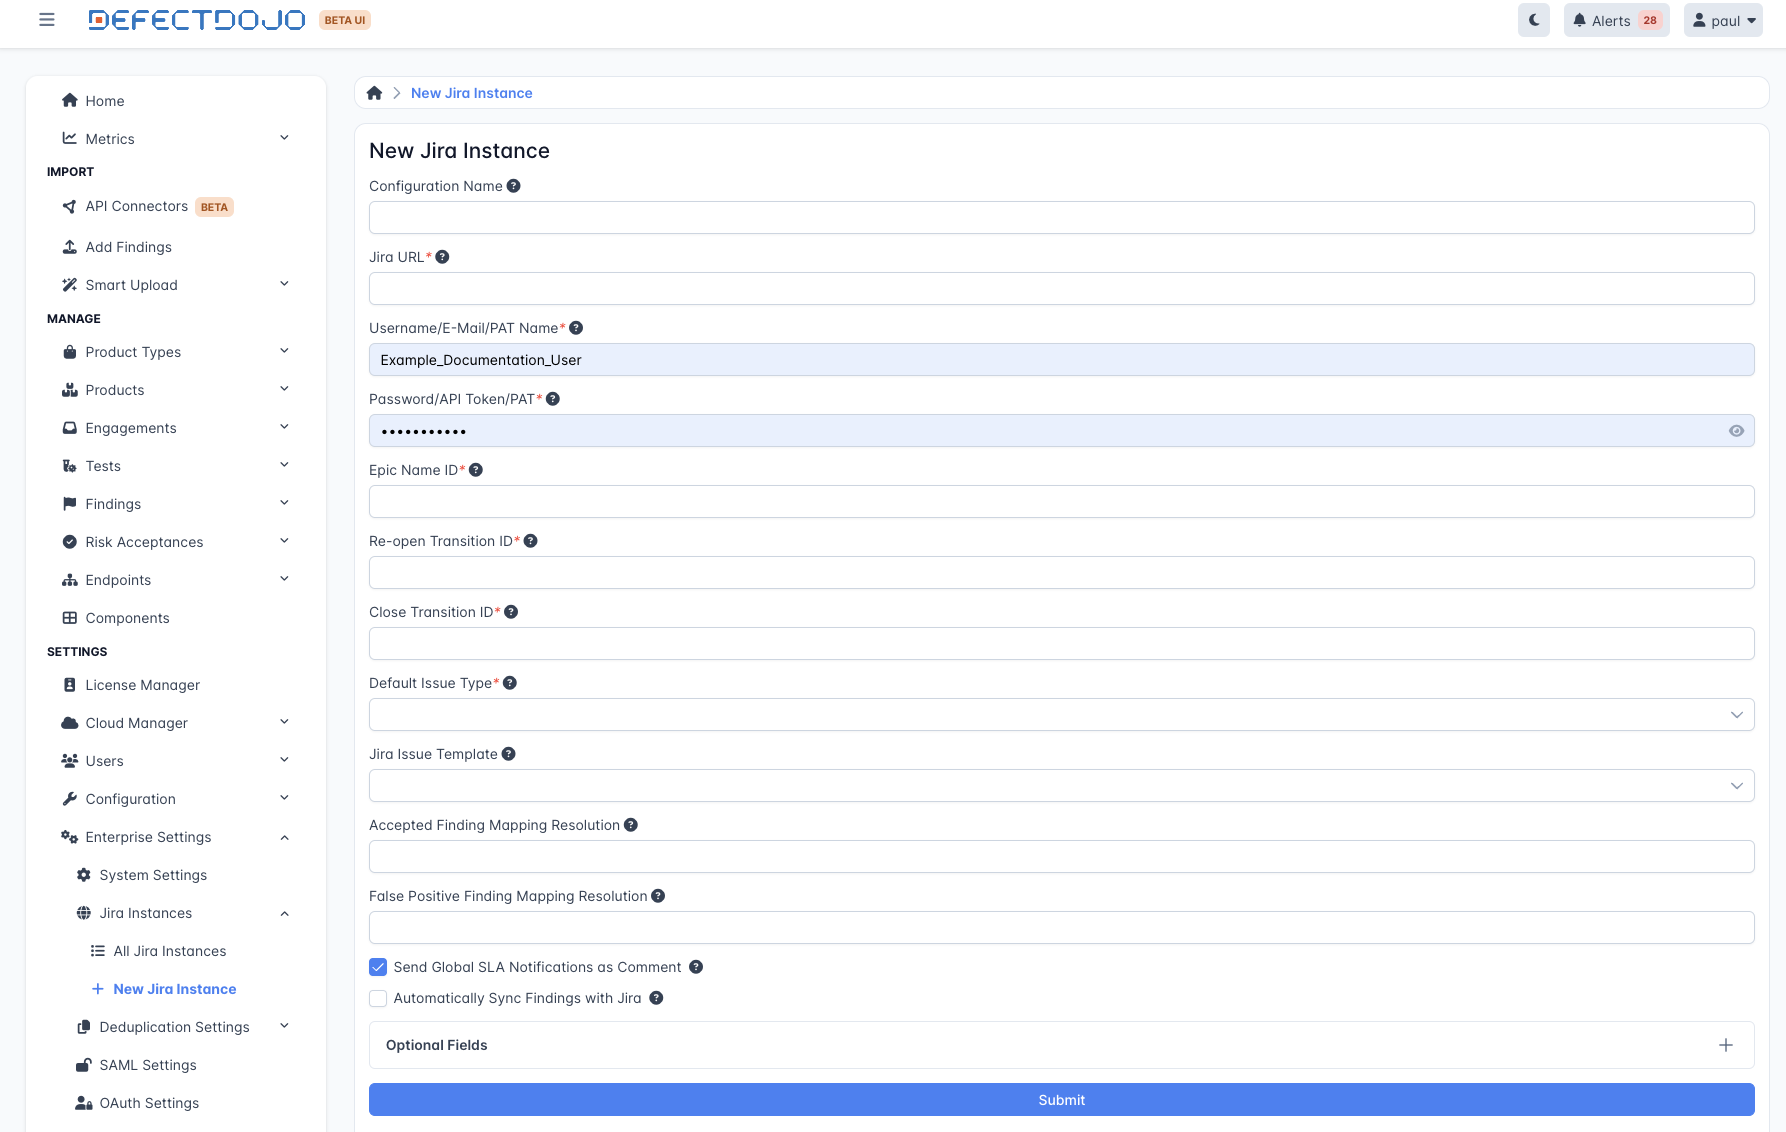
Select a Configuration Name for this Jira Instance to use in DefectDojo. This name is simply a label for the Instance connection in DefectDojo, and does not need to be related to any Jira data.
Select the URL for your company’s Jira instance - likely similar to
https://**yourcompany**.atlassian.netif you’re using a Jira Cloud installation.Enter an appropriate authentication method in the Username / Password fields for Jira:
- For standard username / password Jira authentication, enter a Jira Username and corresponding Password in these fields.
- For authentication with a user’s API token (Jira Cloud) enter the Username with the corresponding API token in the password field.
- For authentication with a Jira Personal Access Token (aka PAT, used in Jira Data Center and Jira Server only), enter the PAT in the password field. Username is not used for authentication with a Jira PAT, but the field is still required in this form, so you can use a placeholder value here to identify your PAT.
Note that the user associated with this connection must have permission to create Issues and access data in your Jira instance.
- You will need to provide values for an Epic Name ID, Re-open Transition ID and Close Transition ID. These values can be changed later. While logged into Jira, you can access these values from the following URLs:
- Epic Name ID: visit
https://<YOUR JIRA URL>/rest/api/2/fieldand search for Epic Name. Copy the number out ofnumberand paste it here. If you do not have an Epic Name ID associated with your Space in Jira (due to using a Team-Managed Space, for example), enter 0 on this field. - Re-open Transition ID: visit
https://<YOUR JIRA URL>/rest/api/latest/issue/<ANY VALID ISSUE KEY>/transitions?expand-transitions.fieldsto find the ID for your Jira instance. Paste it in the Reopen Transition ID field. - Close Transition ID: Visit
https://<YOUR JIRA URL>/rest/api/latest/issue/<ANY VALID ISSUE KEY>/transitions?expand-transitions.fieldsto find the ID for your Jira instance. Paste it in the Close Transition ID field.
Select the Default issue type which you want to create Issues as in Jira. The options for this are Bug, Task, Story and Epic (which are standard Jira issue types) as well as Spike and Security, which are custom issue types. If you have a different Issue Type which you want to use, please contact for assistance.
Select your Issue Template, which will determine the Issue Description when Issues are created in Jira.
The two types are:
- Jira_full, which will include all Finding information in Jira Issues
- Jira_limited, which will include a smaller amount of Finding information and metadata.
If you leave this field blank, it will default to Jira_full. If you need a different kind of template, reach out to .
- If you wish, enter the name of a Jira Resolution which will change the status of a Finding to Accepted or to False Positive (when the Resolution is triggered on the Issue).
The form can be submitted from here. If you wish, you can further customize your Jira integration under Optional Fields. Clicking this button will allow you to apply generic text to Jira Issues or change the mapping of Jira Severity Mappings.
Step 2: Connect a Product or Engagement to Jira
Each Product or Engagement in DefectDojo has its own settings which govern how Findings are converted to JIRA Issues. From here, you can decide the associated Jira Space and set the default behaviour for creating Issues, Epics, Labels and other JIRA metadata.
Add Jira to a Product
You can find this page by clicking the Gear menu on a Product ⚙️ and opening the Jira Project Settings page.

Jira Instance
If you have multiple instances of Jira set up, for separate products or teams within your organization, you can indicate which Jira Space you want DefectDojo to create Issues in. Select a Space from the drop-down menu.
If this menu doesn’t list any Jira instances, confirm that those Spaces are connected in your global Jira Configuration for DefectDojo - yourcompany.defectdojo.com/jira.
Project key
This is the key of the Space that you want to use with DefectDojo. The Space Key for a given Space can be found in the URL. (This was previously referred to as a Jira Project Key, but as of September 2025, this is now referred to in Jira as the Space Key).
Epic Issue Type Name
The name of the Epic issue type in Jira. This defaults to “Epic” but can be changed if your Jira instance uses a different name.
Issue template
Here you can determine how much DefectDojo metadata you want to send to Jira. Select one of two options:
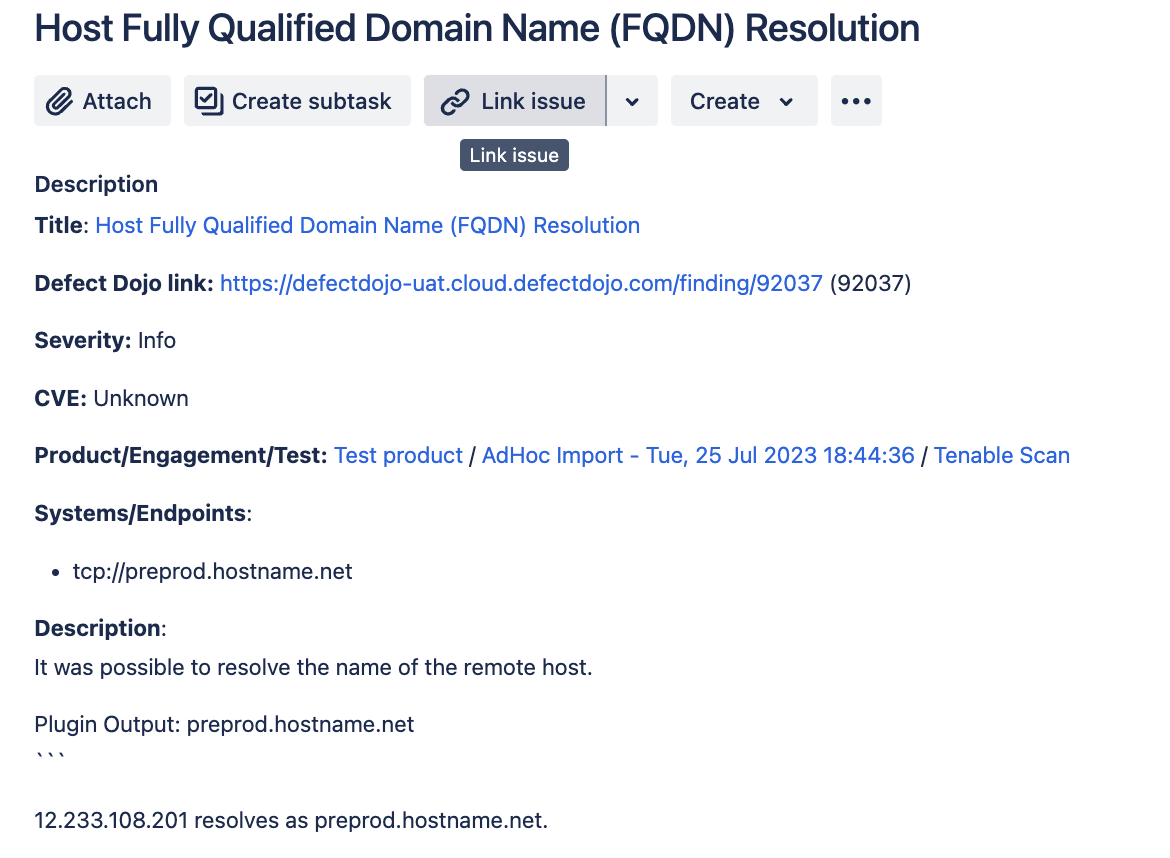
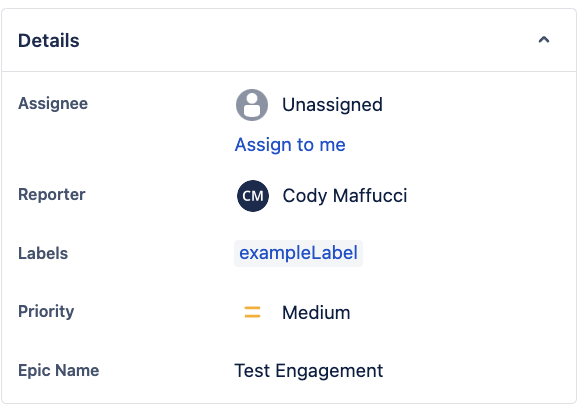
- jira_full: Issues will track all of the parameters from DefectDojo - a full Description, CVE, Severity, etc. Useful if you need complete Finding context in Jira (for example, if someone is working on this Issue who doesn’t have access to DefectDojo).
Here is an example of a jira_full Issue:
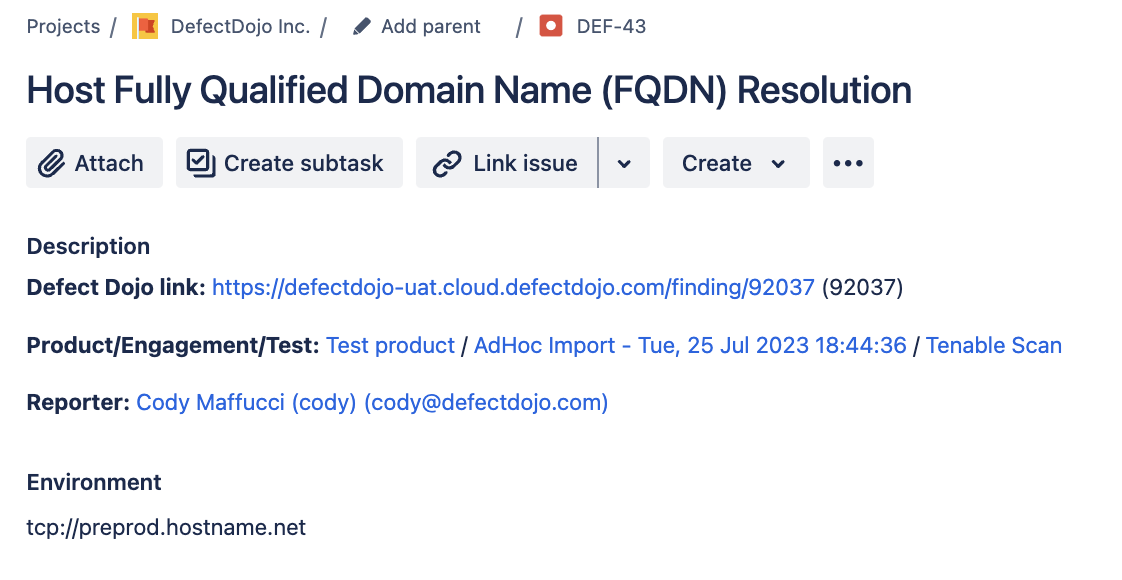
- Jira_limited: Issues will only track the DefectDojo link, the Product/Engagement/Test links, the Reporter and Environment fields. All other fields are tracked in DefectDojo only. Useful if you don’t require full Finding context in Jira (for example, if someone is working on this Issue who mainly works in DefectDojo, and doesn’t need the full picture in JIRA as well.)
Here is an example of a jira_limited Issue:
Component
If you manage your Jira Space using Components, you can assign the appropriate Component for DefectDojo here.
Custom fields
If you don’t need to use Custom Fields with DefectDojo issues, you can leave this field as ’null'.
However, if your Jira Space Settings require you to use Custom Fields on new Issues, you will need to hard-code these mappings.
Note that DefectDojo cannot send any Issue-specific metadata as Custom Fields, only a default value. This section should only be set up if your Jira Space requires that these Custom Fields exist in every Issue in your Space.
Follow this guide to get started working with Custom Fields.
Jira labels
Select the relevant labels that you want the Issue to be created with in Jira, e.g. DefectDojo, YourProductName..
Default assignee
The name of the default assignee in Jira. If left blank, DefectDojo will follow the default behaviour in your Jira Space when creating Issues.
Jira Project Settings
Enabled
This toggle controls whether DefectDojo pushes Findings to Jira for this Product. Disabling this will not delete or change any existing Jira tickets created by DefectDojo, but will prevent any further updates or new Issue creation.
Jira integrations can be removed from your instance only if no related Issues have been created. If Issues have been created, there is no way to completely remove a Jira Instance from DefectDojo.
Add Vulnerability Id as a Jira label
This allows you to add the Vulnerability ID data as a Jira Label automatically. Vulnerability IDs are added to Findings from individual security tools - these may be Common Vulnerabilities and Exposures (CVE) IDs or a different format, specific to the tool reporting the Finding.
Push All Issues
If checked, DefectDojo will automatically push any Active and Verified Findings to Jira as Issues. If left unchecked, all Findings will need to be pushed to Jira manually (individually or via bulk push).
When this setting is enabled, Jira Issues will continue to sync with DefectDojo even if the Finding’s status changes.
Enable Engagement Epic Mapping
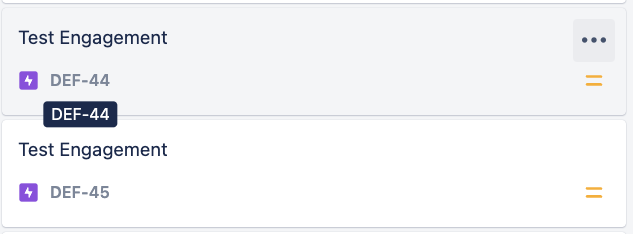
In DefectDojo, Engagements represent a collection of work. Each Engagement contains one or more tests, which contain one or more Findings which need to be mitigated. Epics in Jira work in a similar way, and this checkbox allows you to push Engagements to Jira as Epics.
- An Engagement in DefectDojo - note the three findings listed at the bottom.
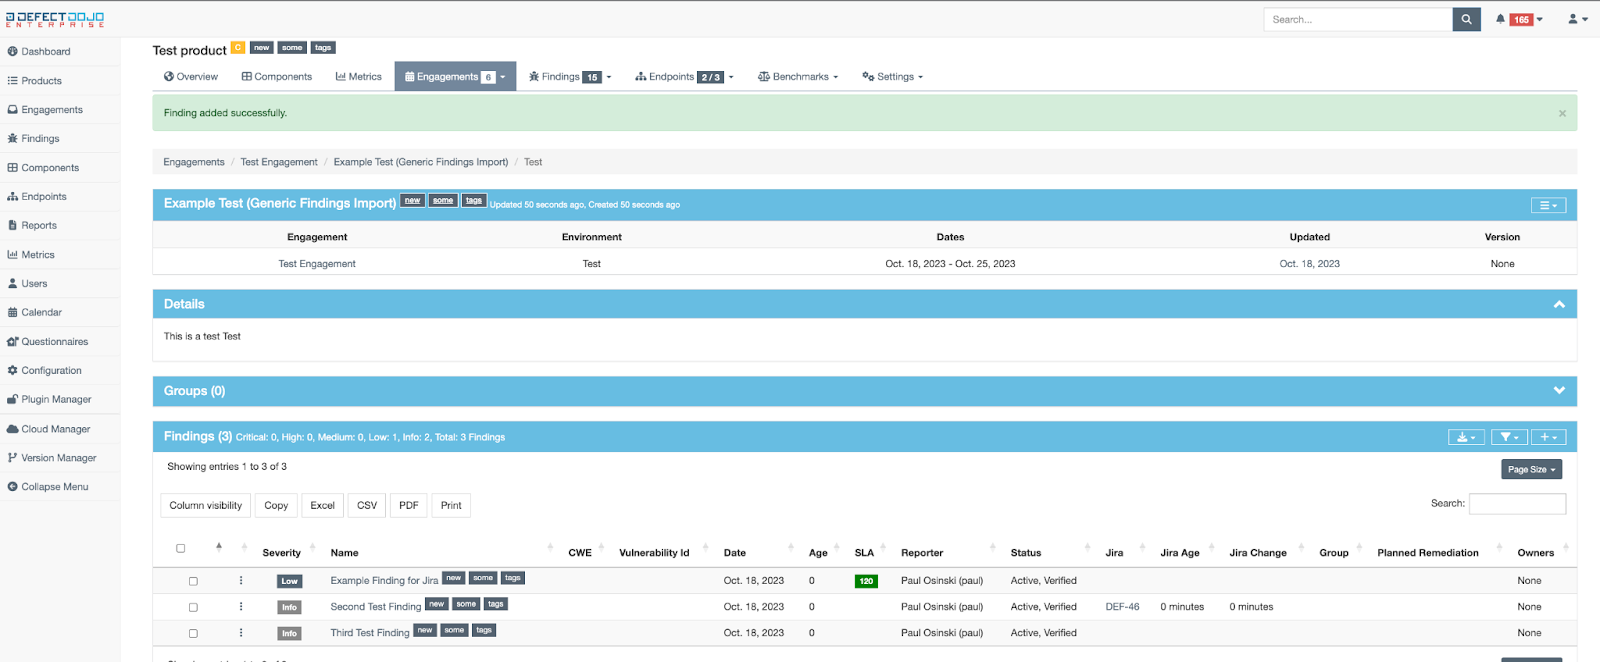
- How the same Engagement becomes an Epic when pushed to JIRA - the Engagement’s Findings are also pushed, and live inside the Engagement as Child Issues.

Push Notes
If enabled, Jira comments will populate on the associated Finding in DefectDojo, under Notes, and vice versa; Notes on Findings will be added to the associated Jira Issue as Comments.
Send SLA Notifications As Comments
If enabled, any Issue which breaches DefectDojo’s Service Level Agreement rules will have comments added to the Jira issue indicating this. These comments will be posted daily until the Issue is resolved.
Service Level Agreements can be configured under Configuration > SLA Configuration in DefectDojo and assigned to each Product.
Send Risk Acceptance Expiration Notifications As Comment
If enabled, any Issue where the associated DefectDojo Risk Acceptance expires will have a comment added to the Jira issue indicating this. These comments will be posted daily until the Issue is resolved.
Engagement-Level Jira Settings
By default, Engagements inherit Jira settings from their Product. However, you can override the Jira settings for individual Engagements.
To access Engagement-level Jira settings, click the Gear menu ⚙️ on an Engagement and open the Jira Project Settings page.
From here, you can uncheck Inherit from Product and provide Engagement-specific values for: Project Key, Issue Template, Custom Fields, Jira Labels, Default Assignee, and other settings.
Note that once an Engagement has its own Jira project assigned, it can no longer inherit from the Product.

Step 3: Configure Bidirectional Sync: Jira Webhook
The Jira integration allows for bidirectional sync via webhook. DefectDojo receives Jira notifications at a unique address, which can allow for Jira comments to be received on Findings, or for Findings to be resolved via Jira depending on your configuration.
Locating your Jira Webhook URL
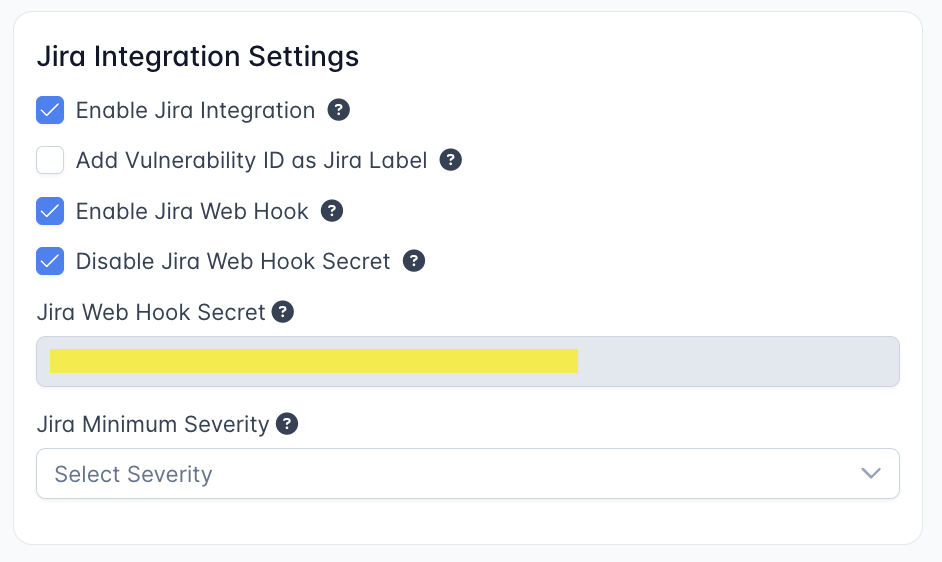
Your Jira Webhook is located on the System Settings form under Jira Integration Settings: Enterprise Settings > System Settings from the sidebar.
Creating the Jira Webhook
- Visit
**https:// \<YOUR JIRA URL\> /plugins/servlet/webhooks** - Click ‘Create a Webhook’.
- For the field labeled ‘URL’ enter:
https:// \<**YOUR DOJO DOMAIN**\> /jira/webhook/ \<**YOUR GENERATED WEBHOOK SECRET**\>. The Web Hook Secret is listed under the Jira Integration Settings as listed above. - Under ‘Comments’ enable ‘Created’. Under Issue enable ‘Updated’.
- Make sure your JIRA instance trusts the SSL certificate used by your DefectDojo instance. For JIRA Cloud DefectDojo must use a valid SSL/TLS certificate, signed by a globally trusted certificate authority
Note that you do not need to create a Secret within Jira to use this webhook. The Secret is built into DefectDojo’s URL, so simply adding the complete URL to the Jira Webhook form is sufficient.
DefectDojo’s Jira Webhook only accepts requests from the Jira API.
Testing the Webhook
Once you have one or more Issues created from DefectDojo Findings, you can test the Webhook by adding a Comment to one of those Findings. The Comment should be received by the Jira webhook as a note.
If this doesn’t work correctly, it could be due to a Firewall issue on your Jira instance blocking the Webhook.
- DefectDojo’s Firewall Rules include a checkbox for Jira Cloud, which needs to be enabled before DefectDojo can receive Webhook messages from Jira.
Testing the Jira integration
Test 1: Do Findings successfully push to Jira?
In order to test that the Jira integration is working properly, you can add a new blank Finding to the Product associated with Jira in DefectDojo. Product > Findings > Add New Finding.
Add whatever title severity and description you wish, and then click “Finished”. The Finding should appear as an Issue in Jira with all of the relevant metadata.
If Jira Issues are not being created correctly, check your Notifications for error codes.
- Confirm that the Jira User associated with DefectDojo’s Jira Configuration has permission to create and update issues on that particular Jira Space.
Test 2: Jira Webhooks send to DefectDojo
In order to test the Jira webhooks, add a Note to a Finding which also exists in JIRA as an Issue (for example, the test issue in the section above).
If the webhooks are configured correctly, you should see the Note in Jira as a Comment on the issue.
If this doesn’t work correctly, it could be due to a Firewall issue on your Jira instance blocking the Webhook.
- DefectDojo’s Firewall Rules include a checkbox for Jira Cloud, which needs to be enabled before DefectDojo can receive Webhook messages from Jira.
Disconnecting from Jira
Jira integrations can be removed from your instance only if no related Issues have been created. If Issues have been created, there is no way to completely remove a Jira Instance from DefectDojo.
However, you can disable your Jira integration by disabling it at the Product level. From the Jira Project Settings page (accessible via the ⚙️ Gear menu on a Product), uncheck the Enabled toggle. This will not delete or change any existing Jira tickets created by DefectDojo, but will disable any further updates.
Pushing Findings To Jira
A Product with a JIRA mapping can push Findings to Jira as Issues using several methods. You can push Findings individually, in bulk, as Finding Groups, or automatically.
Push a Single Finding
- Open the Finding you want to push.
- Click the ☰ Finding Menu and select Push to Jira.
- Confirm the push when prompted. DefectDojo will create a Jira Issue and link it to the Finding.
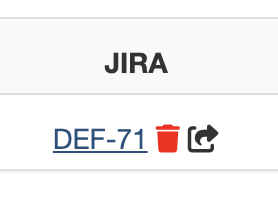
Once the Issue is created, DefectDojo will display a link to the Jira Issue on the Finding page.
You can also check the Push to Jira checkbox when editing a Finding via the Edit Finding form. When the Finding is saved, it will be pushed to Jira.
Updating a Linked Jira Issue
If a Finding already has a linked Jira Issue, selecting Push to Jira again will update the existing Jira Issue with any changes made in DefectDojo. If Push All Issues is enabled on the Product, this syncing happens automatically.
Unlinking a Finding from Jira
To remove the association between a Finding and its Jira Issue, click the ☰ Finding Menu and select Unlink From Jira. This removes the link in DefectDojo but does not delete the Jira Issue itself.
Bulk Push Findings
You can push multiple Findings to Jira at once using the Bulk Update form:
- From a Findings list, select the Findings you want to push using the checkboxes.
- Open the Bulk Update form.
- Under Jira Settings, check the Push to Jira checkbox.
- Click Submit.
The selected Findings will be queued for Jira push. DefectDojo will display a confirmation message indicating how many Findings were queued.
Push Engagements as Epics
If Enable Engagement Epic Mapping is turned on in your Jira Project Settings, you can push an Engagement to Jira as an Epic. The Engagement’s Findings will be pushed as Child Issues within that Epic.
To push an Engagement as an Epic:
- Open the Engagement you want to push.
- Click the ☰ Engagement Menu and select Push to Jira.
- Optionally, provide an Epic Name (defaults to the Engagement name if left blank) and an Epic Priority.
- Check Push to Jira (Create Epic) and submit the form.
Push Finding Groups as Jira Issues
If you have Finding Groups enabled, you can push a Group of Findings to Jira as a single Issue rather than separate Issues for each Finding.
To push a Finding Group:
- Open the Finding Group.
- Click the ☰ Finding Group Menu and select Push to Jira, or check the Push to Jira checkbox when editing the Finding Group.
The Jira Issue associated with a Finding Group must be deleted directly from the Jira instance if removal is needed.
Automatically Create and Push Finding Groups
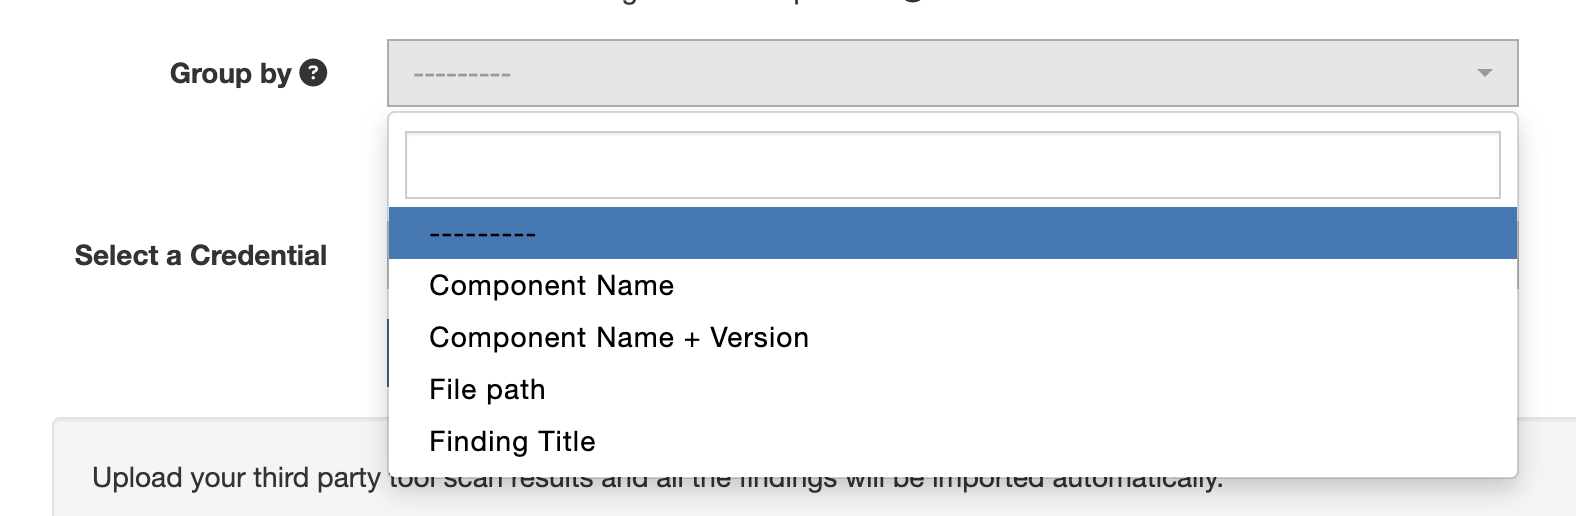
With Push All Issues enabled on the Product, and a Group By option selected on import:
As long as the Finding Groups are being created successfully, the Finding Group is what will automatically push to Jira as an Issue, not the individual Findings.
Automatic Push Behaviour
DefectDojo can automatically push Findings and updates to Jira in several scenarios:
Push All Issues
When the Push All Issues setting is enabled on a Product’s Jira Project Settings, DefectDojo will automatically create Jira Issues for all Active and Verified Findings. This includes Findings created via scan import. Once a Jira Issue is created, it will continue to sync with DefectDojo even if the Finding’s status changes.
Auto-Sync on Status Changes
When Push All Issues or the system-level Finding Jira Sync setting is enabled, DefectDojo will automatically update linked Jira Issues when certain actions are taken on Findings:
- Request Review - A comment is added to the linked Jira Issue (or the Finding Group’s Jira Issue if the Finding belongs to a group).
- Clear Review - A comment is added to the linked Jira Issue.
- Close Finding - The linked Jira Issue is updated to reflect the closure. If Push Notes is enabled, a comment is also added.
Jira Comments and Notes
When Push Notes is enabled in the Jira Project Settings:
- If a comment is added to a Jira Issue, the same comment will be added to the Finding, under the Notes section.
- Likewise, if a Note is added to a Finding, the Note will be added to the Jira issue as a comment.
Jira Status Changes
The Jira Instance configuration has entries for two Jira Transitions which will trigger a status change on a Finding.
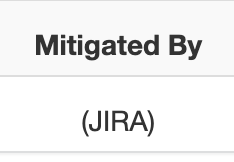
When the ‘Close’ Transition is performed on Jira, the associated Finding will also Close, and become marked as Inactive and Mitigated on DefectDojo. DefectDojo will record this change on the Finding page under the Mitigated By heading.
When the ‘Reopen’ Transition is performed on the Jira Issue, the associated Finding will be set as Active on DefectDojo, and will lose its Mitigated status.
Custom Fields in Jira
DefectDojo does not currently support passing any Issue-specific information into these Custom Fields - these fields will need to be updated manually in Jira after the issue is created. Each Custom Field will only be created from DefectDojo with a default value.
Jira Cloud now allows you to create a default Custom Field value directly in-app. See Atlassian’s documentation on Custom Fields for more information on how to configure this.
DefectDojo’s built-in Jira Issue Types (Bug, Task, Story and Epic) are set up to work ‘out of the box’. Data fields in DefectDojo will automatically map to the corresponding fields in Jira. By default, DefectDojo will assign Priority, Labels and a Reporter to any new Issue it creates.
Some Jira configurations require additional custom fields to be accounted for before an issue can be created. This process will allow you to account for these custom fields in your DefectDojo -> Jira integration, ensuring that issues are created successfully. These custom fields will be added to any API calls sent from DefectDojo to a linked Jira instance.
If you don’t already use Custom Fields in Jira, there is no need to follow this process.
- Recording the names of your Custom Fields in Jira (Jira UI)
- Determine the Key values for the new Custom Fields (Jira Field Spec Endpoint)
- Locate the acceptable data for each Custom Field, using the Key values as a reference (Jira Issue Endpoint)
- Create a Field Reference JSON block to track all of the Custom Field Keys and acceptable data (Jira Issue Endpoint)
- Store the JSON block in the associated DefectDojo Product, to allow Custom Fields to be created from Jira (DefectDojo UI)
- Test your work and ensure that all required data is flowing from Jira properly
Step 1: Record the names of your Custom Fields in Jira
Jira supports a variety of different Context Fields, including Date Pickers, Custom Labels, Radio Buttons. Each of these Context Fields will have a different Key value that can be found in the Jira API.
Write down the names of each required Custom Field, as you will need to search through the Jira API to find them in the next step.
Example of a Custom Field list (your Custom Field names will be different):
- DefectDojo Custom URL Field
- Another example of a Custom Field
- …
Step 2: Finding your Jira Custom Field Key Values
Start this process by navigating to the Field Spec URL for your entire Jira instance.
Here is an example of a Field Spec URL:
https://yourcompany-example.atlassian.net/rest/api/2/field
The API will return a long string of JSON, which should be formatted into readable text (using a code editor, browser extension or https://jsonformatter.org/).
The JSON returned from this URL will contain all of your Jira custom fields, most of which are irrelevant to DefectDojo and have values of "Null". Each object in this API response corresponds to a different field in Jira. You will need to search for the objects that have "name" attributes which match the names of each Custom Field you created in the Jira UI, and then note the value of their “key” attribute.

Once you’ve found the matching object in the JSON output, you can determine the “key” value - in this case, it’s customfield_10050.
Jira generates different key values for each Custom Field, but these key values do not change once created. If you create another Custom Field in the future, it will have a new key value.
Expanding our Custom Field list:
- “DefectDojo Custom URL Field” = customfield_10050
- “Another example of a Custom Field” = customfield_12345
- …
Step 3 - Finding the Custom Fields on a Jira Issue
Locate an Issue in Jira that contains the Custom Fields which you recorded in Step 2. Copy the Issue Key for the title (should look similar to “EXAMPLE-123”) and navigate to the following URL:
https://yourcompany-example.atlassian.net/rest/api/2/issue/EXAMPLE-123
This will return another string of JSON.
As before, API output will contain lots of customfield_## object parameters with null values - these are custom fields that Jira adds by default, which aren’t relevant to this issue. It will also contain customfield_## values that match the Custom Field Key values that you found in the previous step. Unlike with the Field Spec output, you won’t see names identifying any of these custom fields, which is why you needed to record the key values in Step 2.
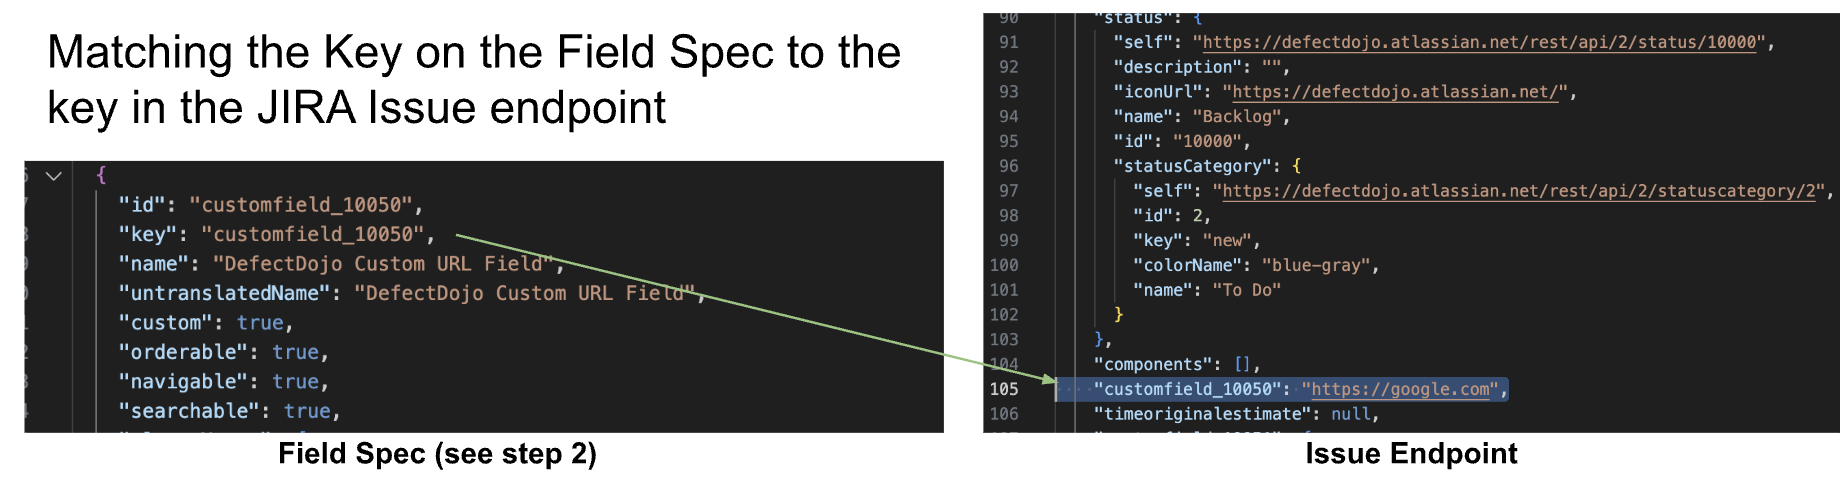
Example:
We know that customfield_10050 represents the DefectDojo Custom URL Field because we recorded it in Step 2. We can now see that customfield_10050 contains a value of "https://google.com" in the EXAMPLE-123 issue.
Step 4 - Creating a JSON Field Reference from each Jira Custom Field Key
You’ll now need to take the value of each of the Custom Fields from your list and store them in a JSON object (to use as a reference). You can ignore any Custom Fields that don’t correspond to your list.
This JSON object will contain all of the default values for new Jira Issues. We recommend using names that are easy for your team to recognize as ‘default’ values that need to be changed: ‘change-me.com’, ‘Change this paragraph.’ etc.
Example:
From step 3, we now know that Jira expects a URL string for “customfield_10050”. We can use this to build our example JSON object.
Say we had also located a DefectDojo-related short text field, which we identified as “customfield_67890”. We would look at this field in our second API output, look at the associated value, and reference the stored value in our example JSON object as well.
Your JSON object will start to look like this as you add more Custom Fields to it.
{
	"customfield_10050": "https://change-me.com",
	"customfield_67890": "This is the short text custom field."
}
Repeat this process until all of the DefectDojo-relevant custom fields from Jira have been added to your JSON Field Reference.
Data types & Jira Syntax
Some fields, such as Date fields, may relate to multiple custom fields in Jira. If that is the case, you’ll need to add both fields to your JSON Field Reference.
  "customfield_10040": "1970-01-01",
  "customfield_10041": "1970-01-01T03:30:00.000+0200",
Other fields, such as the Label field, may be tracked as a list of strings - please make sure your JSON Field Reference uses a format that matches API output from Jira.
// a list of custom labels on a Jira object
  "customfield_10042": [
    "custom-label-one",
    "this-is-default",
    "change-me-please"
  ],
Other custom fields may contain additional, contextual information that should be removed from the Field Reference. For example, the Custom Multichoice Field contains an extra block in the API output, which you’ll need to remove, as this block stores the current value of the field.
- you should remove the extra object from this field:
"customfield_10047": [
    {
      "value": "A"
    },
    {
      "self": "example.url...",
      "value": "C",
      "id": "example ID"
    }
]- instead, you can shorten this to the following and disregard the second part:
"customfield_10047": [
   {
      "value": "A"
   }
]
Example Completed Field Reference
Here is a complete JSON Field Reference, with in-line comments explaining what each custom field pertains to. This is meant as an all-encompassing example. Your JSON will contain different key values and data points depending on the Custom Values you want to use during issue creation.
{
  "customfield_10050": "https://change-me.com",

  "customfield_10049": "This is a short text custom field",

// two different fields, but both correspond to the same custom date attribute
  "customfield_10040": "1970-01-01",
  "customfield_10041": "1970-01-01T03:30:00.000+0200",

// a list of custom labels on a Jira object
  "customfield_10042": [
    "custom-label-one",
    "this-is-default",
    "change-me-please"
  ],

// custom number field
  "customfield_10043": 0,

// custom paragraph field
  "customfield_10044": "This is a very long winded way to say CHANGE ME PLEASE",

// custom radio button field
  "customfield_10045": {
    "value": "radio button option"
  },

// custom multichoice field
  "customfield_10047": [
    {
      "value": "A"
    }
  ],

// custom checkbox field
  "customfield_10039": [
    {
      "value": "A"
    }
  ],

// custom select list (singlechoice) field
  "customfield_10048": {
    "value": "1"
  }
}
Step 5 - Adding the Custom Fields to a DefectDojo Product
You can now add these custom fields to the associated DefectDojo Product, in the Jira Project Settings page (accessible via the ⚙️ Gear menu on the Product). Paste the JSON Field Reference as plain text in the Custom Fields box and save.
Step 6 - Testing your Jira Custom Fields from a new Finding:
Now, when you create a new Finding in the Jira-associated Product, Jira will automatically create all of these Custom Fields in Jira according to the JSON block contained within. These Custom Fields will be created with the default (“change-me-please”, etc.) values.
Within the Product on DefectDojo, navigate to the Findings > Add New Finding page. Make sure the Finding is both Active and Verified to ensure that it pushes to Jira, and then confirm on the Jira side that the Custom Fields are successfully created without any inconsistencies.