

🌐 Universal Parser (Pro)
Note: The Universal Parser is only available in DefectDojo Pro.
The Universal Parser is on for every DefectDojo Pro instance; there is nothing to enable. See our announcement presentation for more information.
About Universal Parser
DefectDojo has a large, regularly updated library of parsers to help security teams ingest data. However, sometimes users have a tool that’s unsupported by the parsers, or they may want to import data into the DefectDojo model differently from the way the parser does.
DefectDojo’s Universal Parser is meant to give our users with unsupported report types a path forward, to import and map any JSON, CSV or XML file.
The Universal Parser is:
- A quick way to support file formats for which we do not have Community parsers, such as reports produced by internal tools
- A tool to help you ingest data, even if a Community parser is out-of-date or doesn’t structure findings the way you would like
- An alternative to custom scripting to transform tool reports into the CSV/JSON format expected by the “Generic Findings Import” scan type
- Designed to be easy to use for anyone, with no coding and minimal configuration required
The Universal Parser is not:
- A comprehensive replacement for open source parsers, Connectors, or carefully-massaged “Generic Findings Import” reports
- Capable of handling nuanced, branching logic to structure findings
The Universal Parser configuration is only available in the Pro UI, though you can still import scans using a Universal Parser via the old UI or API.
Step 1: Creating a new Universal Parser
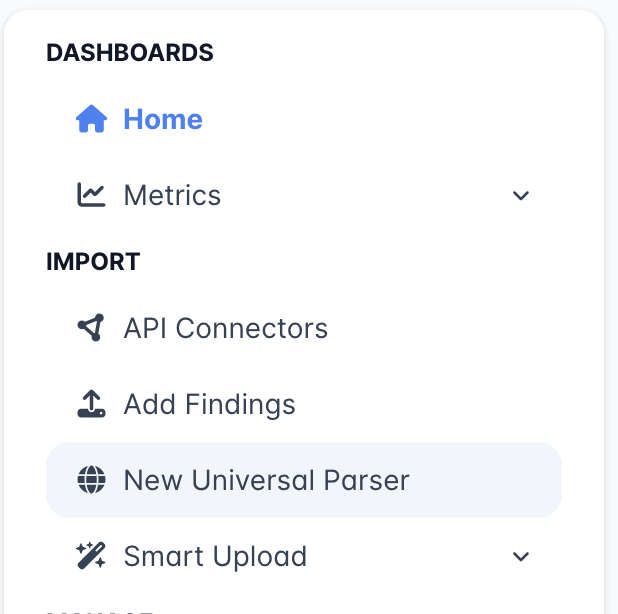
You can create a new Universal Parser by clicking the “New Universal Parser” button in the navigation bar under the “Import” section, or from the link on the “Add Findings” page.
The first screen will ask you for a scan file and a parser name.
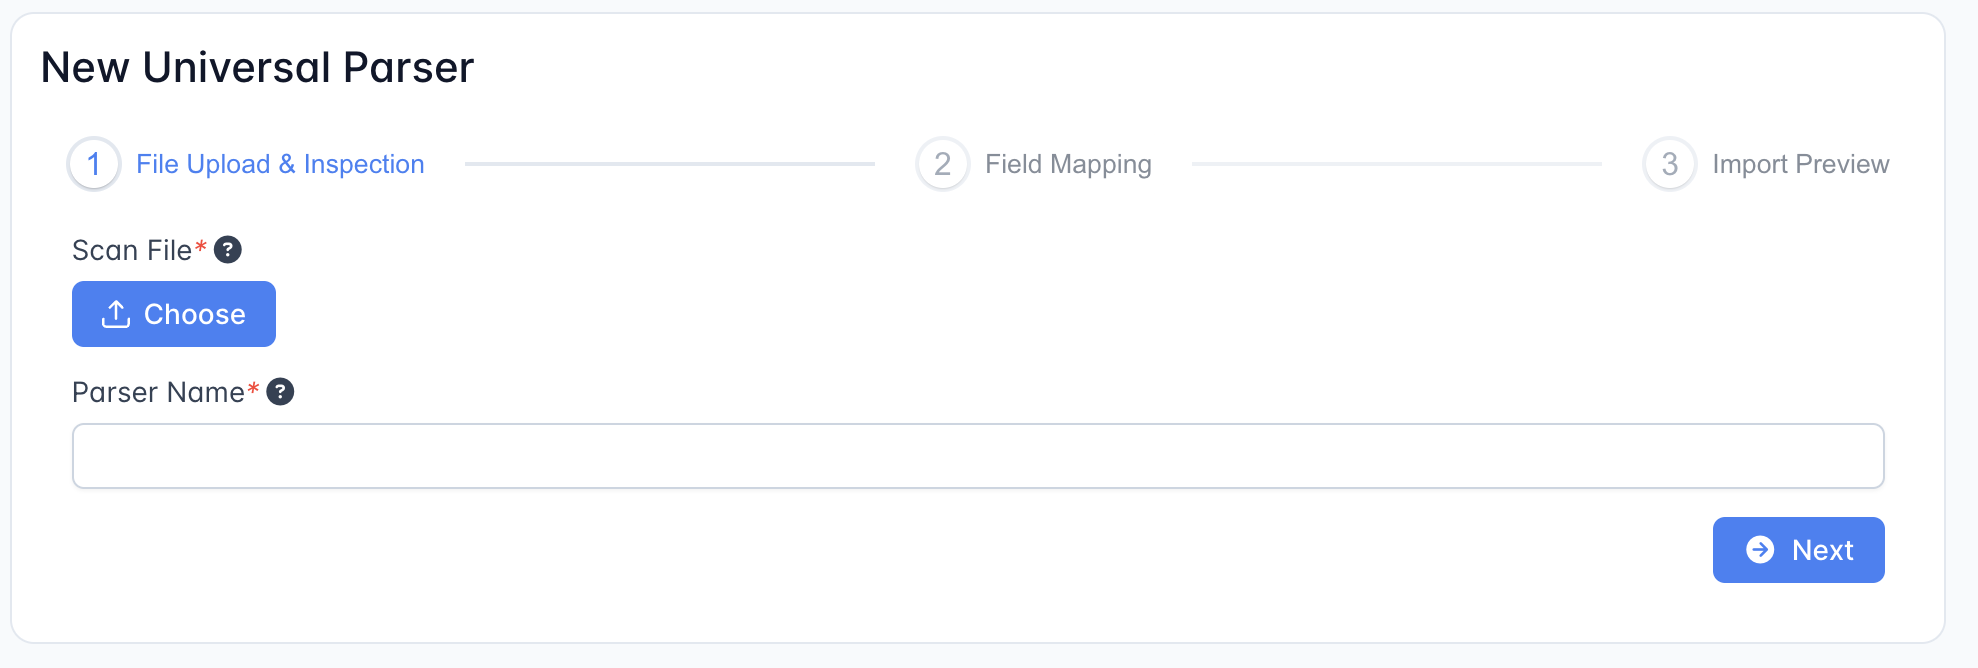
The file should:
- Have a recognized extension (see supported file extensions below)
- Contain enough finding-like objects to be representative of real reports - i.e., one that includes values in all optional fields
- Not be larger than about 1-2MB - beyond this point it will generally just take longer to parse the file, without any benefit
The parser name will be used when creating the Test_Type for this new parser. You’ll find your newly-created Universal Parser in the scan types drop-down on the “Add Findings” page with a name like “Universal Parser - MyCustomParser”. Parser names must be unique to prevent confusion when selecting a scan type for imports.
Step 2: Mapping your Finding fields
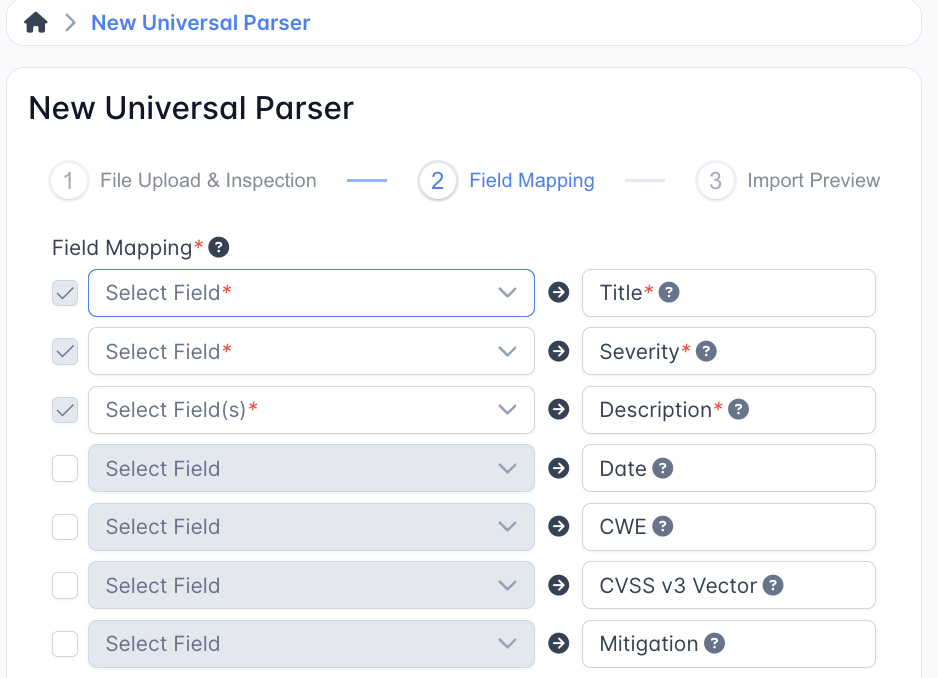
After uploading an example scan file, selecting a parser name, and clicking “Next”, the following page will let you configure the way this Universal Parser will populate finding fields when using this configuration to perform imports. On the right, you will find a selection of DefectDojo finding fields (output fields). Drop-down menus to the left of each output field allow you to select which item(s) (input fields) from your scan file’s structure should be used to populate them.
Example:
If you’ve uploaded a scan file in JSON format that looks like this:
{
    "findings": [
        {
            "title": "Finding 1 Title",
            "description": "Finding 1 Description",
            "severity": "CRITICAL",
            "CVE": "CVE-2025-12345",
            ...
        },
        {
            "title": "Finding 2 Title",
            "description": "Finding 2 Description",
            "severity": "LOW",
            "CVE": "CVE-2025-54321",
            ...
        },
        ...

    ]
}
You’ll see a hierarchical representation of the unique fields we detected based on the structure of the input file, with icons indicating the type of each field (if we can determine this). You can then select the “title” input field in the drop-down menu that populates the “Title” output field, the “description” input field can go with the “Description” output field, and so on.
Input field names don’t have to match the names of output fields, and your scan file may not have an equivalent to all DefectDojo output fields.
Mappable finding fields
The table below lists every DefectDojo finding field (output field) you can map an input field to. Your scan file won’t necessarily have an equivalent for all of them — map only what’s present.
- Required — this output field must have at least one input field mapped before you can save the parser.
- Accepts multiple inputs — this output field can be populated from more than one input field. When you map several, each value is presented under a header named for its input field (see Multi-select fields).
| Output field | Required | Accepts multiple inputs | Description |
|---|---|---|---|
| Title | ✅ | A short description of the flaw. | |
| Severity | ✅ | The severity level of this flaw (Critical, High, Medium, Low, Info). Defaults to “Info” if unknown. | |
| Description | ✅ | ✅ | Longer, more descriptive information about the flaw. |
| Date | The date the flaw was discovered. | ||
| CWE | The CWE number associated with this flaw. | ||
| CVSS v3 Vector | Common Vulnerability Scoring System version 3 (CVSSv3) vector associated with this flaw. | ||
| CVSS v4 Vector | Common Vulnerability Scoring System version 4 (CVSSv4) vector associated with this flaw. | ||
| Mitigation | ✅ | Text describing how to best fix the flaw. | |
| Impact | ✅ | Text describing the impact this flaw has on systems, Assets, enterprise, etc. | |
| References | ✅ | The external documentation available for this flaw. | |
| Severity Justification | ✅ | Text describing why a certain severity was associated with this flaw. | |
| Steps to Reproduce | ✅ | Text describing the steps that must be followed in order to reproduce the flaw / bug. | |
| Component Name | Name of the affected component (library name, part of a system, …). | ||
| Component Version | Version of the affected component. | ||
| File Path | Identified file(s) containing the flaw. | ||
| Line Number | Source line number of the attack vector. | ||
| Active | Denotes if this flaw is active or not. Defaults to true. | ||
| Verified | Denotes if this flaw has been manually verified by the tester. Defaults to false. | ||
| False Positive | Denotes if this flaw has been deemed a false positive by the tester. Defaults to false. | ||
| Duplicate | Denotes if this flaw is a duplicate of other flaws reported. Defaults to false. | ||
| EPSS Score | EPSS score for the CVE — how likely it is the vulnerability will be exploited in the next 30 days. Value must be between 0.0 and 1.0. | ||
| EPSS Percentile | EPSS percentile for the CVE — how many CVEs are scored at or below this one. Value must be between 0.0 and 1.0. | ||
| Unique ID From Tool | Vulnerability technical ID from the source tool. Allows tracking of unique vulnerabilities. | ||
| Vuln ID from Tool | Non-unique technical ID from the source tool associated with the vulnerability type. | ||
| Tags | String tags that help describe this finding. | ||
| Endpoints | The hosts/URLs within the Asset that are susceptible to this flaw. | ||
| Vulnerability IDs | One or more vulnerability advisory identifiers associated with this finding (most commonly, CVEs). | ||
| Reachability | The tool’s verdict on whether the vulnerable code can be reached. Accepted values: reachable_runtime, reachable_static, potentially_reachable, unreachable. Unrecognized values are ignored. | ||
| Asset exposure | The tool’s verdict on whether the asset this flaw lives on can be reached from outside. Accepted values: exposed_public, exposed_limited, reachable_private. Unrecognized values are ignored. See Asset exposure. |
Note: In the example above, a
CVEinput field would be mapped to the Vulnerability IDs output field — DefectDojo does not have a finding field literally named “CVE”.
Note: Asset exposure is the one output field that describes something other than the finding. It records what your scan says about the asset the finding lives on, so every row mapping it is asserting the same thing about the same asset. That is expected, and repeated rows cost nothing: they resolve to a single verdict for that asset and tool.
Required fields
The following output fields require an input field mapping:
- Title
- Severity
- Description
About severities
A Universal Parser will accept any case variation of the DefectDojo severities - “CRITICAL”, “Critical”, “cRiTiCaL”, etc. - and apply it to your findings. Any value that doesn’t match a DefectDojo severity will be replaced with “Info”. This mirrors how parsers and Connectors work today: unknown values are generally mapped to “Info”.
Multi-select fields
Some output fields will accept multiple input fields. If you decide to select more than one input field, we will provide that field’s value under a header with that input field’s name.
Example
description
This was pulled from a field called “description” in the input file
detailed_description
This was pulled from a field called “detailed_description” in the input file
Step 3: Previewing your Findings
Once you’ve selected your mappings from input fields to output fields, you can click the “Next” button to see a preview of what the Findings from your input file will look like once they are imported to DefectDojo with your chosen configuration. Some fields will have an “expand” button next to them to allow you to see the full, rendered MarkDown of what that field will look like. We will only render previews of the first 25 Findings from your input file, but you can also see how many findings were detected in the whole scan file.
If the previews don’t look like you expected, you can hit the “Back” button to tweak the mappings. Once you are satisfied with your configuration, click the “Submit” button to create your new Universal Parser. This will not perform an import automatically.
Once your Universal Parser is created, you’ll be redirected to the “Add Findings” page where you can upload and import a scan file matching the structure of the example file you provided in Step 1.
Additional notes about Universal Parser configuration
Choosing the right input fields
Each vendor may produce very different scan report formats, some of which will map more closely to DefectDojo’s finding model than others. We allow for significant flexibility in what we will accept, but we must impose some structure to ensure that findings don’t get garbled in the translation from input to output. While we can accommodate optional input fields, we don’t accept “global” fields, or fields that occur a different number of times than the number of finding objects.
Example
{
    "scan_type": "MyToolScan", // <- There is only one instance of this field, which doesn't match the number of findings
    "findings": [
        {
            "title": "Finding 1 Title",
            "description": "Finding 1 Description",
            "severity": "CRITICAL",
            "CVE": "CVE-2025-12345", // <- This optional field only appears in Finding 1 - that's okay!
            ...
        },
        {
            "title": "Finding 2 Title",
            "description": "Finding 2 Description",
            "severity": "CRITICAL",
            ...  // <- While there is no "CVE" field here, we can still query for it and simply default to a null value
        },
        ... 5 more findings ...
    ],
    "global_details": [
        {
            "nested_detail": "Global detail 1"
        },
        {
            "nested_detail": "Global detail 2" // <- The number of "global_details" objects (2) does not match the number of individual finding objects (7)
        }

    ]
}
After saving a Universal Parser
You can edit the Test_Type associated with your Universal Parser to change:
- Whether it is “active” or not. If not, it will not appear as an option in the “Scan Type” drop-down on the “Add Findings” page
- Whether its findings should be marked “static” or “dynamic”
- You can tweak the same-tool and cross-tool deduplication hash codes, as well as the reimport hash codes, for your Universal Parser under “Enterprise Settings”. By default, only same-tool deduplication and reimport hash codes are populated, with the required values Title, Severity, and Description.
Lifecycle: create, edit, deactivate, reactivate
What you can do from the UI:
- Deactivate a parser to hide it from the “Scan Type” drop-down on import. Open Import → Universal Parser in the sidebar to see all of your Universal Parsers, and toggle “Active” off. (Alternatively, you can edit the underlying Test_Type and uncheck “active”.) Deactivated parsers no longer appear as a Scan Type option on the Add Findings page, but existing Tests that were imported with this parser are unaffected and continue to work.
- Reactivate a parser from the same screen by toggling “Active” back on.
- Edit the field mappings from the same screen — see Editing a Universal Parser’s field mappings below.
- Edit the Test_Type fields described in the section above (active/inactive, static/dynamic, deduplication hash codes).
Deleting a parser configuration is still not possible, because Universal Parser configurations are tied to Test_Type records that existing Findings, Tests and import history reference. If you need one permanently removed (for example, because it contains sensitive field names), contact .
Editing a Universal Parser’s field mappings
Field mappings can be changed after a parser has been created, from the UI or through the API. Each edit is recorded as a numbered revision, so you can see what changed, when, and who changed it.
Editing mappings requires the Universal Parser Edit permission. Viewing a parser only requires Universal Parser View, so a user who can see your parsers cannot necessarily change how they read a file.
Some mapping edits are riskier than others, and DefectDojo classifies each edit before applying it:
- A presentation-only edit changes a field that does not take part in matching —
references,mitigation,impactand similar. It applies immediately with no further consequences. - An identity-relevant edit changes a field that your deduplication configuration hashes. By default that is Title, Severity and Description, so remapping any of those falls in this category, as does mapping a vendor’s own identifier into
unique_id_from_tool. These edits change what a finding’s identity is built from, which is why the configuration used to be frozen.
Which fields count as identity-relevant depends on your own deduplication settings for that scan type, not on a fixed list, so it follows any change you make under Enterprise Settings.
Editing from the UI
Open Import → Universal Parser in the sidebar, then choose Edit Field Mappings from the menu on the parser’s row.
The first step asks you to upload a scan file. This is not the file the parser was created with — nothing is kept from that one. It is a current sample of the kind of report this parser reads, and it is what the available fields are read from, so the mapping choices have something to point at.
Your saved mappings are pre-selected against that sample, and the screen tells you if any of them could not be found in it. That normally means the file you uploaded has a different shape from the one the parser was built for. Mappings that could not be found are not pre-selected and will be dropped if you save, so either upload a closer sample or re-select them by hand.
The second step is the same field-mapping screen used when creating a parser. The third shows you what your change would do before it is applied:
- whether the edit is presentation-only or identity-relevant;
- which fields are changing, split into those that reach identity and those that do not;
- how many findings currently exist under this parser’s scan type.
If the edit is identity-relevant you have to tick a box confirming you understand it opens a transition window. A presentation-only edit does not ask, so the confirmation stays meaningful.
Checking an edit before you make it
The UI does this for you in its third step. Through the API, POST your proposed mappings to the impact endpoint to see how they will be classified, without applying anything:
POST /api/vue/universal_parser/{id}/impact/
{"mappings": [ ... ]}
The response tells you whether the edit is identity-relevant, which fields moved, which of those reach identity, and how many findings currently exist under this parser’s scan type.
Making the edit
PATCH /api/vue/universal_parser/{id}/
{"mappings": [ ... ], "acknowledge_identity_change": true}
acknowledge_identity_change is required only for an identity-relevant edit, and the request is rejected without it. A presentation-only edit does not need it.
What happens to findings you have already imported
An identity-relevant edit opens a transition window. During the window, an import re-derives its findings under the previous mappings as well as the current ones, and carries both identities. Findings imported before the edit are matched on the identity they were stored with, so a reimport updates them instead of closing them and creating duplicates.
Two limits are worth knowing:
- Only the immediately previous identity generation is bridged. If you make two identity-relevant edits without importing in between, findings imported before the first edit will not be matched.
- The bridge pairs findings by position in the report. If your edit changes how many findings the report yields — for example by repointing the query at a different array — the pairing cannot be established and the bridge declines rather than risk attaching one finding’s history to another. In that case, roll forward to a new parser instead.
Viewing the history
GET /api/vue/universal_parser/{id}/revisions/Each revision records the full mapping set in force at that point, which fields the edit changed, whether it was identity-relevant, and who made it.
Changing mappings through the Django admin
Editing a FieldMapping directly in the Django admin bypasses all of the above: no revision is recorded, no version is bumped, and no transition window opens, so findings imported before that change become unreachable from findings imported after it. Use the UI or the API instead.
If it has already happened, the impact step says so: it reports that this parser’s mappings were changed once without being recorded, and warns that findings imported before that change have no previous generation to be matched from — which a later edit cannot recover.
Rolling forward to a new parser
Editing is not always the right answer. If your scanner’s report format changes so substantially that the new report yields a different set of findings, prefer creating a second parser:
- Create a new Universal Parser using a sample of the new report format (see Step 1). Give it a distinct name — e.g. append
v2or a date to the original name. - Switch new imports in your CI/CD pipeline or UI workflow to use the new parser’s scan type.
- Deactivate the old parser once you’ve confirmed the new one is producing the findings you expect. Tests already imported under the old parser remain in DefectDojo and can still be triaged; only new imports route to the new parser.
A note about severity mapping
The Universal Parser does not have a configurable severity-mapping field. Severity is mapped automatically with these rules:
- Any case variation of a DefectDojo severity is accepted —
CRITICAL,Critical,cRiTiCaL,criticalall map to Critical. The same applies toHigh,Medium,Low, andInfo. - Any value that does not match one of DefectDojo’s five severities is mapped to Info.
This behavior is the same for all parsers in DefectDojo (built-in parsers, Connectors, and Universal Parsers).
If a scanner you’re trying to ingest uses severity labels that don’t line up with DefectDojo’s (e.g. “warning”, “note”, or numeric CVSS scores), the Universal Parser will map all of those non-matching values to Info. If you need a different mapping, the best workaround today is to transform the severity values upstream — for example, in your CI pipeline before uploading — so the values DefectDojo receives are already one of the five DefectDojo severity names.