Import Scan form (Open Source)
Once you have your Product Hierarchy set up with at least one Product Type, Product, Test and Engagement, you can import a scan file to DefectDojo and create Findings.
It’s easy to reorganize your Product Hierarchy in DefectDojo, so it’s ok if you’re not sure how to set things up yet.
For now, it’s good to know that Engagements can store data from multiple tools, which can be useful if you’re running different tools concurrently as part of a single testing effort.
Accessing the Import Scan Form (Classic UI / Open Source)
In DefectDojo OS, you can access this form from two locations:
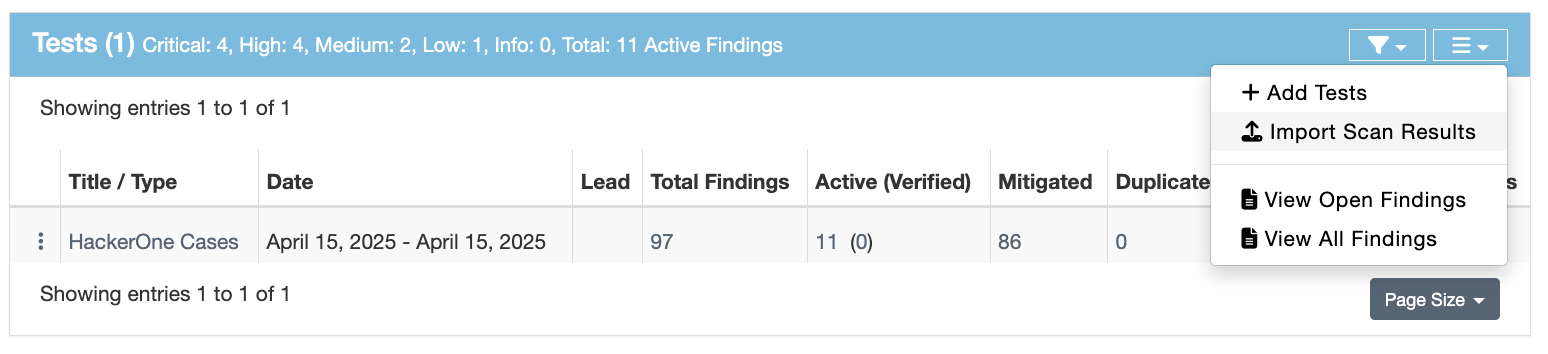
- The Tests section of an Engagement:
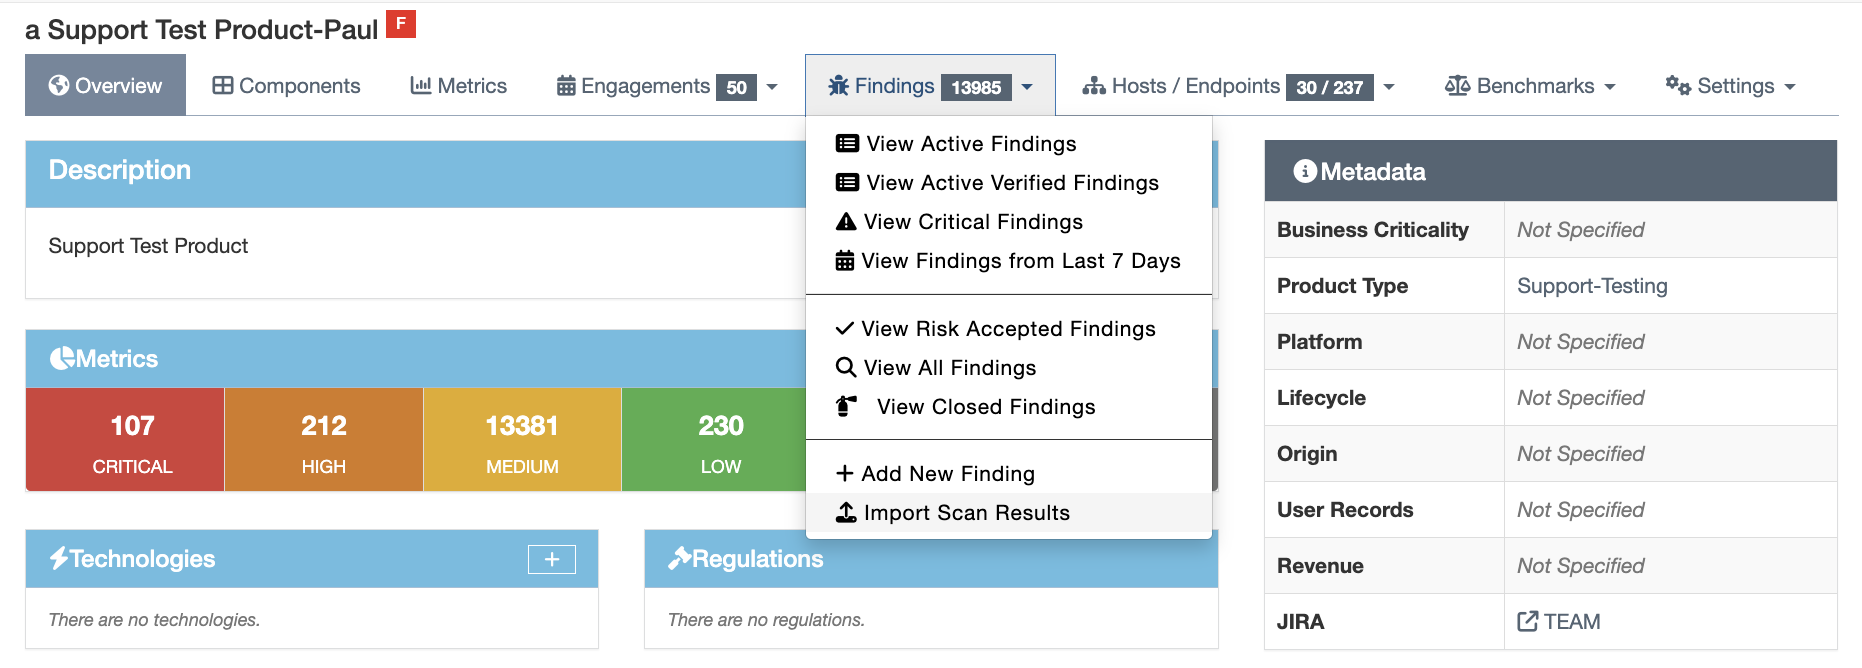
- The Findings section of the navigation bar on a Product:
Completing the Import Scan Form
 The Import Scan form will create a new Test nested under an Engagement, which will contain a unique Finding for each vulnerability contained within your scan file.
The Test will be created with a name that matches the Scan Type: e.g. a Tenable scan will be titled ‘Tenable Scan’.
Form Options
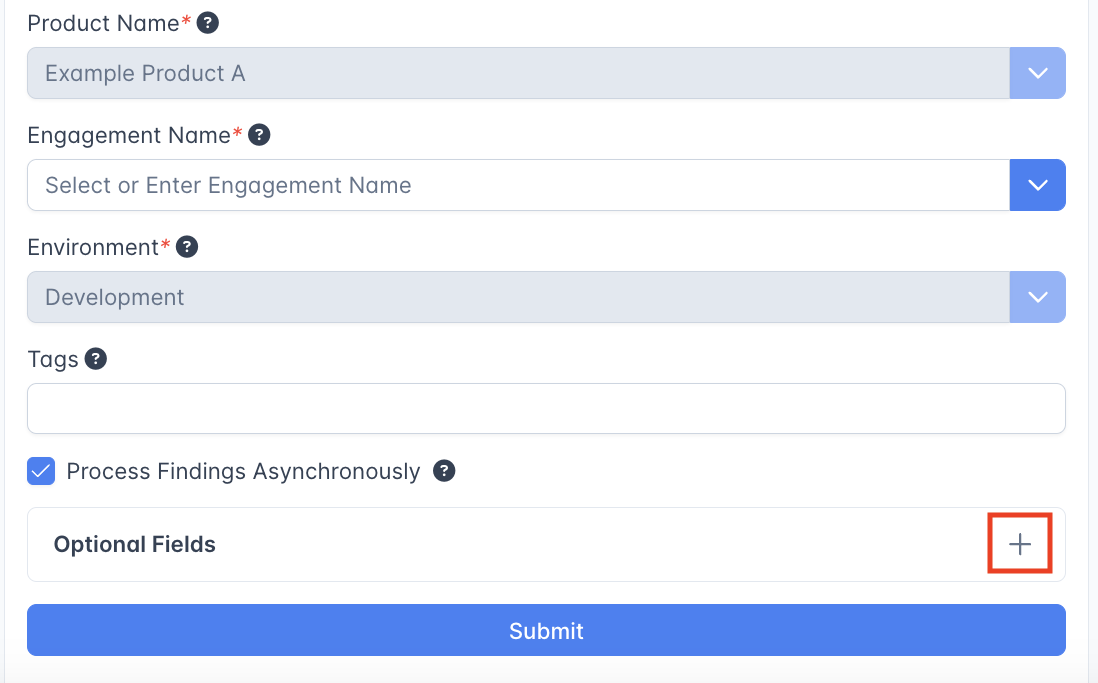
- Scan File: by clicking on the Choose button, you can select a file from your computer to upload.
- Scan Date (optional): if you want to select a single Scan Date to be applied to all Findings that result from this import, you can select the date in this field.
If you do not select a Scan Date, Findings created from this report will use the date specified by the tool. SLAs for each Finding will be calculated based on their date. - Scan Type: select the tool used to create this data.
- Environment: select an Environment that corresponds to the data you’re uploading.
- Tags: if you want to use tags to further organize your Test data, you can add Tags using this form. Type in the name of the tag you want to create, and press Enter on your keyboard to add it to the list of tags.
Optional Fields
- Minimum Severity: If you only want to create Findings for a particular Severity level and above, you can select the minimum Severity level here. All vulnerabilities with lower severity than this field will be ignored.
- Active: if you want to set all of the incoming Findings to either Active or Inactive, you can specify that here. Otherwise, DefectDojo will use the tool’s vulnerability data to determine whether the Finding is Active or Inactive. This option is relevant if you need your team to manually triage and verify Findings from a particular tool.
- Verified: as with Active you can set the new set of Findings to either Verified or Unverified by default. This depends on your workflow preferences. For example, if your team prefers to assume Findings are verified unless proven otherwise, you can set this field to True.
- Version, Branch Tag, Commit Hash, Build ID, Service can all be specified if you want to include these details in the Test.
- Source Code Management URI can also be specified. This form option must be a valid URI.
- Group By: if you want to create Finding Groups out of this File, you can specify the grouping method here.
Triage-less scanners: Do Not Reactivate field
Some scanners might not include triage information in their reports (e.g. tfsec). They simply scan code or dependencies, flag issues, and return everything, regardless of whether a vulnerability has already been triaged or not.
To handle this case, DefectDojo also includes a “Do not reactivate” checkbox in uploading reports (also in the reimport API), so you can use DefectDojo as the source of truth for triage, instead of reactivating your triaged Findings on each import / reimport.
Using the Scan Completion Date (API: scan_date) field
DefectDojo offers a plethora of supported scanner reports, but not all of them contain the
information most important to a user. The scan_date field is a flexible smart feature that
allows users to set the completion date of the a given scan report, and have it propagate
down to all the findings imported. This field is not mandatory, but the default value for
this field is the date of import (whenever the request is processed and a successful response is returned).
Here are the following use cases for using this field:
- The report does not set the date, and
scan_dateis not set at import- Finding date will be the default value of
scan_date
- Finding date will be the default value of
- The report sets the date, and the
scan_dateis not set at import- Finding date will be whatever the report sets
- The report does not set the date, and the
scan_dateis set at import- Finding date will be whatever the user set for
scan_date
- Finding date will be whatever the user set for
- The report sets the date, and the
scan_dateis set at import- Finding date will be whatever the user set for
scan_date
- Finding date will be whatever the user set for