Title here
Summary here
Connecting a Jira Instance is the first step to take when setting up DefectDojo’s Jira integration.
You will need:
Optionally, you can map:
Multiple Jira Projects can be handled by a single Jira Instance connection, as long as the Jira account / token used by DefectDojo has permission to create Issues in the associated Jira Project.
Connecting a Jira instance does not cause any Findings to push right away - this is simply the first step. Once the Jira Instance connection is created, it must be associated with a Product or an Engagement before any information will push to Jira.
If you already have a Jira Instance connection set up, you can use this guide for help with adding this integration to a Product.
If you have not already done so, navigate to the System Settings page and check the box on Enable Jira Integration.
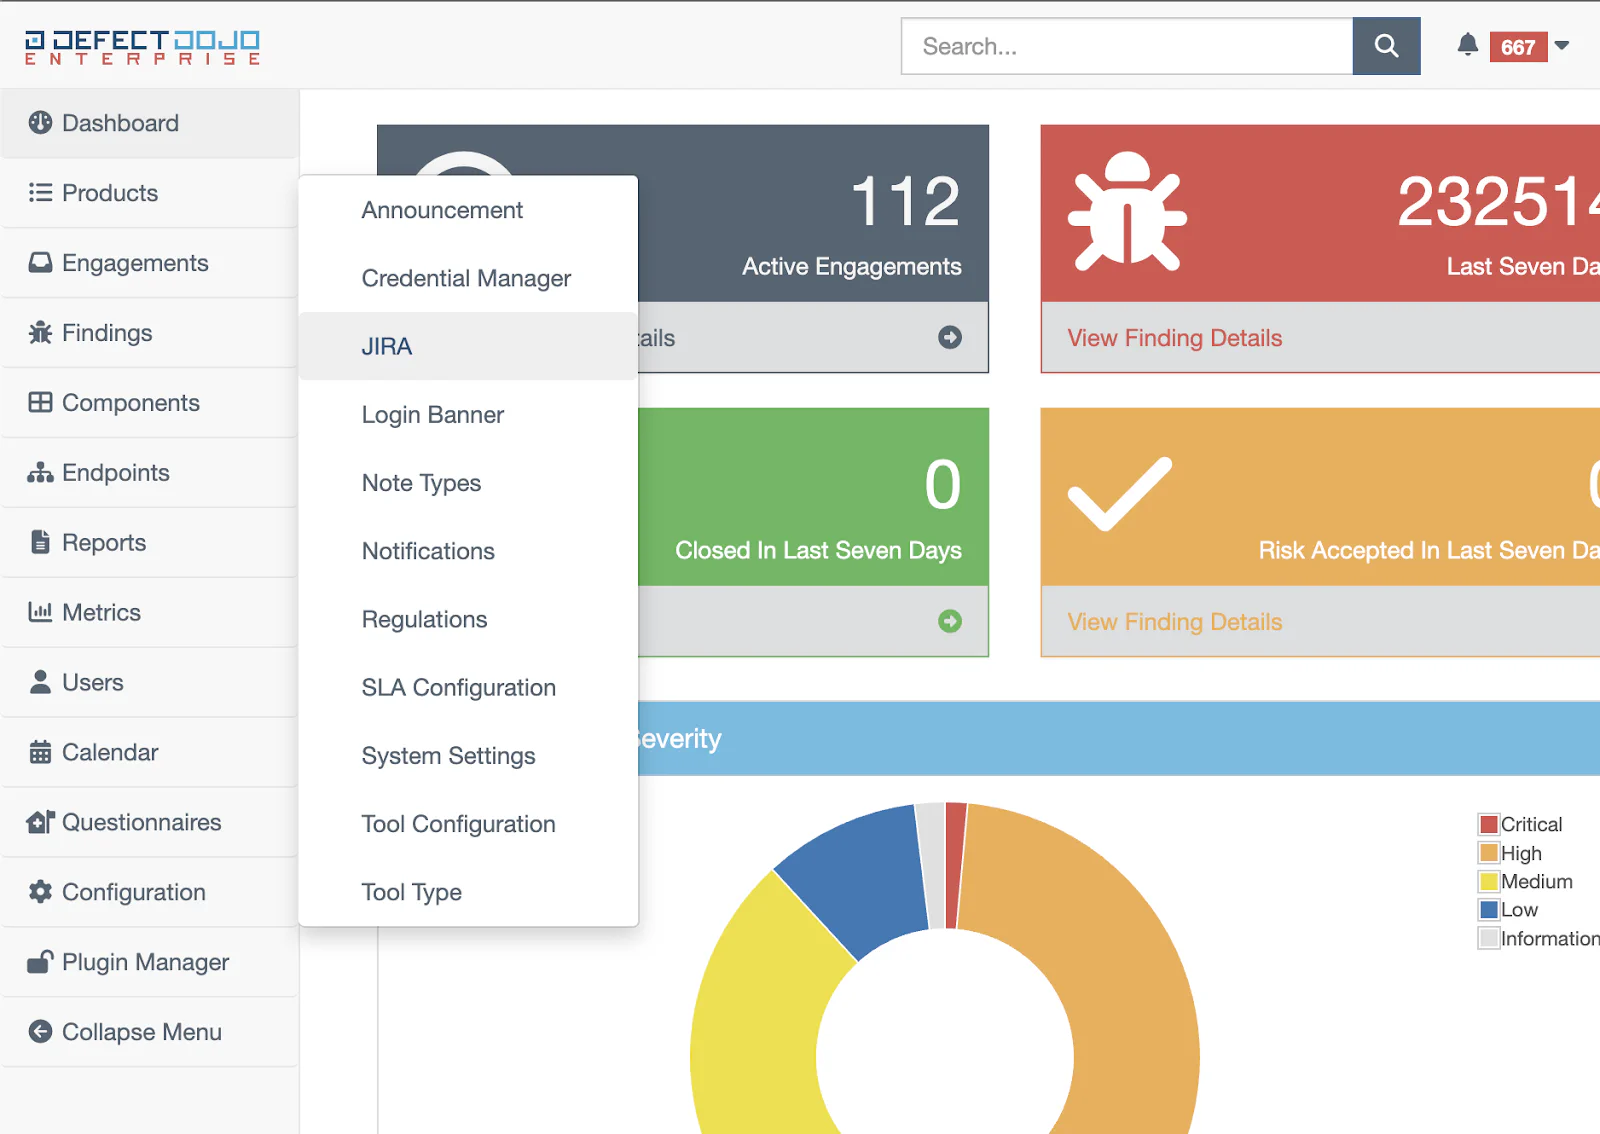
Navigate to the Enterprise Settings > Jira Instances > + New Jira Instance page from the DefectDojo sidebar.

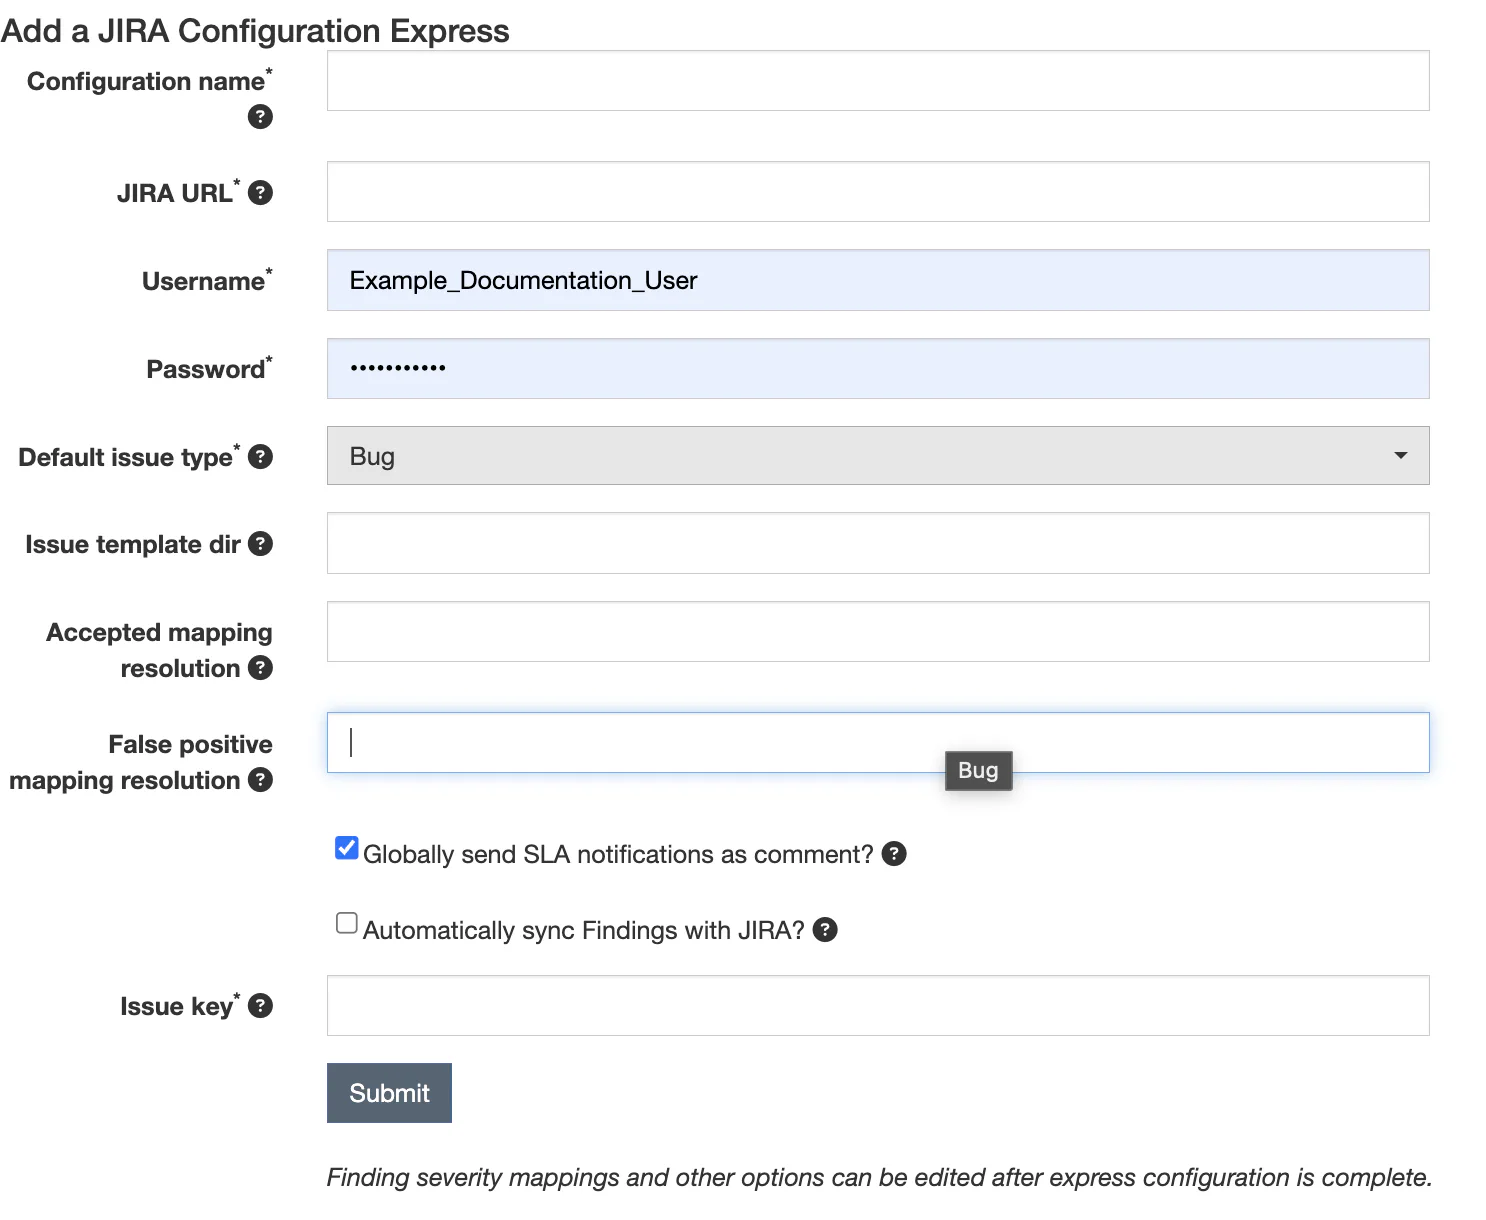
Select a Configuration Name for this Jira Instance to use in DefectDojo. This name is simply a label for the Instance connection in DefectDojo, and does not need to be related to any Jira data.
Select the URL for your company’s Jira instance - likely similar to https://yourcompany.atlassian.net if you’re using a Jira Cloud installation.
Enter an appropriate authetication method in the Username / Password fields for Jira:
Note that the user associated with this connection have permission to create Issues and access data in your Jira instance.
https://\<YOUR JIRA URL\>/rest/api/2/field and search for Epic Name. Copy the number out of cf[number] and paste it here.https://\<YOUR JIRA URL\>/rest/api/latest/issue/\<ANY VALID ISSUE KEY\>/transitions? expand\-transitions.fields to find the ID for your Jira instance. Paste it in the Reopen Transition ID field.https://\<YOUR JIRA URL\>/rest/api/latest/issue/\<ANY VALID ISSUE KEY\>/transitions? expand\-transitions.fields to find the ID for your Jira instance. Paste it in the Close Transition ID field.Select the Default issue type which you want to create Issues as in Jira. The options for this are Bug, Task, Story and Epic (which are standard Jira issue types) as well as Spike and Security, which are custom issue types. If you have a different Issue Type which you want to use, please contact for assistance.
Select your Issue Template, which will determine the Issue Description when Issues are created in Jira.
The two types are: - Jira_full, which will include all Finding information in Jira Issues - Jira_limited, which will include a smaller amount of Finding information and metadata. If you leave this field blank, it will default to Jira_full. If you need a different kind of template, Pro users can reach out to support@defectdojo.com
The form can be submitted from here. If you wish, you can further customize your Jira integration under Optional Fields. Clicking this button will allow you to apply generic text to Jira Issues or change the mapping of Jira Severity Mappings.
The Express method allows for a quicker method of linking a Project. Use the Express method if you simply want to connect a Jira Project quickly, and you aren’t dealing with a complex Jira workflow.
The two types are:
- Jira_full, which will include all Finding information in Jira Issues
- Jira_limited, which will include a smaller amount of Finding information and metadata.
If you leave this field blank, it will default to Jira_full.
6. Select one or more Jira Resolution types which will change the status of a Finding to Accepted (when the Resolution is triggered on the Issue). If you don’t wish to use this automation, you can leave the field blank.
7. Select one or more Jira Resolution types which will change the status of a Finding to False Positive (when the Resolution is triggered on the Issue). If you don’t wish to use this automation, you can leave the field blank.
8. Decide whether you wish to send SLA Notifications as a comment on a Jira issue.
9. Decide whether you wish to automatically sync Findings with Jira. If this is enabled, Jira Issues will automatically be kept in sync with the related Findings. If this is not enabled, you will need to manually push any changes made to a Finding after the Issue has been created in Jira.
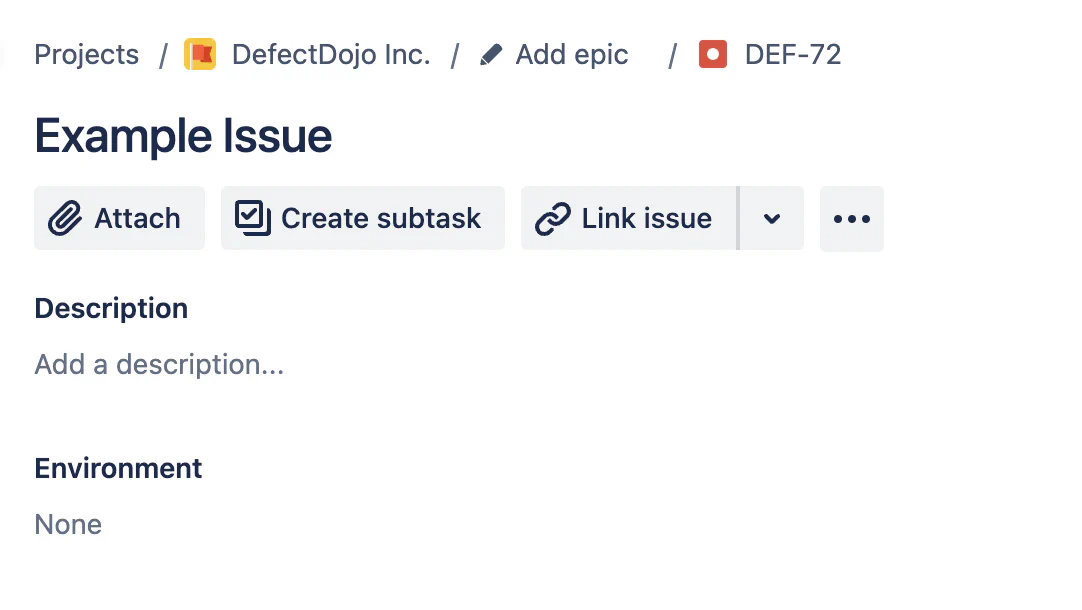
10. Select your Issue key. In Jira, this is the string associated with an Issue (e.g. the word ‘EXAMPLE’ in an issue called EXAMPLE-123). If you don’t know your issue key, create a new Issue in the Jira Project. In the screenshot below, we can see that the issue key on our Jira Project is DEF.
11. Click Submit. DefectDojo will automatically look for appropriate mappings in Jira and add them to the configuration. You are now ready to link this configuration to one or more Products in DefectDojo.
11. Click Submit. DefectDojo will automatically look for appropriate mappings in Jira and add them to the configuration. You are now ready to link this configuration to one or more Products in DefectDojo.
The Standard Jira Configuration adds a few additional steps to allow for more precise control over Jira mappings and interactions. This can be changed after a Jira configuration has been added, even if it was created using the Express method.
Epic Name ID: If you have multiple Epic types in Jira, you can specify the one you want to use by finding its ID in the Jira Field Spec.
To obtain the ‘Epic name id’ visit https://\<YOUR JIRA URL\>/rest/api/2/field and search for Epic Name. Copy the number out of cf[number] and paste it here.
Reopen Transition ID: If you want a specific Jira Transition to Reopen an issue, you can specify the Transition ID here. If using the Express Jira Configuration, DefectDojo will automatically find an appropriate Transition and create the mapping.
Visit https://\<YOUR JIRA URL\>/rest/api/latest/issue/\<ANY VALID ISSUE KEY\>/transitions? expand\-transitions.fields to find the ID for your Jira instance. Paste it in the Reopen Transition ID field.
Close Transition ID: If you want a specific Jira Transition to Close an issue, you can specify the Transition ID here. If using the Express Jira Configuration, DefectDojo will automatically find an appropriate Transition and create the mapping.
Visit https://\<YOUR JIRA URL\>/rest/api/latest/issue/\<ANY VALID ISSUE KEY\>/transitions? expand\-transitions.fields to find the ID for your Jira instance. Paste it in the Close Transition ID field.
Mapping Severity Fields: Each Jira Issue has an associated Priority, which DefectDojo will automatically assign based on the Severity of a Finding. Enter the names of each Priority which you want to map to, for Info, Low, Medium, High and Critical Severities.
Finding Text - if you want to add additional standardized text to each Issue created, you can enter that text here. This is not text that maps to any field in Jira, but additional text that is added to the Issue Description. “Created by DefectDojo” for example.
Comments (in Jira) and Notes (in DefectDojo) can be kept in sync. This setting can be enabled once the Jira configuration has been added to a Product, via the Edit Product form.
The Jira integration allows for bidirectional sync via webhook. DefectDojo receives Jira notifications at a unique address, which can allow for Jira comments to be received on Findings, or for Findings to be resolved via Jira depending on your configuration.
Your Jira Webhook is located on the System Settings form under Jira Integration Settings: Enterprise Settings > System Settings from the sidebar.
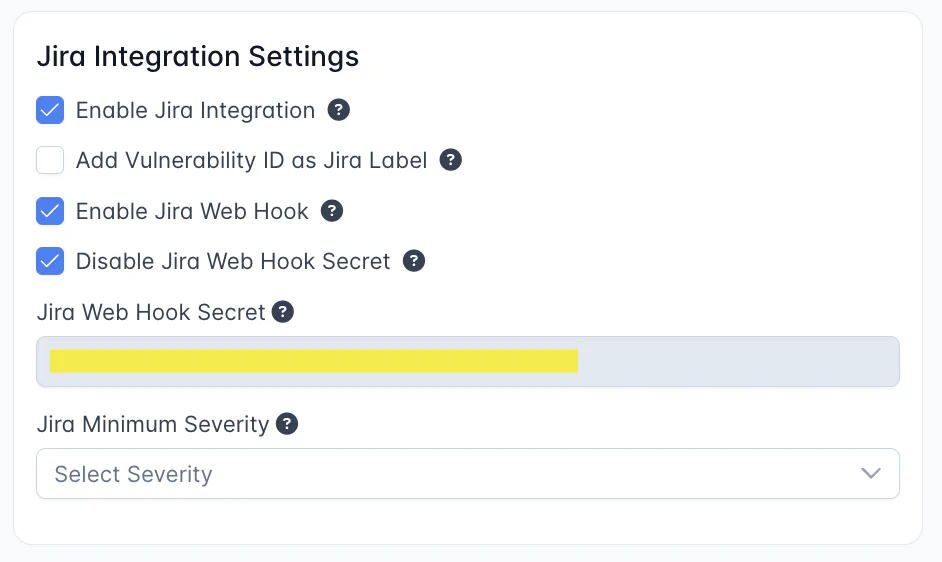
**https:// \<YOUR JIRA URL\> /plugins/servlet/webhooks**https:// \<**YOUR DOJO DOMAIN**\> /jira/webhook/ \<**YOUR GENERATED WEBHOOK SECRET**\>. The Web Hook Secret is listed under the Jira Integration Settings as listed above.Note that you do not need to create a Secret within Jira to use this webhook. The Secret is built into DefectDojo’s URL, so simply adding the complete URL to the Jira Webhook form is sufficient.
DefectDojo’s Jira Webhook only accepts requests from the Jira API.
Once you have one or more Issues created from DefectDojo Findings, you can test the Webhook by adding a Comment to one of those Findings. The Comment should be received by the Jira webhook as a note.
If this doesn’t work correctly, it could be due to a Firewall issue on your Jira instance blocking the Webhook.
Jira integrations can be removed from your instance only if no related Issues have been created. If Issues have been created, there is no way to completely remove a Jira Instance from DefectDojo.
However, you can disable your Jira integration by disabling it at the Product level. From the Edit Product form (Classic UI) or from the Jira Product Settings (Beta UI) you can uncheck the “Enable Connection With Jira Project” option. This will not delete or change any existing Jira tickets created by DefectDojo, but will disable any further updates.
See our guide on Adding Jira To a Product for more information on Product-level settings.