

Managing Records
Note: Upstream Connectors are a DefectDojo Pro-only feature.
Once you have run your first Discover operation, you should see a list of Mapped or Unmapped records on the Manage Records and Operations page.
Each configured Connector’s tile on the Upstream Connectors page shows how many of its records still need to be mapped. If any records need attention, the count is highlighted and a Manage Records & Operations button appears directly on the tile. The page is always reachable from the tile’s Manage Configuration > Manage Records & Operations menu as well.
What’s a Record?
A Record is a connection between a DefectDojo Asset and a Vendor-Equivalent-Product. You can use your Records list to control the flow of data between your tool and DefectDojo.
Records are created and updated during the Discover operation, which DefectDojo runs daily to look for new Vendor-Equivalent Products.
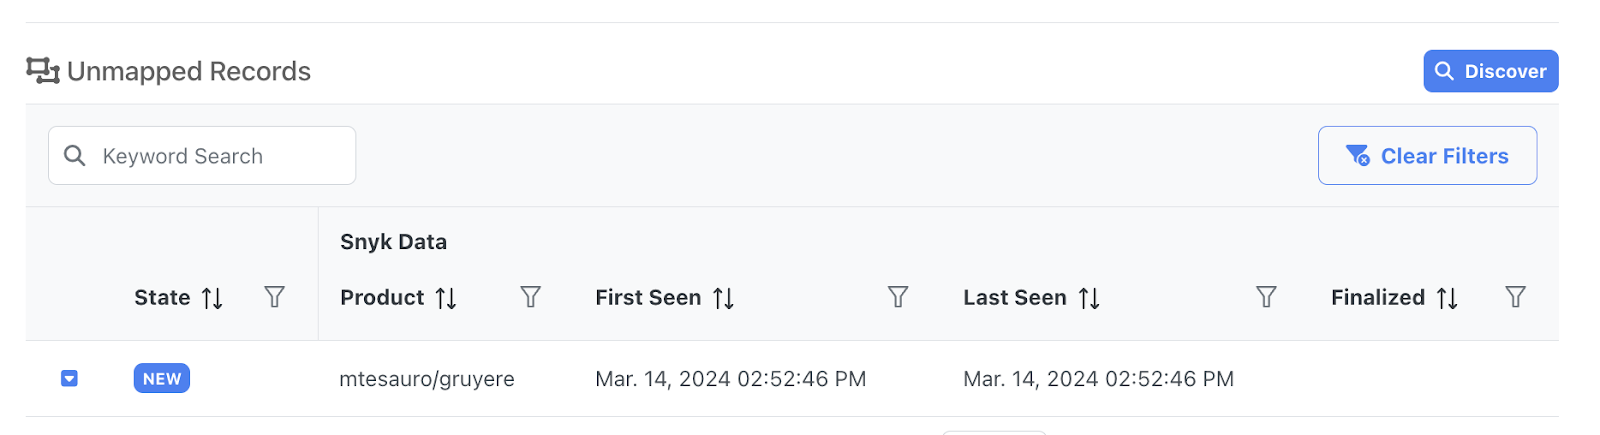
Records have various attributes, including:
- The State of the Record
- The Asset the Record imports data to
- When the Record was First and Last Discovered (by the Discover process)
- When the Record mapping was Finalized by a user
- A link to the DefectDojo Asset
How Records are Mapped
Each Record needs to have a Mapping assigned. The Mapping tells DefectDojo where to store the scan data from the tool. A Mapped Record assigns the Vendor-Equivalent Product to a DefectDojo Asset, and tells the Connector to start importing scan data to that location (as Engagements and Tests).
You can assign Mappings yourself, or you can have DefectDojo assign them automatically.
Auto-Mapping
If you have Auto-Mapping enabled, new Records will be Mapped to Assets automatically. Each time DefectDojo Discovers a new Record, a matching DefectDojo Asset will be automatically created for each Record**.** That Record will be stored under Mapped Records to indicate that it is ready to import data to DefectDojo.
If you don’t have Auto-Mapping enabled, you can make your own decisions about where you want data to flow. Each time the Connector finds a new Vendor-Equivalent Product (via Discover), it will add a new Record to your Unmapped Records list, and you can then manually assign that Record to a new or existing Asset in DefectDojo.
How Auto-Mapping chooses the Asset
Auto-Mapping resolves each Record in a fixed order, and stops at the first answer:
- The tool’s own identifier. Every Record stores the identifier the tool uses for the Vendor-Equivalent Product. Once a Connector has mapped that identifier once, it recognises it on every later Discover — so renaming the project in the tool, or in DefectDojo, no longer loses the Mapping or creates a duplicate Asset.
- The name. If the Connector has not seen the identifier before, it looks for an Asset whose name matches. When one is found, the Record is mapped to it and the identifier is recorded, so step 1 answers from then on.
- A new Asset. If neither matches, DefectDojo creates one.
Step 1 requires the identity feature to be enabled (DD_V3_ASSET_ALIASES); until then,
Auto-Mapping resolves by name alone, which is the historical behaviour. Enabling it changes
nothing about existing Mappings: the first Discover after it is turned on records identifiers
for the Records you already have, and later runs use them.
Because names are matched globally, two tools that each report something called payments map
to the same Asset on first sight. Recording each tool’s identifier separately is what stops
that coincidence from becoming permanent — after the first mapping, each Connector follows its
own identifier rather than the shared name.
Remapping a Record by hand always wins. When you change a Record’s Mapping yourself, the tool’s identifier moves with it, and the next sync follows your decision.
How Auto-Mapping chooses the Product
Auto-Mapping resolves each Record in a fixed order, and stops at the first answer:
- The tool’s own identifier. Every Record stores the identifier the tool uses for the Vendor-Equivalent Product. Once a Connector has mapped that identifier once, it recognises it on every later Discover — so renaming the project in the tool, or in DefectDojo, no longer loses the Mapping or creates a duplicate Product.
- The name. If the Connector has not seen the identifier before, it looks for a Product whose name matches. When one is found, the Record is mapped to it and the identifier is recorded, so step 1 answers from then on.
- A new Product. If neither matches, DefectDojo creates one.
Step 1 requires the identity feature to be enabled (DD_V3_ASSET_ALIASES); until then,
Auto-Mapping resolves by name alone, which is the historical behaviour. Enabling it changes
nothing about existing Mappings: the first Discover after it is turned on records identifiers
for the Records you already have, and later runs use them.
Because names are matched globally, two tools that each report something called payments map
to the same Product on first sight. Recording each tool’s identifier separately is what stops
that coincidence from becoming permanent — after the first mapping, each Connector follows its
own identifier rather than the shared name.
Remapping a Record by hand always wins. When you change a Record’s Mapping yourself, the tool’s identifier moves with it, and the next sync follows your decision.
Mapping - Example Workflow:
David has just finished setting up a connector for his BurpSuite tool, and runs a Discover operation. David has Burp set up to scan 4 different ‘Sites’, and DefectDojo creates a new Record for each of those Sites.
- If David decides to use Auto-Mapping, DefectDojo will create a new Asset for each Site. From now on, when DefectDojo runs a Synchronize operation, the Connector will import scan data directly from the Site into the Asset (via the Record mapping)
- If David leaves Auto-Mapping off, DefectDojo will still discover those 4 Sites and create Records, but it won’t import any data until David creates the Mappings himself.
- David can always change how these mappings are set up later. Maybe he wants to consolidate the output of a few different Burp Sites into a single Asset. Or maybe he’s looking to have an Asset which records scan data from a few different tools - including Burp. It’s easy for David to change where Burp scan data is stored into DefectDojo by changing the Mapping of these Records.
How Records interact with Assets
Once a Record is Mapped, DefectDojo will be ready to import your tool’s scans through a Sync Operation. Connectors can work alongside other DefectDojo import processes or interactive testing.
- Record Mappings are designed to be non-invasive. If you map an Asset to a Record which contains existing Engagements or Findings, those existing Engagements and Findings will not be affected or overwritten by the data sync process.
- All data created via a connector will be stored under a single Engagement called Global Connectors. That Engagement will create a separate Test for each Connector mapped to the Asset.
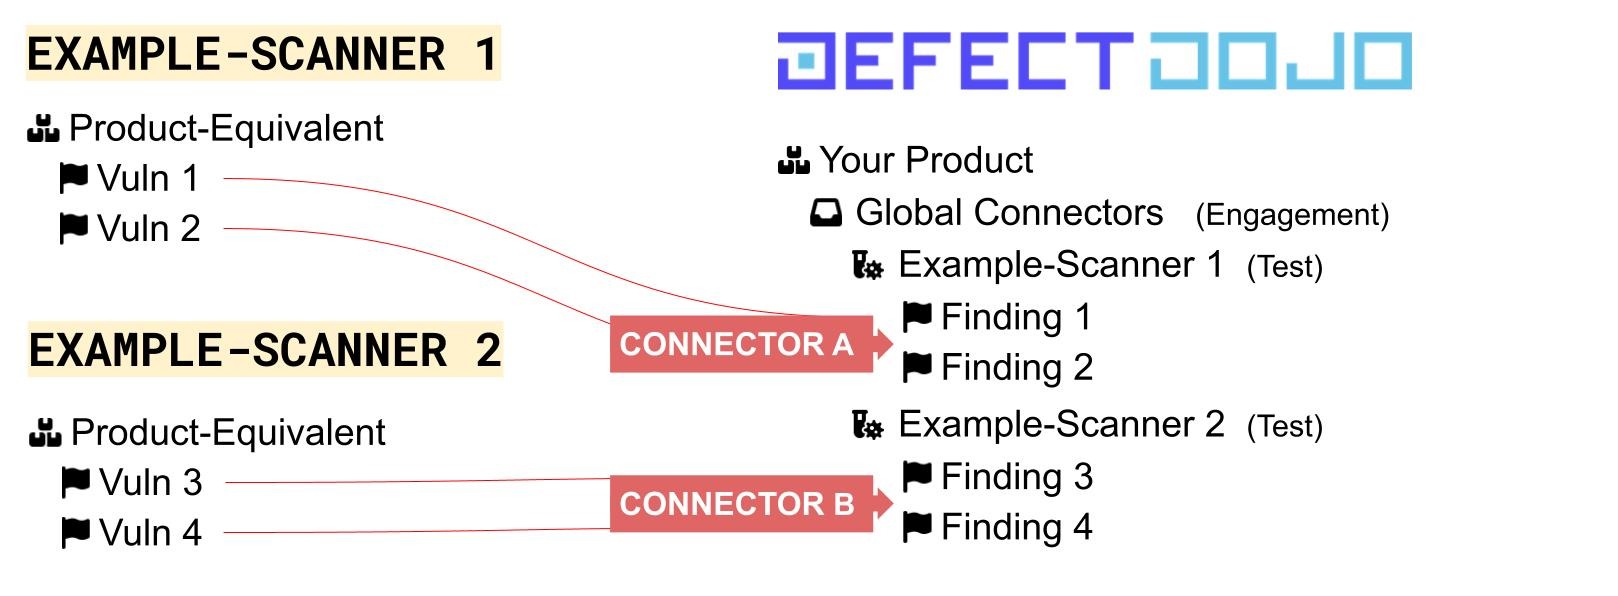
This makes it possible to send scan data from multiple Connectors to the same Asset. All of the data will be stored in the same Engagement, but each Connector will store data in a separate Test.
To learn more about Assets, Engagements and Tests, see our Asset Hierarchy Overview.
Record States - Glossary
Each Record has an associated state to communicate how the Record is working.
A connector’s full records list is reached by opening the connector from Connect > Upstream — the page is titled All <Connector> Records. Despite the name, it lists every Record belonging to that one connector, not every Record on the instance.
That list can be filtered by state from the State column, and more than one state can be selected at a time. This is the fastest way to answer the questions that come up most often on a large connector fleet — what is waiting for me to map? (New) and what has stopped reporting? (Missing or Error) — without reading through every Record.
Not every state applies to every connector. Stale is set by the findings-import pipeline, so it only occurs on connectors that import findings; Asset Connectors never enter it, and it is not offered as a filter option for them.
New
A New Record is an Unmapped Record which DefectDojo has Discovered. It can be Mapped to an Asset or Ignored. To Map a new Record to an Asset, see our guide on Editing Records.
Good
‘Good’ indicates that a Record is Mapped and operating correctly. Future Discover Operations check to see if the underlying Vendor-Equivalent Product still exists, to ensure that the Sync operation will run correctly.
Ignored
‘Ignored’ Records have been successfully Discovered, but a DefectDojo user has decided not to map the data to an Asset.
Warning States: Stale or Missing
If the connection between tool and DefectDojo changes, the state of a Record will change to let you know.
Stale
A Mapping is moved to ‘Stale’ when a related Asset, Engagement or Test has been deleted from DefectDojo. The mapping still exists, but there isn’t anywhere in DefectDojo for the Tool’s data to import to.
Stale records can be remapped to an existing Asset, or Ignored if the scan data is no longer relevant.
Missing
If a Record has been Mapped, but the source data (or Vendor-Equivalent Product) is not being detected by DefectDojo, the Record will be labeled as Missing.
DefectDojo Connectors will adapt to name changes, directory changes and other data shifts, so this is possibly because the related Vendor-Equivalent Product was deleted from the Tool you’re using.
If you intended to remove the Vendor Equivalent Product from your tool, you can Delete a Missing Record. If not, you’ll need to troubleshoot the problem within the Tool so that the source data can be Discovered correctly.
Error
Error indicates that DefectDojo could not process the Record. It is available on every connector type, and can be selected in the State filter alongside the states above, which makes it the quickest way to check whether anything on a connector needs attention after a run.
Edit Records: Remap, Ignore or Delete
Records can be Edited, Ignored or Deleted from the Manage Records & Operations Page.
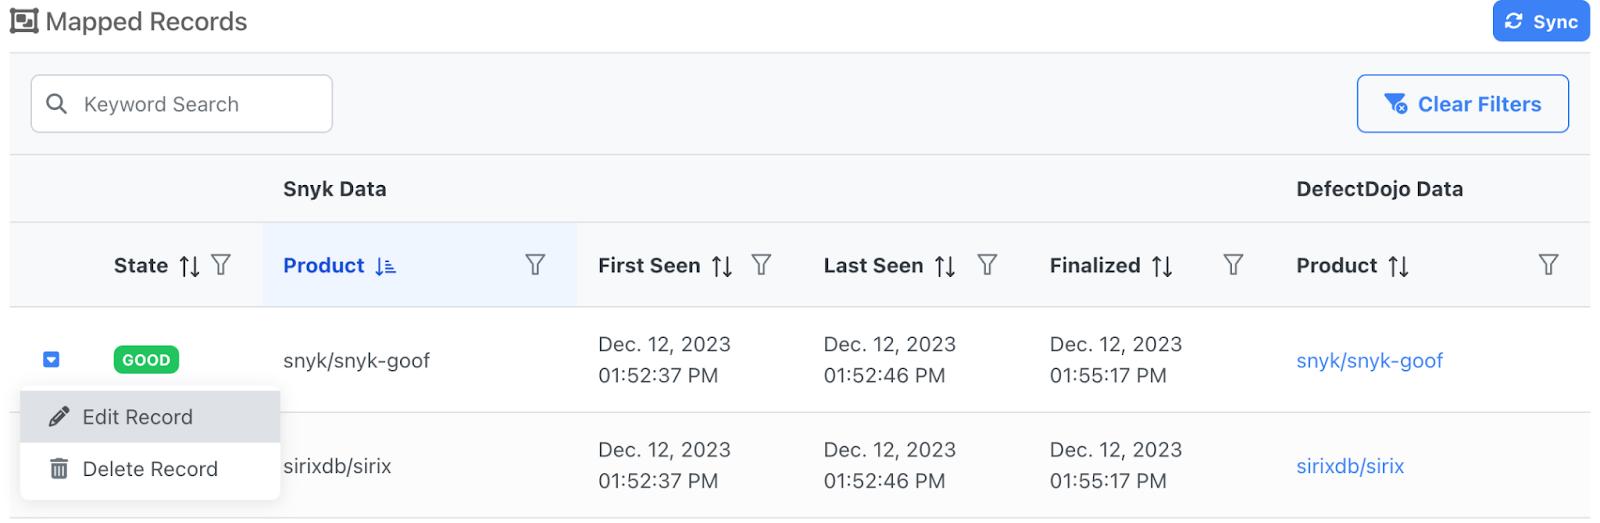
Although Mapped and Unmapped records are located in separate tables, they can both be edited in the same way.
From the Records table, click the blue ▼ Arrow next to the State column on a given Record. From there, you can select Edit Record, or Delete Record.
Change the Mapping of a Record
Clicking Edit Record will open a window which allows you to change the destination Asset in DefectDojo. You can either select an existing Asset from the drop-down menu, or you can type in the name of a new Asset you wish to create.
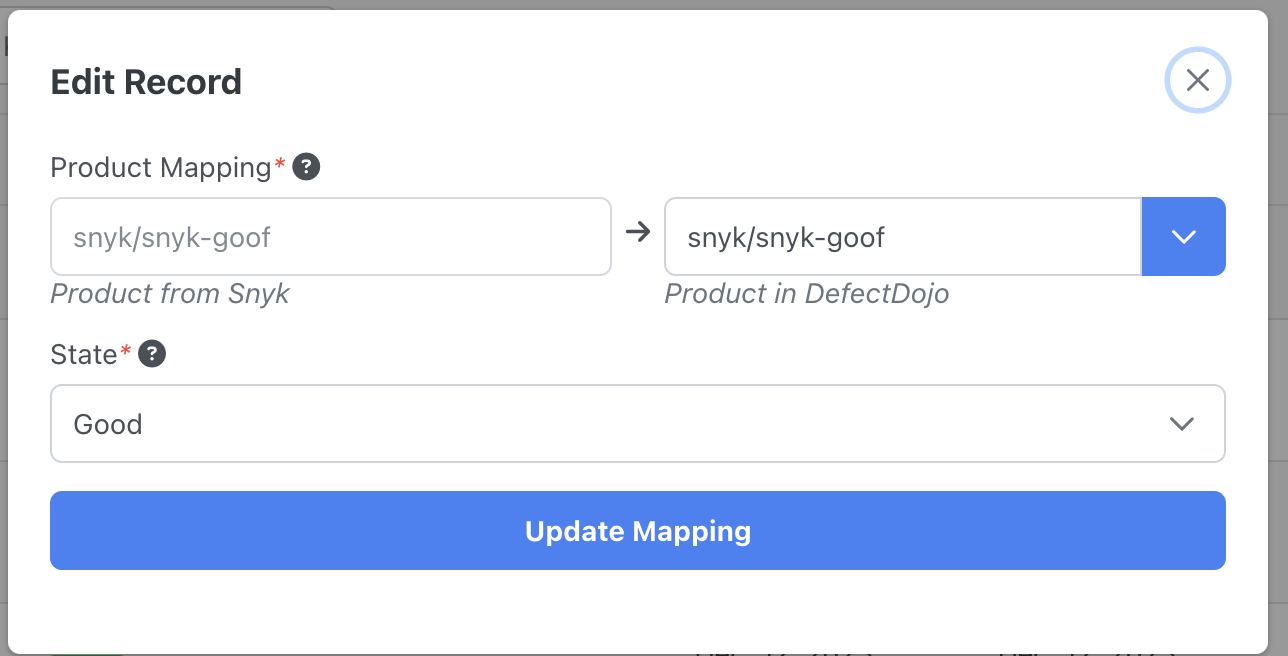
The scan data associated with a Record can be directed to flow into a different Asset by changing the mapping.
Select, or type in the name of a new Asset from the drop-down menu to the right.
Edit the State of a Record
The State of a Record can be changed from this menu as well. Records can be switched from Good to Ignored (or vice versa) by choosing an option from the State dropdown list.
Ignoring a Record
If you wish to ‘switch off’ one of the records or disregard the data it’s sending to DefectDojo, you can choose to ‘Ignore’ the record. An ‘Ignored’ record will move to the Unmapped Records list and will not push any new data to DefectDojo.
You can Ignore a Mapped Record (which will remove the mapping), or a New Record (from the unmapped Records list).
Restoring an Ignored Record
If you would like to remove the Ignored status from a record, you can change it back to New with the same State dropdown menu.
- If Auto-Map Records is enabled, the Record will return to its original mapping once the Discover operation runs again.
- If Auto-Map Records is not enabled, DefectDojo will not automatically restore a previous mapping, so you’ll need to set up the mapping for this Record again.
Delete a Record
You can also Delete Records, which will remove them from the Unmapped or Mapped Records table.
Keep in mind that the Discover function will always import all records from a tool - meaning that even if a Record is deleted from DefectDojo, it will become re-discovered later (and will return to the list of Records to be mapped again).
- If you plan on removing the underlying Vendor-Equivalent Product from your scan tool, then Deleting the Record is a good option. Otherwise, the next Discover operation will see that the associated data is missing, and this Record will change state to ‘Missing’.
- However, if the underlying Vendor-Equivalent Product still exists, it will be Discovered again on a future Discover operation. To prevent this behaviour, you can instead Ignore the Record.
Does this affect any imported data?
No. All Findings, Tests and Engagements created by a sync record will remain in DefectDojo even after a Record is deleted. Deleting a record or a configuration will only remove the data-flow process, and won’t delete any vulnerability data from DefectDojo or your tool.