

Asset Hierarchy (Pro)
DefectDojo Pro is extending the Product/Product Type object classes to provide greater flexibility with the data model.
Enabling the Hierarchy Feature
The two pieces below are separate, and are controlled by different means.
Asset Hierarchy
Asset Hierarchy enables parent/child relationships between Assets. The hierarchy is viewed and managed from Act > Explore > Assets > Hierarchy in the sidebar.
Asset Hierarchy is generally available and on for every instance, Cloud and On-Premise. There is nothing to enable, and it is no longer listed on the Feature Flags page.
Label Changes (optional)
Label Changes renames “Product Type” to “Organization” and “Product” to “Asset” throughout the UI. This is a separate step from enabling the hierarchy and can be done at the same time or later.
Label changes are on by default as of 3.0. There are two controls, covering different parts of the application:
- Pro UI (the default UI): a superuser toggles “Organization / Asset Relabeling” at Settings > Feature Flags, on both Cloud and On-Premise instances. The new labels appear on the next page load. See Feature Flags.
- Classic UI pages and generated reports: their labels and URLs are decided when DefectDojo starts, so they follow the same toggle after the next restart. On-premise, restart DefectDojo after changing the toggle. On DefectDojo Pro (Cloud), email support@defectdojo.com with your instance URL if you need a restart scheduled.
The toggle is on by default. Its stored value was seeded from the DD_ENABLE_V3_ORGANIZATION_ASSET_RELABEL deployment setting on upgrade; from then on the database owns it, and the setting is only a fallback for when the database cannot be reached at start-up.
Note that label changes are cosmetic only: API endpoints and field names remain unchanged, so existing automation will continue to work.
Significant Changes
- Product Types have been renamed to “Organizations”, and Products have been renamed to “Assets”. As of 3.0 this name change is on by default. See Label Changes for the controls that turn it off.
- Assets can now have parent/child relationships with one another to further sub-categorize Organizational components.
Organizations
As with Product Types, Organizations should be understood as a top-level category. You can use these to separate your business’ core software applications, departments or business functions.
For example, you could create an Organization for many repository groupings: “Core Application”, “Infrastructure”, “DevOps”, “Analytics”, “SDK” could all contain multiple code repos.
Keep in mind that for reporting purposes, it’s easier to combine multiple Organizations into a single document than it is to subdivide a single Organization into separate documents. Therefore, we recommend setting up Organizations at as granular a level as makes sense for your team’s reports. For example, there is no need to represent a large business division as an Organization if you’re primarily going to be reporting on individual departments within that division.
Assets
Assets are meant to represent subdivisions of your Organizations. However, unlike Products, Assets can be nested, and have parent-child relationships with one another.
Asset Nesting Examples
Asset-Level Branch Representation
Development and feature branches can be represented in a variety of ways; separate Engagements or Tests are existing ways that you can represent the difference between your Production, Dev, and other feature branches.
You can also represent these using nested Assets. Consider the following Asset tree:
Core Application [Organization]
└── webapp-frontend
    ├── webapp-frontend/prod
    └── webapp-frontend/dev
        ├── webapp-frontend/dev/feature-a
        └── webapp-frontend/dev/feature-b
In this environment, each branch (prod, dev, feature a, feature b) could have its own Engagements and Tests that are isolated from the other Assets, so that they don’t deduplicate against each other. This setup can also ease in navigation, as Asset names can directly correspond to the path on Git.
Mono-Repo: Separate Components
If you use a single repository for all of your code, but have different teams contributing to directories within that repository, you can set up your Asset nesting to represent that structure.
Core Application [Organization]
├── webapp-frontend [Parent Asset]
│   ├── mobile-ios
│   ├── mobile-android
│   └── mobile-sdk
├── webapp-backend [Parent Asset]
│   ├── database
│   └── api
└── infra [Parent Asset]
    ├── docker
    ├── kubernetes
    └── nginx
In this diagram, every element under “Core Application” could be recorded as a separate Asset, with unique business criticality (see: Priority & Risk), RBAC, and corresponding Engagements and Tests. You could continue to test, and store results, on the parent Asset (for example, webapp-backend), but you could also run isolated testing on a particular child Asset (for example, database).
Pen Tests: Isolated RBAC
If you want to store pen test results within a single asset, but you don’t want testers to be able to look at asset data, you could create child assets for each testing group to upload their results.
Core Application [Organization]
└── webapp-frontend [Parent Asset]
    ├── Pen Test Group A
    └── Pen Test Group B
Crucially, giving a user RBAC access to a single Child Asset (e.g. Pen Test Group A) here does not allow them to see any Findings from other Child Assets (e.g. Pen Test Group B), nor does it allow them to see Findings in the Parent Asset (webapp-frontend).
The Parent Asset could contain Engagements representing CI/CD results, internal Testing, historical data, or other Finding data which you do not want 3rd parties to be able to discover. Creating a Child Asset for specific Test results allows your internal team to report on those results in combination with the state of the parent Asset.
Visualizing Assets - Hierarchy
You can visualize the structure of Assets in DefectDojo, and change relationships using Act > Explore > Assets > Hierarchy in the sidebar.
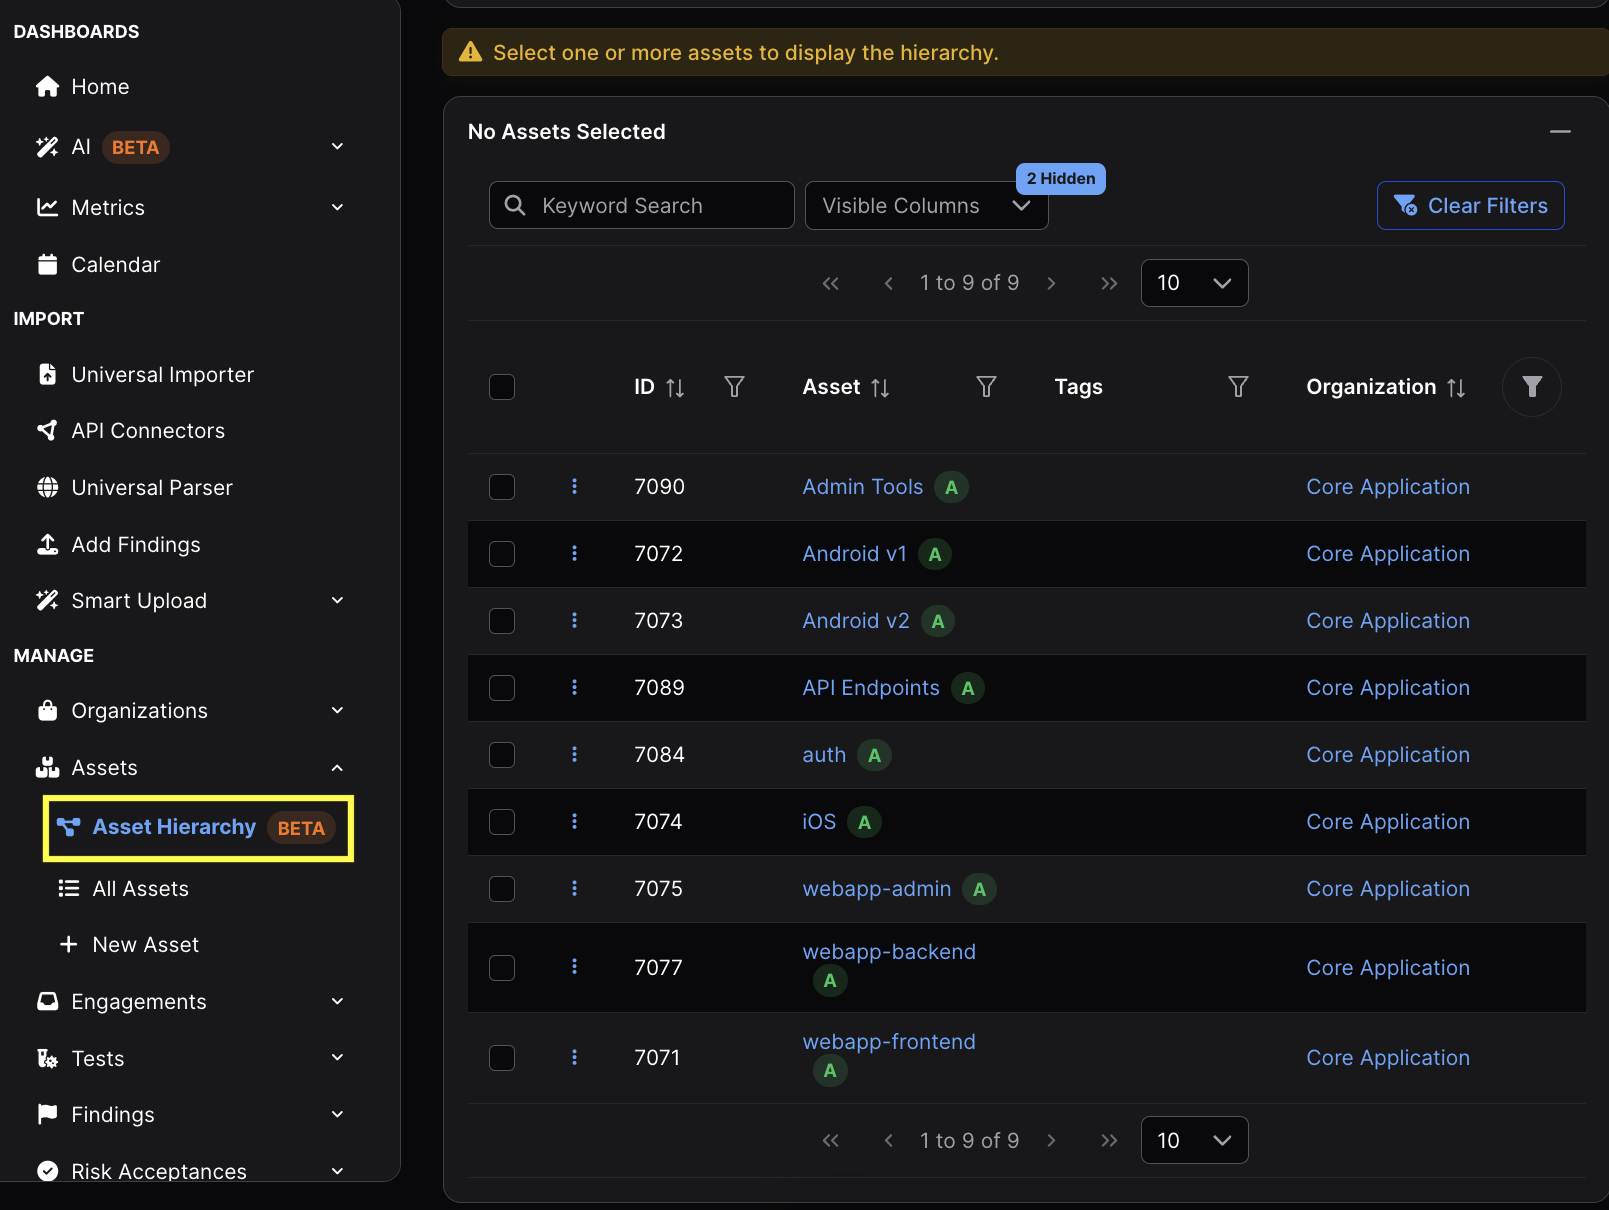
The page has three parts: a list of your Assets across the top, the diagram below it, and a panel on either side of the diagram. Selecting one or more Assets in the list draws them, and each Asset you select becomes a starting point that the diagram builds around. The list can be filtered, and once you have the Assets you want you can collapse it with the Hide Asset List button to give the diagram the whole page.
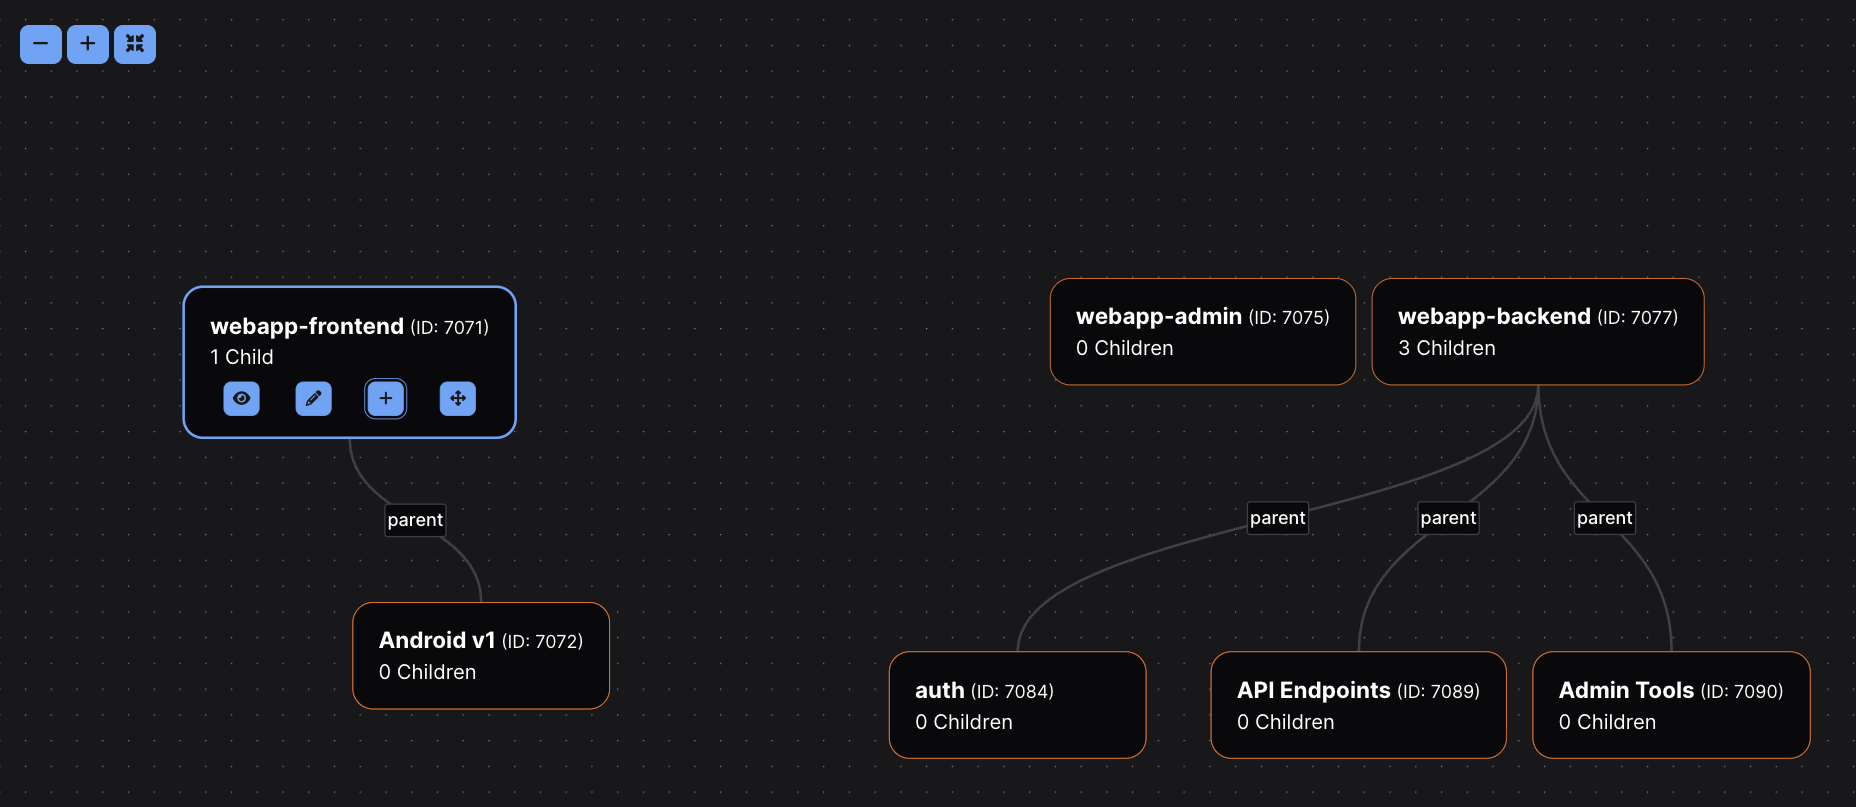
Diagram navigation
The buttons at the bottom left of the diagram zoom in and out, and fit the whole diagram in view. Clicking and dragging the background moves the diagram, and each Asset can be dragged for display purposes.
Assets are connected by labelled arrows, which represent the kind of relationship each node has to the other.
Four relationship types ship by default:
| Label | Meaning | Rolls up? |
|---|---|---|
parent | The tree relationship you build from the Asset Hierarchy screen. An Asset has at most one parent. | Yes |
contains | Composition — the source Asset is made up of the target. Unlike parent, the same Asset can be contained by several others. | Yes |
derived_from | Lineage — the source Asset was built from the target, as a container image is built from a base image. | No |
deploys_to | Deployment: the source Asset runs on the target, as a service runs on a cluster. The diagram labels the edge “deploys to” one way and “hosts” the other. | No |
“Rolls up” is what decides whether a relationship aggregates upward: it controls both the
indirect counts described below and the Include child assets option on metrics. derived_from
deliberately does not roll up. A base image’s Findings are not the derived Asset’s own exposure,
and attributing them to every Asset built from it multiplies the same Finding across your whole
estate. deploys_to does not roll up for the same reason: a cluster’s Findings are not the
Findings of every service deployed on it.
deploys_to is the one relationship that carries Asset Exposure:
a service deployed onto an internet-facing cluster shows the cluster’s exposure as its effective
exposure. No other relationship carries exposure, so an Asset that contains an exposed Asset
is not itself treated as reachable.
Each node is coloured by where it came from: one colour for the Assets you selected in the list, another for Assets the diagram loaded because they are related to your selection. The Legend in the left panel names both.
The left panel also chooses what the nodes display. Asset ID, Organization ID, Organization Name, Child Count and Vulnerabilities can each be turned on or off.
Direct and indirect vulnerabilities
Each node shows two counts:
- direct — Findings on that Asset itself.
- indirect — Findings on the Assets below it, reached over relationships that roll up.
So an Asset that contains a library shows the library’s Findings as indirect, while an Asset built from a base image does not show the base image’s Findings at all.
A Finding reachable by more than one path is counted once. The counts are always calculated from the graph as it currently stands — nothing is stored, so re-parenting an Asset changes them immediately, and no Finding is ever copied onto another Asset. Assets you do not have permission to view contribute nothing, and show no counts at all rather than a zero.
The same split appears under the Findings count on the Asset page. There, direct matches the total in that page’s Open Finding Severity breakdown: both exclude duplicates, false positives and out-of-scope Findings.
Acting on an Asset
Clicking an Asset’s node selects it, which fills both panels: the left panel lists what you can do with that Asset, and the right panel describes it, including its Organization, its relationship to its parent, how many children it has, and links to its metrics.
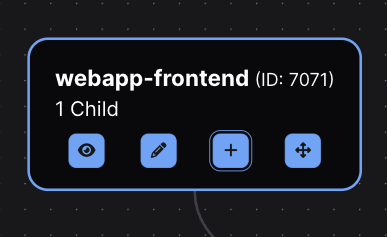
- Open Asset takes you to the corresponding Asset View (formerly known as the Product View).
- Edit Asset opens the Edit Asset form (formerly known as the Edit Product form).
- Add Child nests another Asset under this one. You can choose an Asset that is not currently in the diagram, or create a new one, but either way it must be part of the same Organization.
- Change Parent moves the selected Asset underneath a different parent.
- Remove From Hierarchy detaches the Asset from its parent, and asks whether that Asset’s own children should be left without a parent or moved up to the parent you are detaching from. It is only available when the Asset has a parent.
Each of these opens in the right panel, so the diagram stays visible while you work on it. An action you cannot use is shown greyed out, and hovering it explains why: changing relationships needs edit permission on the Asset itself as well as permission to edit the hierarchy.
Loading more of the hierarchy
The diagram loads part of the hierarchy at a time, so a large one stays readable.
Where an Asset’s parent has not been loaded, a Load Parents button appears above it, which adds that parent along with the parent’s other children.
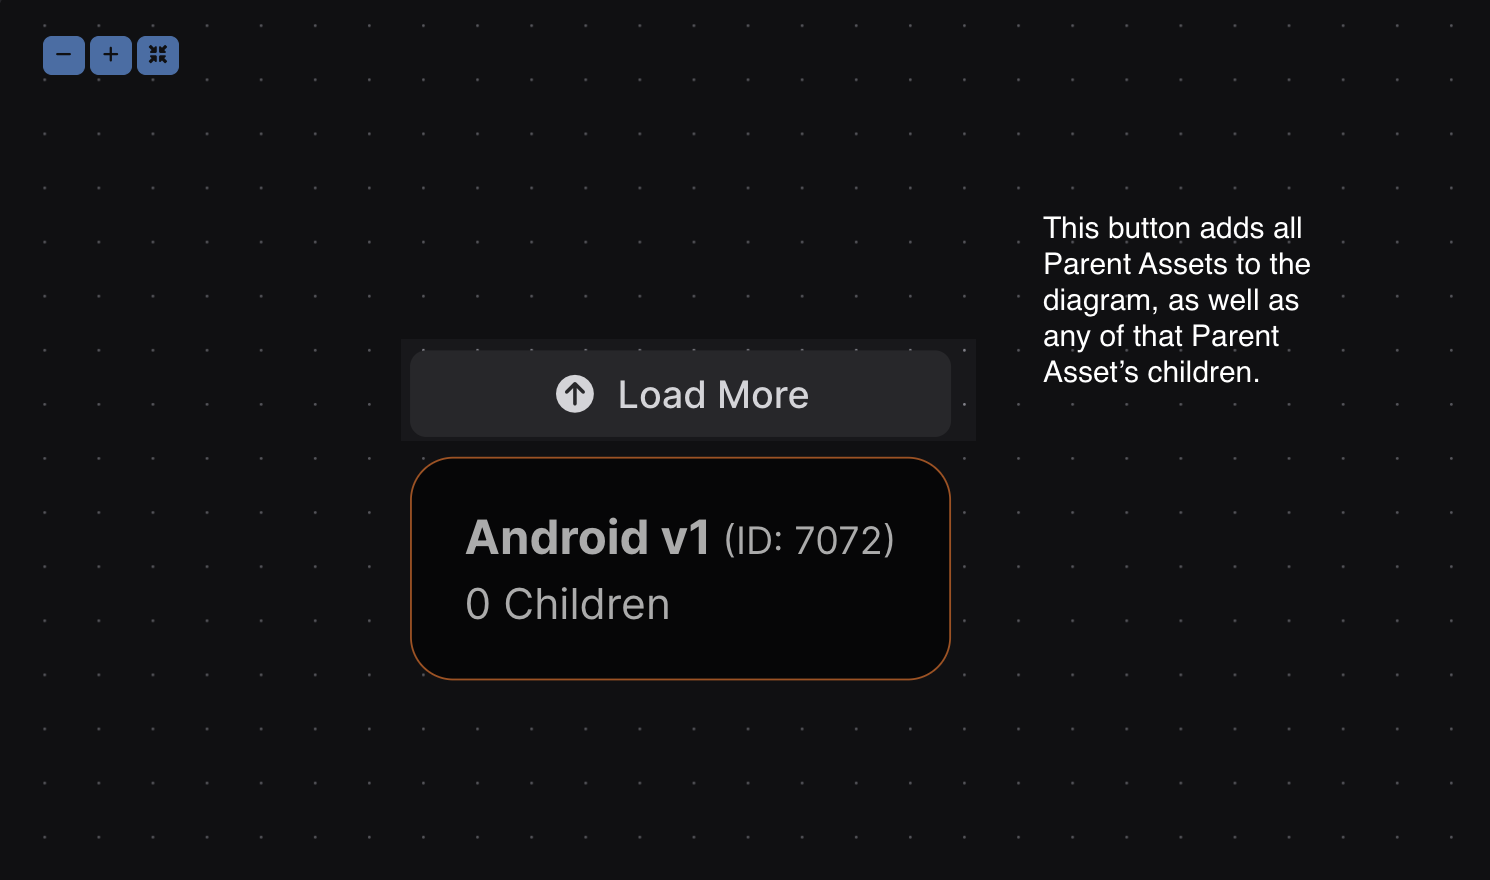
Where an Asset has more children than the diagram is currently showing, a Load button appears below it, together with a choice of how many to add at a time.
Moving Assets between Organizations
You can reorganize at any time: an Asset can move to another Organization from the Edit Asset form, the bulk menu on the Assets list, the API, or a Rules Engine action, and the hierarchy stays consistent whichever you use.
The subtree moves along
When an Asset moves to another Organization, every Asset below it (its children, their children, and so on) moves to the same Organization, and the parent/child links inside that subtree are kept. Moving webapp-backend from the earlier example to another Organization takes database and api with it.
To move an Asset on its own, uncheck Move Children Along in the bulk menu, or send "move_children": false to the bulk update API. The children then stay in the original Organization: their link to the moved Asset is removed and each one becomes a top-level Asset there.
Moving a child is an edit of that child, so taking a subtree along needs edit permission on every Asset in it. If you cannot edit one of them, the move is refused and nothing changes; move the Asset without its children instead, or ask someone who can edit the whole subtree.
A parent stays in its own Organization
A parent link never connects Assets in two different Organizations. When an Asset moves away from its parent, the link to that parent is removed and the Asset becomes a top-level Asset in its new Organization.
Each removed link is kept in the audit log, and the owners and contacts of the Asset that lost its parent (its Technical Contact, Team Manager and Asset Manager, and members with the Owner role, as long as they can still see the Asset) receive one notification listing the affected Assets.
The same rule applies everywhere a parent is set:
- Choosing a parent in another Organization (on the Edit Asset form, in the hierarchy, or with
"parent"on the API) is refused with an error. - Parent links that a connector declares (for example, artifacts under their repository) are only created when both Assets are in the same Organization. A declared parent in another Organization is skipped.
- The Rules Engine Set Parent action counts a parent in another Organization as a failed item, and Set Organization moves subtrees along exactly as described above.
The other default relationship types, contains and derived_from, also refuse a new link between two Organizations, but a move leaves their existing links in place.
Priority is recalculated
A Finding’s priority weighs its Asset’s revenue and user records as a share of its Organization’s totals, so a move changes the share of every Asset in both Organizations. After a move, Finding priority is recalculated in the background for the Organization the Assets left and the one they joined, once per Organization however many Assets moved.
Dedupe pools that were created from a parent Asset’s subtree are not updated when Assets move or are re-parented. To bring such a pool up to date, turn the subtree option off and on again on the parent Asset.
Bulk updates through the API
POST /api/v2/assets/bulk_update/ applies the same change to many Assets in one request. It is what the bulk menu on the Assets list uses, and it accepts an API token like every other /api/v2/ endpoint.
| Field | Effect |
|---|---|
products | Required. The IDs of the Assets to change, at most 500 per request. |
prod_type | Move the Assets to this Organization. |
move_children | true (default) moves each Asset’s subtree along; false leaves the children behind as top-level Assets. |
parent | Place the Assets under this parent. null removes their parent. |
asset_type | Set the Asset type (for example repository or service). null clears it. |
business_criticality | very high, high, medium, low, very low or none. null clears it. |
technical_contact, team_manager, product_manager | Set the contact to this user ID (an active user). null clears it. |
sla_configuration, prioritization_engine | Apply this SLA configuration or Prioritization Engine. |
tags | Add these tags. Existing tags are kept. |
Leave out any field you do not want to change. Moving and setting a parent can be combined: the move happens first, so the new parent only has to be in the new Organization.
curl -X POST "https://defectdojo.example.com/api/v2/assets/bulk_update/" \
  -H "Authorization: Token <your API token>" \
  -H "Content-Type: application/json" \
  -d '{"products": [12, 13, 14], "prod_type": 4, "parent": 9, "business_criticality": "high"}'
A successful request returns how many of the named Assets changed, how many descendants moved along, and how many parent links were removed:
{"updated": 3, "unchanged": 0, "descendants_moved": 5, "parent_links_removed": 1}A bulk update is all or nothing. If any Asset in the request cannot be changed, nothing is written and the response is a 400 listing every Asset that was refused and why, so you can fix them and send the whole request again:
{
  "detail": "Nothing was changed. Fix the listed problems and send the whole batch again.",
  "errors": [
    {"product": 13, "name": "payments-api", "field": "parent", "message": "Relationship 'parent' cannot cross organizations: both assets must belong to the same organization"},
    {"product": 99, "field": "products", "message": "Not found, or you are not allowed to edit it."}
  ]
}
An Asset is refused when you cannot edit it (or it does not exist), when the new parent would create a cycle or sit in another Organization, when its subtree contains an Asset you cannot edit, or, for SLA and Prioritization Engine changes, while a previous recalculation for that Asset is still running.
Permissions are the same as editing each Asset on its own: you need edit permission on every Asset in the request and on the new parent, and permission to add Assets to the destination Organization. Setting parent requires the Asset Hierarchy to be enabled.
To reorganize more than 500 Assets, send several requests. Each one is applied as a single change, so a failed request never leaves a reorganization half done.
To see what a bulk update will change before it writes anything, add "dry_run": true to the request: nothing is written, and the response lists every field change, every descendant that would move along, every parent link that would be removed and every refused Asset. For reorganizations larger than 500 Assets, or ones you want reviewed, applied and possibly undone as one change, use a change plan.
Suggested edges from container evidence
When Container Image Locations are enabled, DefectDojo can notice a deployment relationship nobody has drawn: an image whose repository belongs to one asset is seen running in another, and no deploys to edge joins the two. Each such pair appears as a suggested edge on the hierarchy page, with the images as evidence.
- A banner at the top of the page counts the open suggestions. Review opens the list.
- Accept draws the deploys-to edge from the asset that built the image to the asset that runs it. Because deploys-to propagates exposure, the deployed asset then inherits its host’s exposure when you read it; finding priority is unaffected, since it runs on the asset’s own exposure.
- Dismiss suppresses the pair. Further images for the same pair are counted but do not reopen it. A dismissed suggestion can be reopened from the same dialog.
- Accepted edges carry their own origin (container evidence), so they can be told apart from edges people drew and from connector-declared ones.
Suggestions are never accepted automatically, and they are only offered within one organization while deploys-to stays a same-organization relationship. Reviewing requires the Asset Hierarchy view permission; deciding requires the edit permission plus edit access to both assets.
Notes
- Note that deduplication scopes have not changed; Assets only deduplicate Findings within themselves, and do not consider Findings in other Assets, regardless of Parent/Child relationships.
- RBAC scopes have not changed within this system; each Asset is still considered an individual object for the purposes of assigning permissions. No new RBAC inheritance has been created.
- Giving a user access to an entire Organization will still give that user access to all Assets contained within that Organization (as with Product Types).
- Giving a user access to a single Asset does not give that user access to any related Parent or Child Assets, nor access to the Organization.
- There is no limit to the number of Parent/Child relationships that can be created. Theoretically, you could represent a repository’s entire directory structure with separate Assets if you wished.
- Cyclical relationships are not allowed: Parent Assets cannot be Children of their Child Assets. This is enforced per relationship type and in the database itself, so it holds no matter how the edge was created.
- Indirect counts are calculated on read and never stored. Attributing a Finding to an Asset that did not report it would multiply that Finding across every Asset below it, so DefectDojo shows the number and leaves the Finding where it was found.