

Findings (Pro)
Organizations → Assets → Engagements → Tests → FINDINGS
Overview
Findings represent the lowest level of the Asset Hierarchy where individual vulnerabilities are tracked and managed and serve as the main way that DefectDojo standardizes and guides the reporting and remediation process of your security tools. Regardless of whether a vulnerability was reported in SonarQube, Acunetix, or your team’s custom tool, Findings give you the ability to manage each vulnerability in the same way.
Examples of Findings include:
- Cookie Not Marked as HttpOnly
- Out-of-Date Version (PHP)
- Out-of-Band Code Evaluation (PHP)
- Out-of-Date Version (MySQL)
- Backup Source Code Detected
- Blind Cross-Site Scripting
In addition to storing the vulnerability data and providing a remediation framework, DefectDojo also enhances your Findings in the following ways:
- Automatically adding related EPSS scores to a Finding to describe exploitability
- Automatically translating a security tool’s severity metric into a Severity score for each Finding, which confers an SLA onto the Finding according to your Asset’s SLA configuration. For more information on SLA configuration, click here.
Overall, Findings are designed to work with the Asset Hierarchy to standardize your efforts, and apply a consistent method to each Asset.
Accessing Findings
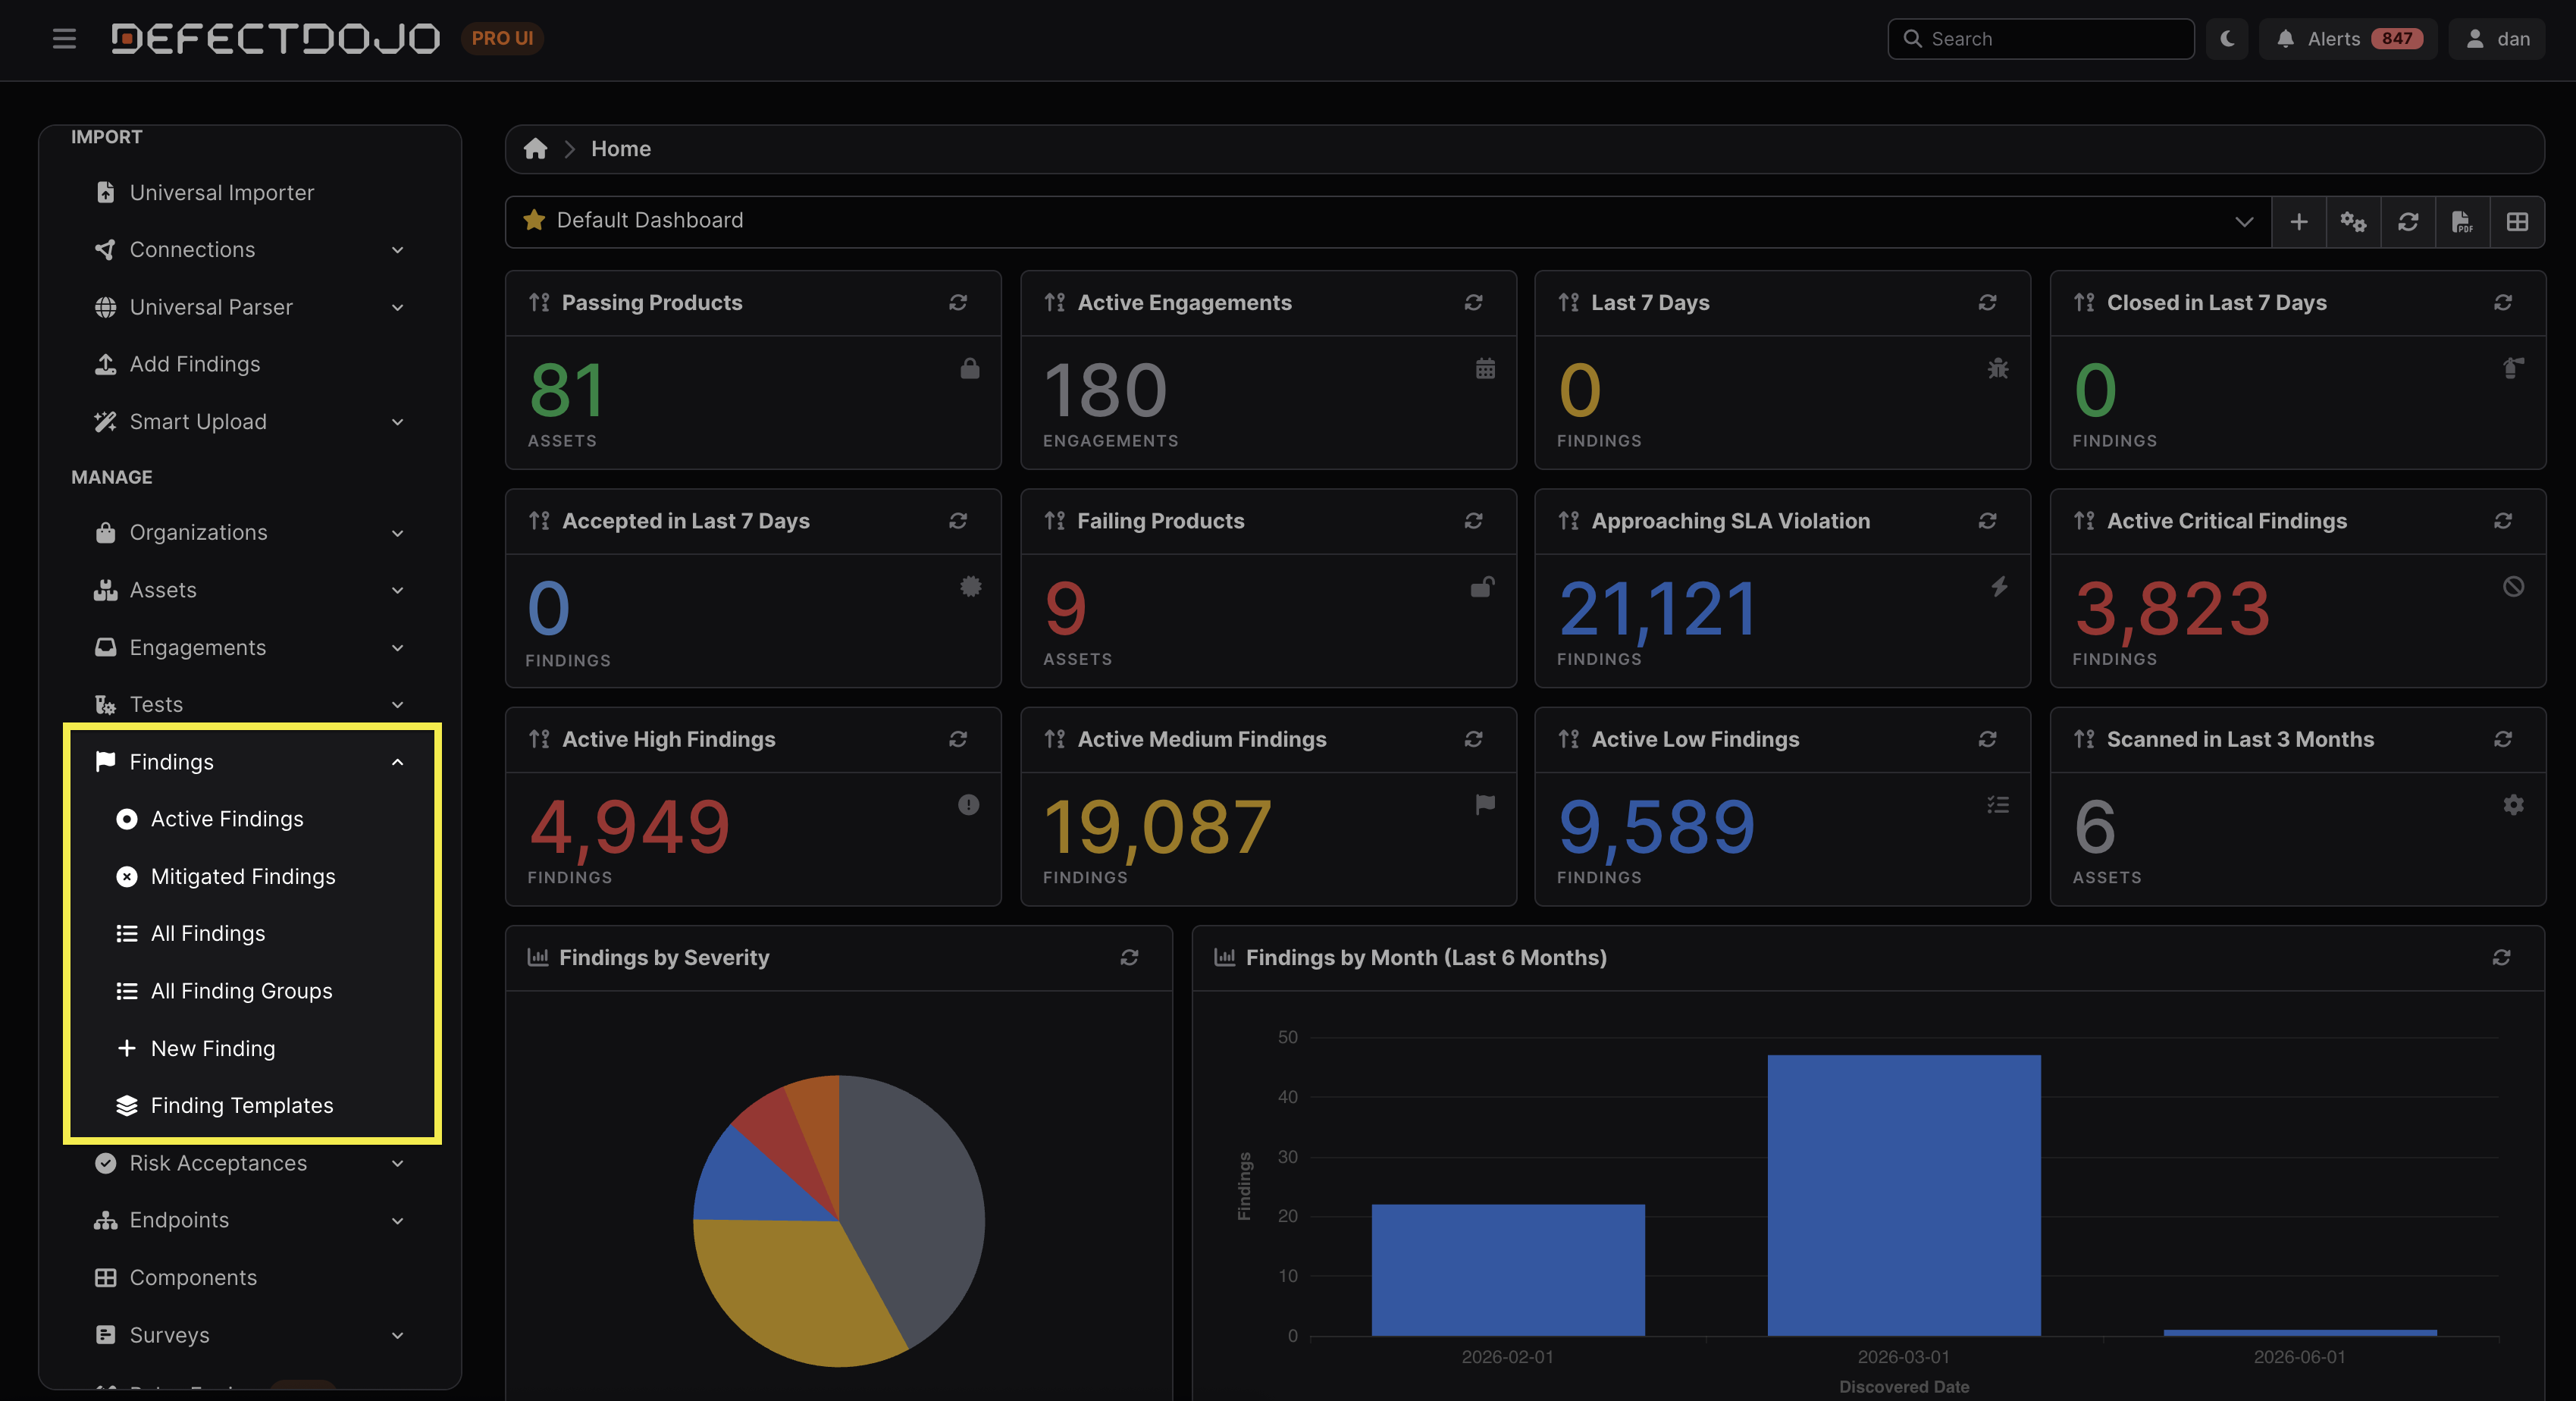
Findings are accessible from the sidebar under Act > Explore > Findings. The submenu provides access to Active and Mitigated Findings, All Findings (regardless of Open or Closed status), Finding Groups, Risk Accepted Findings and Finding Templates; new Findings are created with the New Finding button at the top of a Findings list. Individual Findings are also accessible from within the Test that contains them.
Risk Accepted Findings are listed under Act > Explore > Findings > Risk Accepted; the Risk Acceptance records themselves are managed from Act > Risk Acceptances in the sidebar.
Permissions
Every Finding belongs to a Test, allowing DefectDojo to preserve which scan or assessment originally identified the vulnerability.
As Findings belong to Tests, access to Findings is determined by a User’s access to the Asset that contains the Test. Tests do not have independent access control lists.
Findings View
Finding views contain a variety of tables to help interpret a Finding’s status at a glance.
Finding Overview
- Description: The description of the Finding (added automatically depending on the type of Finding, or created manually).
- Mitigation: Suggested steps to mitigate.
- General Mitigation Policy: The standardized mitigation policy for the selected Finding. Mitigation policies can be found and edited in the sidebar under Settings > Finding Workflow > Mitigation Policies.
- Impact: Potential impact of leaving the Finding unresolved.
- References: URL to cross-reference the third-party scan tool’s specific description of the Finding. For example, References could be links to a relevant entry in a Finding catalog, or a single advisory URL.
- Files: Any files that have been added to contextualize the Finding.
- Notes: Notes left by Users related to the Finding. Marking a note as Private will mean it will not be included in any generated reports that include the selected Finding.
Metadata
- ID: DefectDojo’s unique Finding ID.
- Organization, Asset, Engagement, and Test: The parent objects of the selected Finding.
- Status: The status of the Finding (e.g., Active, Verified, False Positive, Duplicate, Out of Scope, and Under Defect Review).
- Severity: The severity rating of that Finding, which is applied automatically.
- As mentioned above, DefectDojo automatically translates a security tool’s severity metric into a Severity score for each Finding, which confers an SLA onto the Finding according to your Asset’s SLA configuration.
- Risk: A 4-level ranking system that factors in a Finding’s exploitability and is applied automatically.
- Priority: A calculated numerical rank applied to all Findings that allows you to quickly understand vulnerabilities in context.
- Age: How old the selected Finding is.
- SLA: The due date by which the Finding is intended to be resolved.
- Type: Whether the Finding has been detected from a static or dynamic application security tool (Static, Dynamic or Static/Dynamic).
- Location and Line: The file and line number in which the selected Finding was found.
- Component Name and Version: The name and version of the component in which the selected Finding was found.
- Date Discovered: The date on which the Finding was discovered.
- Planned Remediation Date and Version: The date on which the Finding is planned to be remediated, and the version of the affected component in which the fix will be implemented.
- Service: Connected Services (self-contained pieces of functionality within an Asset) that are affected by the selected Finding. When populated, this field is included in deduplication matching (i.e., Findings with identical Service fields will deduplicate).
- Reporter: The User who revealed the Finding.
- CWE: The CWE weakness classification of the Finding. A Finding can carry multiple CWEs — a primary CWE, plus any additional CWEs the reporting tool supplied. The primary CWE is the one used for legacy deduplication and hash code calculation; the full CWE set can additionally be used for matching through Pro’s set-based Hash Code Fields (see Deduplication Tuning).
- A CWE describes a weakness class (for example, “SQL Injection”), not a specific vulnerability instance — that is what Vulnerability IDs are for.
- Vulnerability IDs: Publicly recognized vulnerability identifiers associated with the Finding, such as CVE, GHSA, or other standardized advisory references. In DefectDojo Pro, they are also used to perform EPSS and KEV lookups.
- Vulnerability IDs are stored as first-class records, so the same CVE is tracked once and shared by every Finding that references it. You can review them — along with their EPSS and KEV values — in the Vulnerability Explorer. See EPSS / KEV.
- Unique ID From Tool: A stable identifier assigned by the source tool to a specific Finding instance. Unique IDs are intended to remain consistent across repeated scans, allowing the tool to recognize the same Finding over time.
- Unlike Vulnerability IDs, this value is proprietary to the reporting tool and is not a public vulnerability reference.
- Example:
finding-12345
- Example:
- Unlike Vulnerability IDs, this value is proprietary to the reporting tool and is not a public vulnerability reference.
- Vulnerability ID From Tool: A proprietary vulnerability or rule identifier assigned by the source tool to describe the type of vulnerability that was detected.
- Unlike the Unique ID From Tool, this identifier is not unique to an individual Finding and may appear on many Findings that match the same detection rule.
- Unlike Vulnerability IDs, these identifiers are specific to the reporting tool and are not publicly standardized.
- Example:
semgrep.rule.lang.security.sql-injection
- Example:
- EPSS Score / Percentile: EPSS score and percentile for the CVE.
- Known Exploited: Whether there is confirmation that the vulnerability has been exploited.
- Ransomware Used: Whether ransomware was involved in the exploitation of the vulnerability.
- KEV Date: The date the Finding was added to the KEV catalog.
- The EPSS and KEV values are maintained by the EPSS / KEV sync. They can also be set by hand in the Threat Intelligence panel of the Add and Edit Finding forms; on a Finding that references a CVE, the next sync overwrites what was entered.
- Found By: The type of tool that identified the vulnerability.
- CVSSv3 and CVSSv4 Vector and Score: The CVSS3 and CVSS4 vector and score of the selected Finding.
- Connector Tickets: Third-party issue tracker ticket numbers associated with the Finding. In the Findings list this column is hidden by default; turn it on from the column picker.
Vulnerable Endpoints
This section includes a table of the Endpoints that the selected Finding affects, along with any relevant metadata.
Additional Details
- Request/Response Pairs: A copy of the message sent by the client and the server’s reply to the request.
- Steps to Reproduce: Steps for reproducing the Finding.
- Severity Justification: Written description of why a certain Severity rating was associated with the Finding.
Findings Data
Findings require the following metadata:
- Name
- Date
- Severity
- Description
In addition to metadata corresponding to the tables in a Finding’s view, optional metadata fields include:
- Tags: Any tags that have been added to the Finding.
- Owners: The group of users that will be responsible for the selected Finding. The Findings list shows it in the Owner (Team) column, hidden by default, with a filter that lists the groups you can view. Through the API,
/api/v2/findings/?owners=<group id>filters by the same group, and?assignee=<user id>or?is_assigned=falseby individual assignees (is_assignedtakestrueorfalse; any other value is ignored). - Push to Jira: Pushes the Finding to Jira for ticketing purposes.
- Push to Connector: Pushes the Finding to the issue tracker assigned to its Asset or Engagement through a Downstream Connector. When no Issue Tracker Assignment covers either, nothing is sent and DefectDojo says so.
- Risk and priority settings: Offers the option to override DefectDojo’s automatic calculation of the Finding’s risk and priority.
- Endpoints to add: Vulnerable endpoints that may be affected by the selected Finding that are not reflected in the preceding list of systems/endpoints.
- Defect review requested by: Records who requested a defect review for the flaw in question.
- SAST source object, line number, and file path: Source object, line number, and file path of the attack vector.
- SAST sink object: Sink object of the attack vector.
- Number of occurrences: Number of occurrences in the source tool when several vulnerabilities were found and aggregated by the scanner.
- Publish date: The date on which the vulnerability was published.
- Effort estimation: The level of effort involved in fixing the Finding (e.g., Low, Medium, or High).
The exact metadata available will depend on the parser/scanner that revealed the Finding. Some provide only basic information such as title and severity, while others include CVSS vectors, vulnerable components, endpoints, request/response pairs, and other scanner-specific metadata.
This metadata improves filtering, reporting, and prioritization across your security program, enabling long-term tracking and trend analysis. Additional details and metadata descriptions can be found here.
Deduplication
DefectDojo includes deduplication capabilities that help identify and manage Findings representing the same underlying vulnerability. As scan results are imported from one or more tools, DefectDojo uses configurable matching logic to identify Findings that represent the same vulnerability.
Deduplication prevents the same vulnerability from appearing multiple times when discovered repeatedly by the same or different scanners, allowing remediation history to remain attached to a single Finding.
More information about deduplication can be found here.
Reimport
DefectDojo’s Reimport function allows Findings to be updated as new scan results are imported. When a scan is reimported, DefectDojo compares the incoming results against existing Findings and updates matching records instead of creating entirely new ones. This preserves valuable context such as status changes, remediation history, comments, and ownership information, providing a continuous record of a Finding’s lifecycle across multiple testing cycles.
More information about the Reimport function can be found here.
Risk Acceptances
Risk Acceptances are a special status that can be applied to Findings to formally document and operationalize the decision to acknowledge them without immediately remediating them.
More information about Risk Acceptances can be found here.
Statuses
Each Finding created in DefectDojo has a Status that communicates relevant information and helps your team keep track of their progress in resolving issues.
More information about Statuses can be found here.
Working with Findings
Creating Findings
While most Findings are generated automatically through scan imports and integrations, DefectDojo also supports the manual creation of Findings. Manual Findings are useful for tracking vulnerabilities and security concerns identified through penetration testing, architecture reviews, compliance assessments, bug bounty programs, consultant engagements, or other activities that do not produce scanner output.
Findings can be manually added by either opening a Findings list (Act > Explore > Findings) and selecting New Finding, or by selecting Add Finding within the gear menu of the Test you wish to add the Finding to.
Editing Findings
The ⋮ kebab menu next to Findings contains the following functions:
- Edit Finding: Edit the Finding.
- Move or Copy Finding: Moves the Finding to another Test, or copies it there and leaves the original in place. The Test can be in the same Engagement, another Engagement, or another Asset you can add Findings to. The dialog has the same Move / Copy toggle and destination fields as Bulk Edit, and offers Move only if you can edit the Finding. After a copy, the new Finding opens. See Move or Copy for what a move changes and what a copy carries.
- Close Finding: Initiates the process of closing the Finding.
- Request Review: Initiates the Peer Review process and changes the Finding’s status to “Under Review.” More information about Peer Reviews can be found here.
- Add Risk Acceptance: Initiates the Risk Acceptance process. More information can be found here.
- Add File: Initiates the process to add a file to the Finding (see the section below).
- Add Note: Initiates the process to add a note to the Finding.
- Add Custom Field: Adds a free-form metadata field to the Finding. With the typed Custom Fields feature enabled, this becomes Custom Fields and opens the typed editor, where you fill in a value for each field an administrator has defined for Findings.
- Push to Jira: Pushes the Finding to Jira for ticketing purposes.
- Push to Connector: Pushes the Finding to the issue tracker assigned to its Asset or Engagement through a Downstream Connector. When no Issue Tracker Assignment covers either, nothing is sent and DefectDojo says so.
- Delete Finding: Deletes the selected Finding.
- Finding History: Reveals the history of the selected Finding.
Attaching Files to Findings
You can attach files to any Finding to provide additional context — for example, a screenshot of a vulnerability in action or a proof-of-concept image.
Supported file types include:
.txt  .pdf  .json  .xml  .csv  .yml  .png  .jpeg
.sarif  .xlsx  .doc  .html  .js  .nessus  .zip  .fpr
To attach a file to a Finding, click Add File from within either the ⋮ kebab menu or the gear menu of the selected Finding. Enter a Title for the file, choose the file from your computer, and click Submit.
The file will then appear in the Files section of the Test Overview table within the Finding’s view.
Bulk Edit Findings
Findings can be edited in bulk from a Finding List, such as the table of All Findings (Act > Explore > Findings > All in the sidebar), or from the table of Findings within a specific Test.
More information about how to bulk edit Findings can be found here.
Bulk edit is also how you move or copy several Findings to another Test at once — see Move or Copy.
Closing Findings
Once the work on a Finding is complete, you can manually close it by clicking Close Finding within the Finding’s ⋮ kebab menu or gear menu. Alternatively, if a scan is re-imported into DefectDojo which does not contain a previously-recorded Finding, the previously-recorded Finding will automatically close.
If you don’t want any Findings to be closed, you can disable this behavior on the Reimport Scan form:
- Uncheck the Close Old Findings checkbox if using the UI
- Set close_old_findings to False if using the API
Deleting Findings
Deleting a Finding can be done from the Finding’s ⋮ kebab menu or gear menu. This action can’t be undone.
For auditing purposes, it is recommended to close any remediated Findings, rather than deleting them.
Finding Groups
Finding Groups allow you to treat multiple related Findings as a single logical unit for triage, reporting, and remediation coordination.
For example, a scan might produce 10 SQL injection Findings across different endpoints. Instead of managing each one independently, you can group them into a single Finding Group representing the broader SQL injection issue.
A Finding Group does not replace the individual Findings. Each Finding still exists with its own severity, status, metadata, comments, and remediation history. A Finding Group simply provides an additional organizational layer above the Findings it contains.
Accessing Finding Groups
Finding Groups can be accessed from the sidebar under Act > Explore > Findings > Groups, which lists Open and Closed Finding Groups as well as All Finding Groups (regardless of Open status).
Creating Finding Groups
Finding Groups can be created either manually or automatically.
Notably, Finding Groups can only be created from the Findings contained within a single Test. Findings from different Tests, Engagements, or Assets cannot be added to the same Finding Group.
Manual Finding Groups
To manually perform Finding Group actions:
- Navigate to a list of Findings within a Test.
- Select the Finding(s) you wish to add to a Finding Group by clicking the Finding’s corresponding checkbox.
- Click the Finding Group button that appears at the top of the Finding list.
- Click the corresponding action you wish to complete.
- Add to New Finding Group: Creates a new Finding Group that includes the selected Findings.
- Add to Existing Finding Group: Adds the selected Findings to a preexisting Finding Group.
- Remove From Finding Group: Removes the selected Findings from any Finding Groups they were previously a part of.
- Click Submit.
Note that grouping will be disabled unless every selected finding is editable, ungrouped, and in the same Test.
Further, note that the only possible action when selecting Findings from the All Findings list is to remove the selected Findings from any Finding Group. This is because, as mentioned, Finding Groups can only be created from the Findings contained within a single Test.
Automatic Finding Groups
When importing a scan, the Group By feature within the collapsible Optional Fields menu can automatically create Finding Groups based on a chosen grouping method. This is useful when a scanner produces many related Findings that should be managed together.
The adjoining Create Finding Groups for All Findings checkbox performs two functions:
- Checked: Creates a Finding Group for every imported Finding, even if that Finding is the only member of the group.
- Unchecked: Creates Finding Groups only when there are actually multiple Findings to group together.
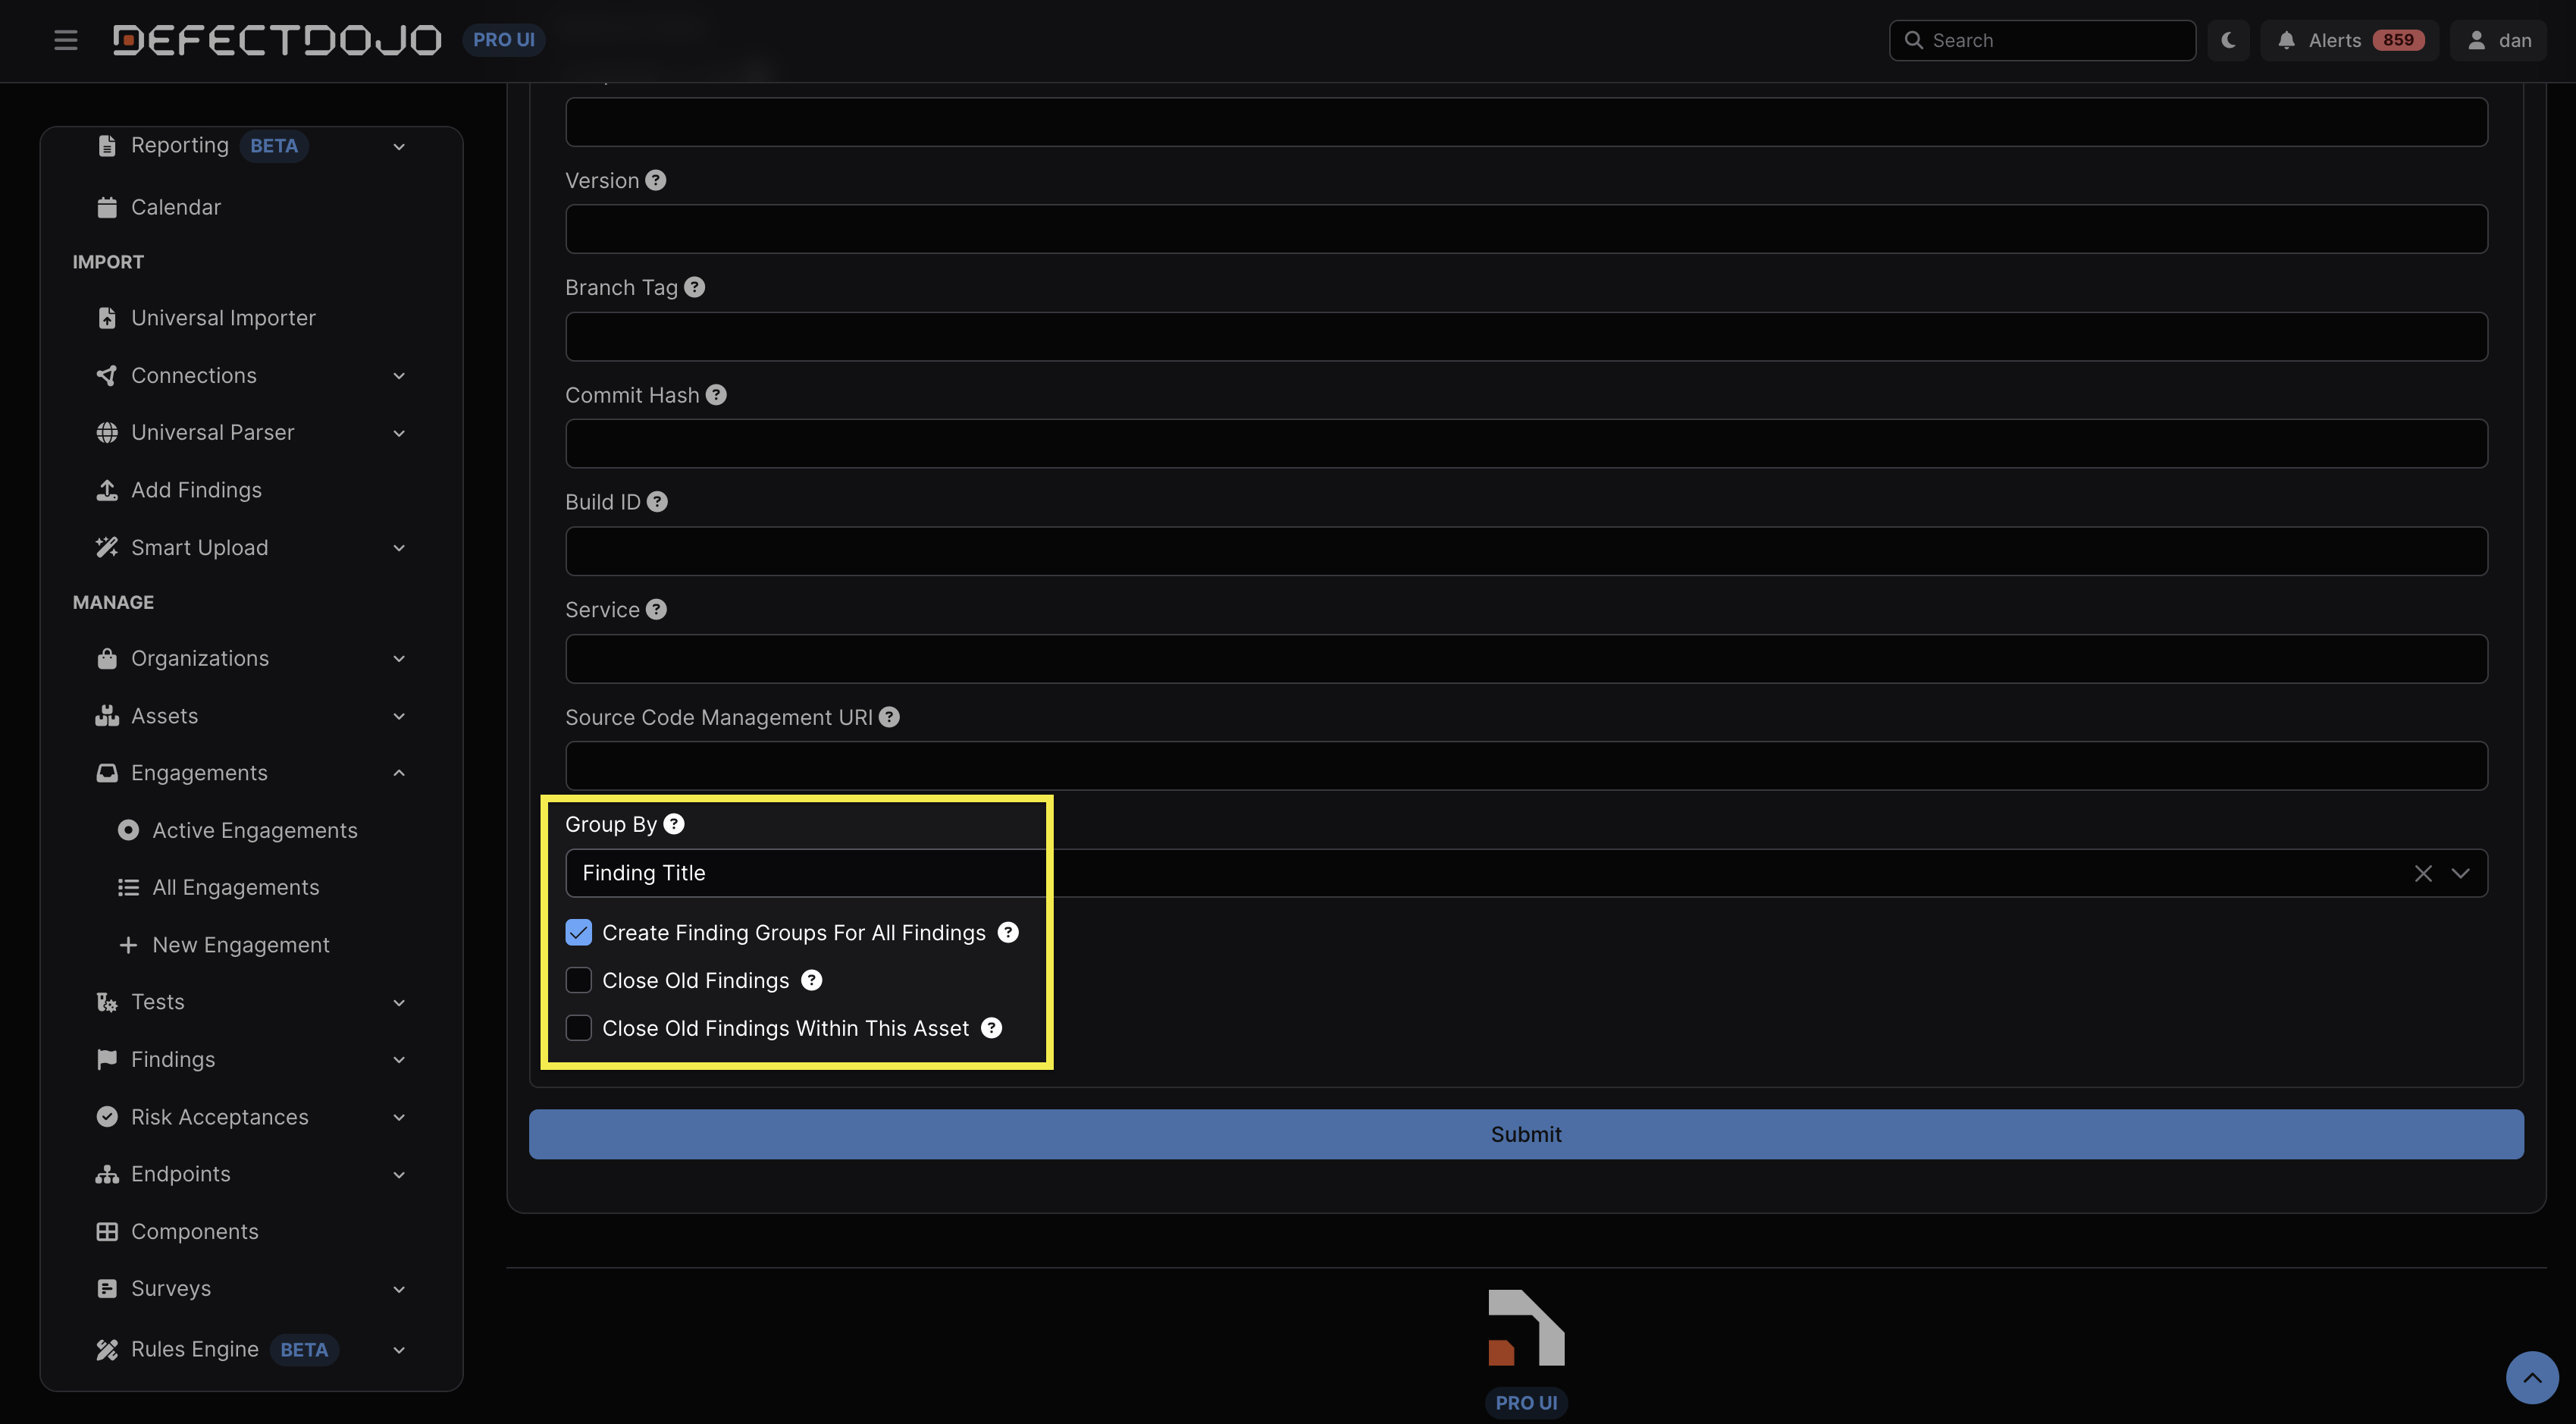
If an option is not selected from the Group By dropdown menu during import (e.g., Finding Title in the screenshot above, etc.), no grouping will occur.
If the grouping criteria (e.g., component name, vulnerability ID, Finding title, etc.) isn’t populated in the Finding, it will not have a group created or be added to a preexisting Finding Group.
If a scan is imported that reveals 10 Findings that are not grouped and the same scan is reimported and the Findings are grouped, the first 10 Findings will not be added to that Finding Group (i.e., the Finding Group will only include the 10 Findings from the reimport, not the 10 Findings from the initial import).
Finding Templates
Finding Templates allow Users to create reusable templates for commonly reported vulnerabilities and security issues. A template can include standardized information such as a title, description, impact, steps to reproduce, mitigation, references, and other Finding metadata.
Finding Templates are most useful in situations where Users need to create manual Findings repeatedly and want to avoid re-entering the same supporting information each time.
Accessing Finding Templates
Finding Templates are found in the sidebar under Act > Explore > Findings > Templates.
Creating Finding Templates
Finding Templates can be created by clicking the New Finding Template button at the top left of the Finding Templates view.
The ensuing page provides an overview of the metadata that will be applied to a Finding when a Finding Template is used.
Applying Finding Templates
Finding Templates can be applied to preexisting Findings, and created from preexisting Findings, using the gear menu on a Finding:
- Apply Template to Finding opens a dialog to select a template. For each field you can keep the Finding’s current value, replace it with the template’s value, or combine both. Applying the template also copies the template’s CVSS scores, remediation and technical detail fields, adds the template’s endpoints, and records the template’s note on the Finding.
- Make Finding a Template creates a new Finding Template from the Finding, copying its details, tags, vulnerability IDs, and endpoints. Each template title must be unique.
Applying a template requires edit access to the Finding plus access to Finding Templates; creating a template from a Finding requires the “add finding template” configuration permission.
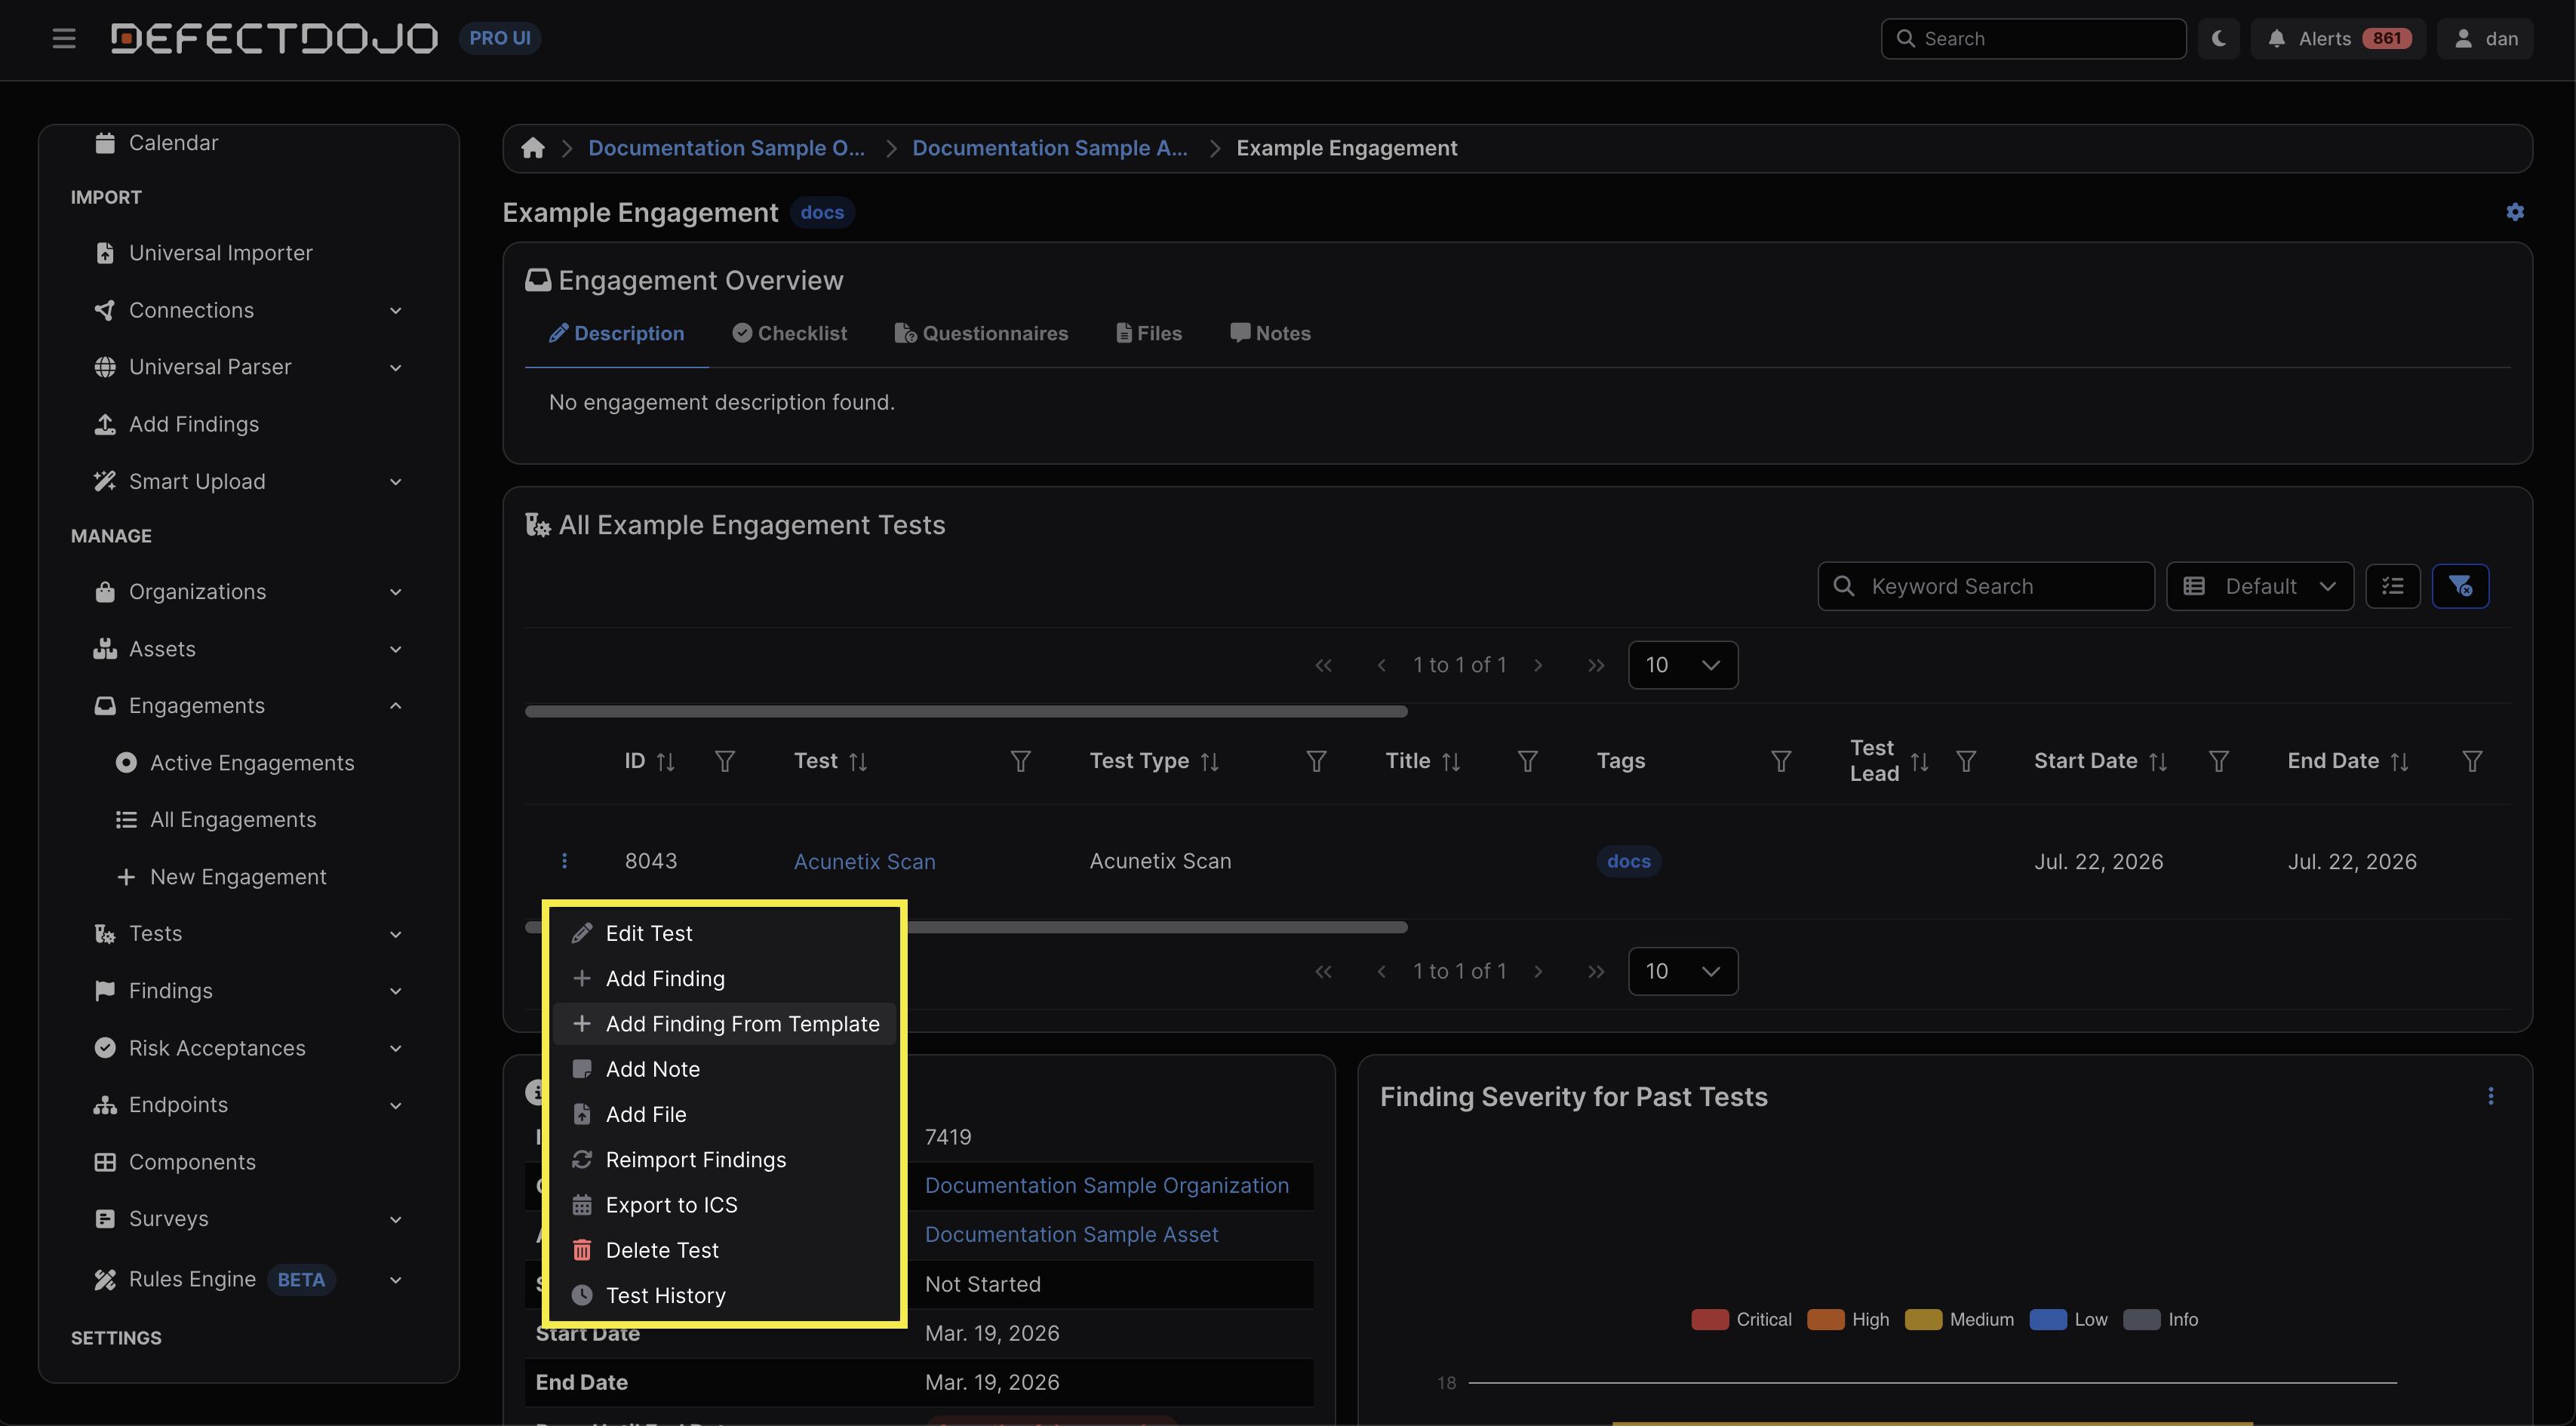
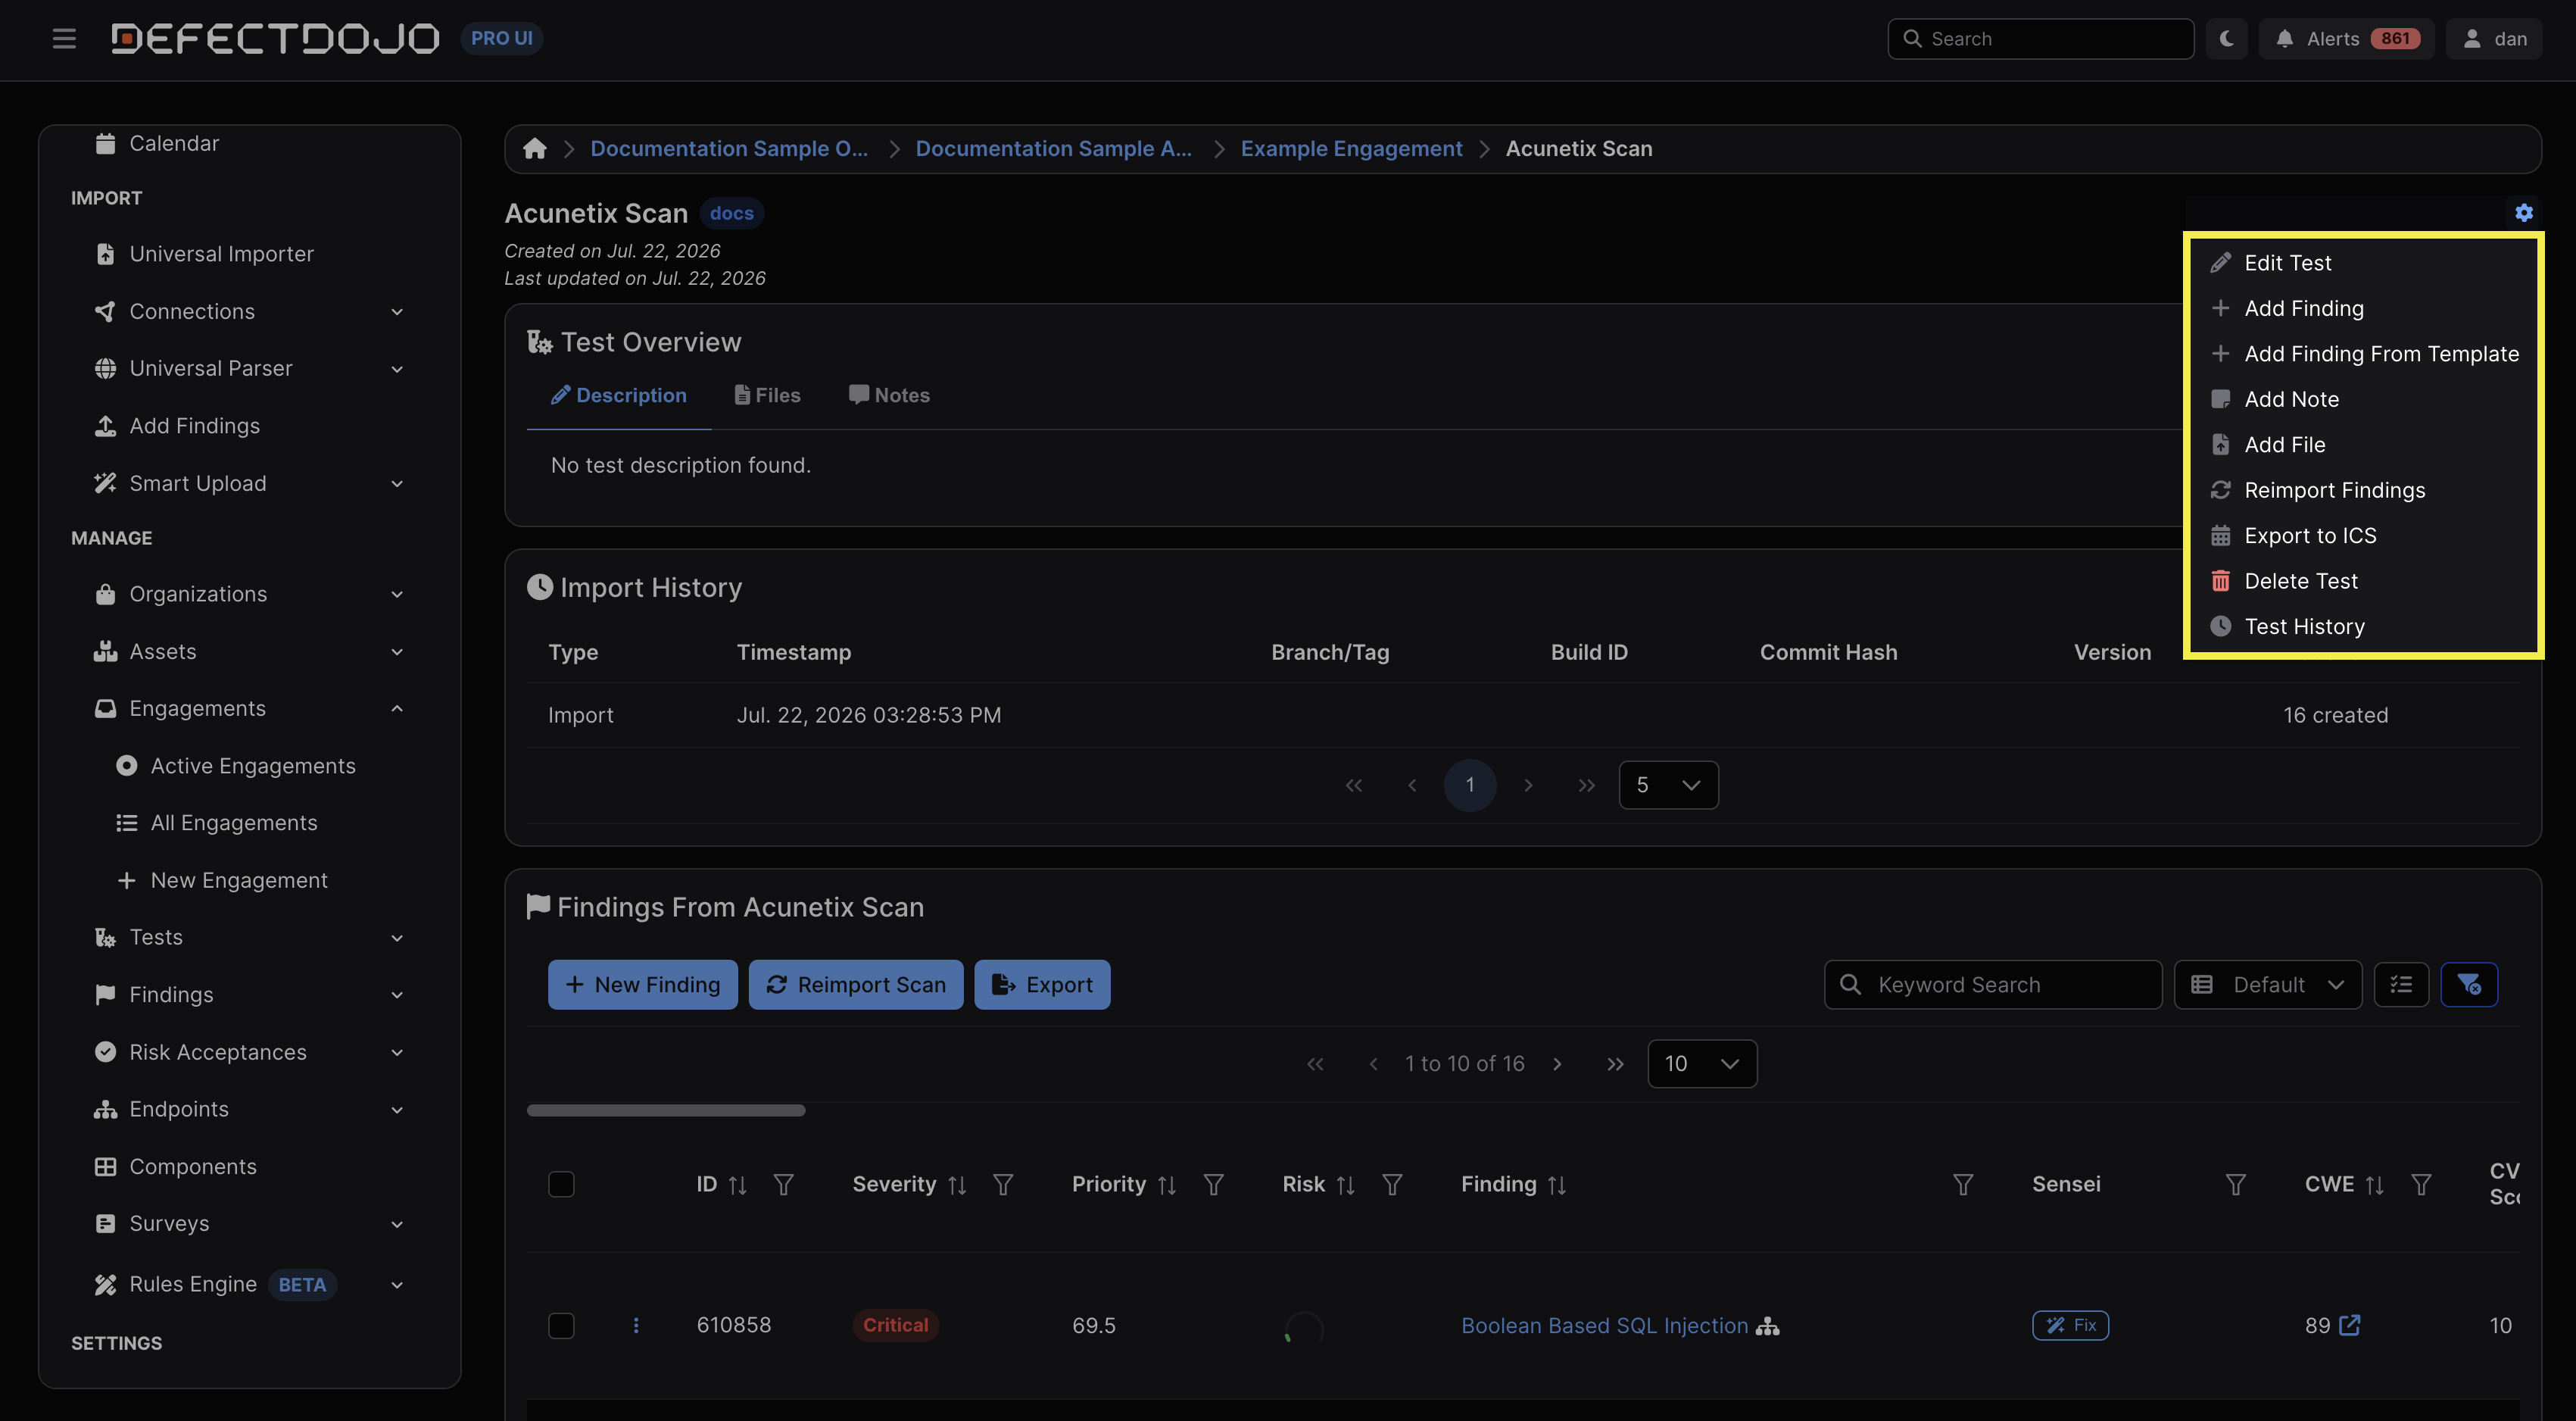
You can also manually add a Finding to a Test based on a Finding Template using either the ⋮ kebab menu next to the Test in the parent Engagement’s view, or using the gear menu in the Test’s view.
Reporting
DefectDojo’s report builder lets you assemble a custom report from a set of content widgets, run it, and export the result (for example, by printing it to PDF). Custom reports can summarize the Findings or Endpoints you want to share with an external audience, and can include branding and boilerplate text.
More information about DefectDojo’s Report Builder can be found here.
Export Findings
Pages that show a list of Findings or a list of Engagements have a CSV and Excel export option at the top left. For Findings, there is also the option to perform a Quick Export.
The CSV and Excel export dialog lets you choose which fields to include and which field to sort by. Findings exports can include Priority, Risk and Risk Score, the same values shown in the Findings table. Export From Table Preference selects them when the Risk and Priority columns are visible in the table, and carries a Risk or Priority sort from the table into the export. Risk is exported as its label (for example, Needs Action), so sort by Risk Score to order an export by risk.
Findings exports can also name the systems each Finding affects. With Locations enabled, select the Locations field: each row lists the values of the Finding’s Locations, and you only see Locations you have permission to view. (On instances still using Endpoints, the equivalent field is Endpoints.) The Locations column of a report template’s Findings table carries the same values, so a scheduled or templated report can pair each Finding with its affected hosts.
Selecting Quick Export opens a dialog with three choices:
- Template: the report template to apply. This defaults to the standard Findings table, so you can export without choosing one.
- Report name: the name the finished report is stored under. It arrives prefilled, and you can edit it before running the export.
- Format: whether the report is produced as HTML or PDF.
The export runs in the background, and the finished report appears in your Generated Reports list under the name you chose. The export opens in a new tab, which shows the report once it is ready. If the export fails, the tab says why. If it takes longer than about a minute, the tab says the report is still being generated and links to its row in the Generated Reports list, where it finishes in the background.
The prefilled name describes what you exported, followed by where you exported it from in parentheses. It carries no date, because the Generated Reports list already shows when each report was requested and completed. Exporting from a Findings list that is not scoped to anything gives just the content name.