

Assets (Pro)
Organizations → ASSETS → Engagements → Tests → Findings
Overview
Assets sit at the center of how security work is organized within DefectDojo’s object hierarchy. Assets represent any project, program, software, or physical asset that your security team is testing, and host all of the security work and testing history related to the testing goal. Examples of Assets can include:
- Software releases
- Third-party software
- Virtual machines or assets in production
- A single application
- A microservice
- An API
- A SaaS platform
- A mobile app
- An internal system
- A business service
- A customer-facing platform
- A cloud environment or infrastructure domain
In general, an Asset should represent the “thing” whose security posture you want to track over time. This includes the associated testing history, Findings, metrics, ownership, integrations, and remediation workflows related to that “thing.”
Asset Examples
Assets can become even more granular depending on the needs of your organization. For example, you may consider creating separate DefectDojo Assets in the following scenarios:
- “ExampleAsset” has a Windows version, a Mac version, and a Cloud version
- “ExampleAsset 1.0” uses completely different software components from “ExampleAsset 2.0”, and both versions are actively supported by your company.
- The team assigned to work on “ExampleAsset version A” is different from the Asset team assigned to work on “ExampleAsset version B”, and needs to have different security permissions assigned as a result.
While you may also elect to represent these variations as Engagements within a single Asset, RBAC can only be set at the level of Assets or Organizations, which may limit users’ access to the appropriate Engagement (as well as the Tests and Findings within those Engagements) if they’re organized as such. For more information on RBAC and permissions in DefectDojo, click here.
Asset Data
Assets will always include the following components:
- Organization
- Unique name
- Description
- SLA Configuration
- Prioritization Engine
Optional Asset metadata includes:
- Tags
- Business criticality
- User records (i.e., the estimated number of user records in the Asset)
- Revenue
- Personnel information (e.g., Asset Manager, Team Manager, Technical Contact, etc.). Only active users can be assigned to these fields, in the UI and over the API. If a user is deactivated later, the assignment stays in place as a historical reference and continues to be readable, but that user cannot be assigned again until the account is reactivated. An update that re-sends the value already stored is still accepted.
- Regulations (e.g., HIPAA, GLBA, OPPA, etc.)
- Platform (e.g., API, Desktop, IoT, Mobile, Web, etc.)
- Lifecycle (e.g., Construction, Production, Retirement, etc.)
- Origin (e.g., Third-Party Library, Purchased, Open Source, etc.)
To send notifications to somebody who does not have an active DefectDojo account, use a Rules Engine 2 rule with an Email node instead. The node sends to any address named in its Email connection’s recipients field, and the recipient needs no DefectDojo account at all. The personnel fields grant no notification rights of their own.
This metadata improves filtering, reporting, and prioritization across your security program, but most importantly, Assets also contain all of the Engagements, Tests, and Findings related to the testing efforts surrounding that Asset. All Findings from Tests ultimately roll up to the Asset level, enabling long-term tracking, trend analysis, and reporting.
Beyond these built-in fields, an administrator can define typed Custom Fields for Assets, which you fill in on the Asset’s page and can turn on as opt-in columns on the All Assets table. See Custom Fields.
Accessing Assets
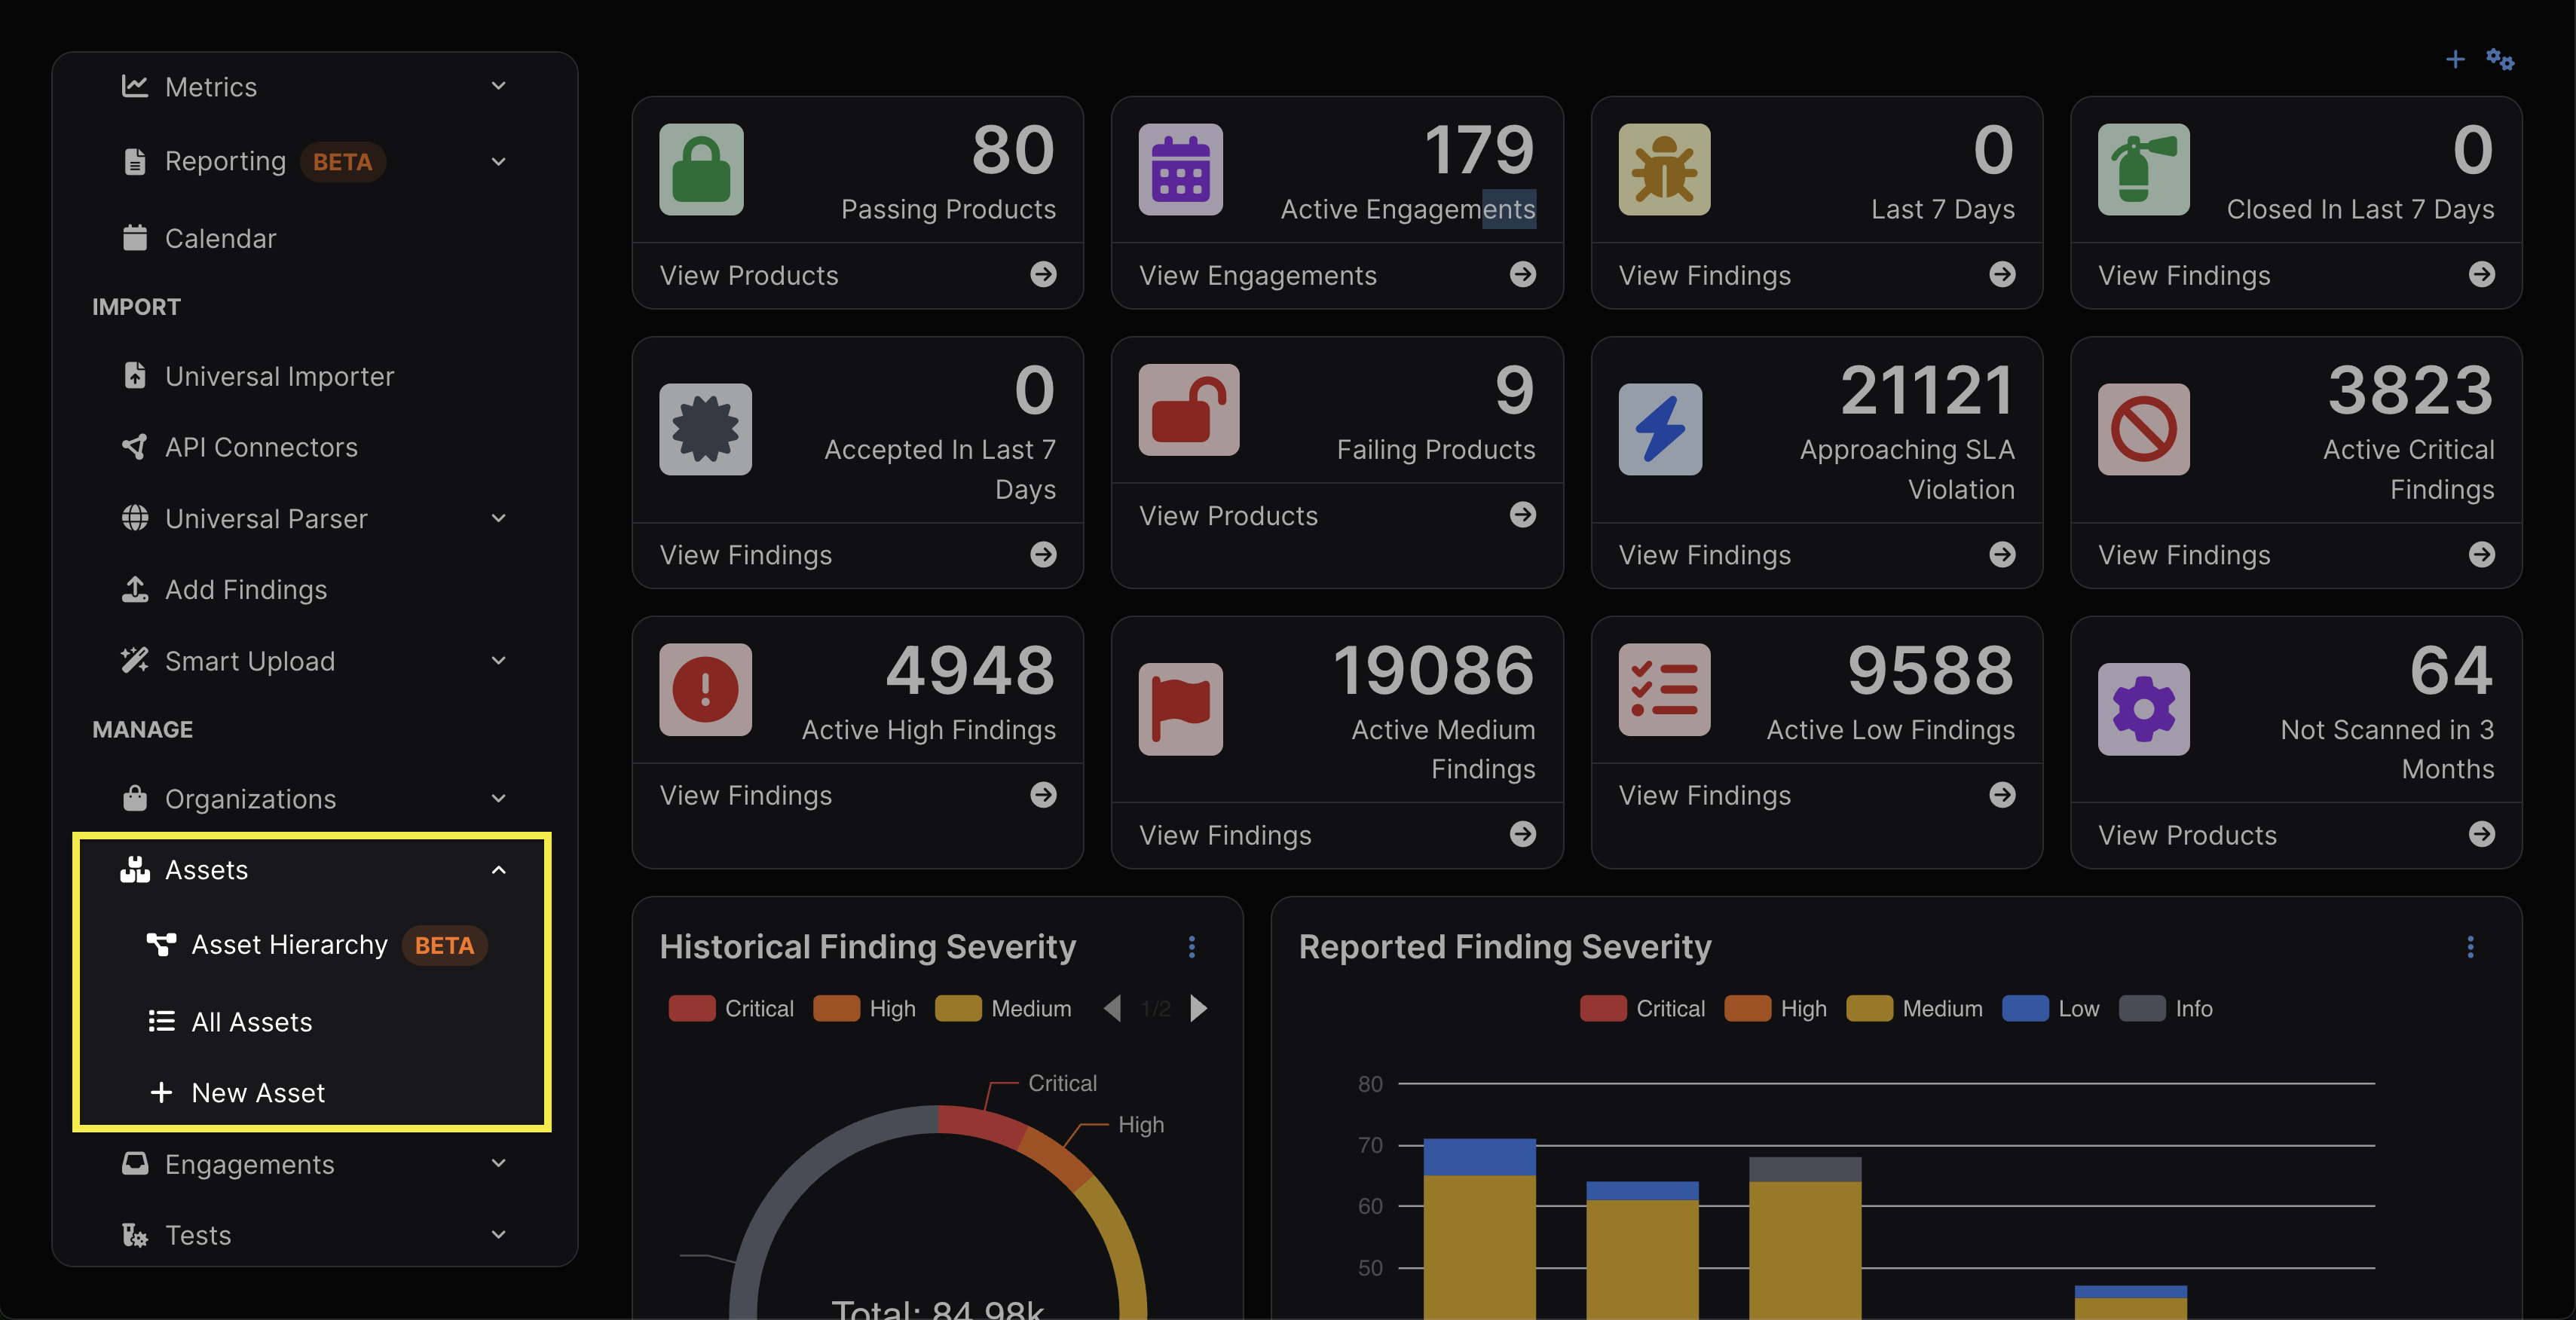
Assets are accessible via the sidebar. The submenu provides access to the Asset Hierarchy and All Assets, as well as the option to create a new Asset.
Permissions
Assets can have Role-Based Access Control (RBAC) rules applied, which limit team members’ ability to view and interact with them.
Permissions cascade downward, meaning that access to an Asset automatically grants access to all objects within that Asset (e.g., Engagements, Tests, and Findings).
For more information on user roles, see our Introduction To Roles article.
Asset View
Asset views contain a variety of tables and charts to interpret an Asset’s status at a glance. This includes:
- Open Finding Severity
- A list of open Findings within the Asset, grouped by severity
- Asset Overview
- A breakdown of various features of the Asset, including Description, Components, Contacts, User Groups, Members, Technologies, and Regulations.
- Technologies: next.js, vue.js, npm v.1.2.3, Django, nginx, Hugo
- A breakdown of various features of the Asset, including Description, Components, Contacts, User Groups, Members, Technologies, and Regulations.
- Metadata
- Including parent and child Assets, Organization, business criticality, revenue, and other details added from the Asset’s settings.
- Service Level Agreement by Severity
- Applies the Asset’s SLA configuration from settings to the Findings within the Asset.
- Finding Severity Breakdown
- A graph of the Findings within the Asset, organized by severity.
- Finding Distribution
- A breakdown of the Findings within the Asset, organized by status (e.g., Active, Mitigated, Static, and Dynamic)
- All Engagements
- A list of Engagements contained within the Asset.
Working with Assets
Create Assets
There are two ways to create Assets:
- From the New Asset option in the side menu
- From the New Asset button at the top of the All Assets list
Edit Assets
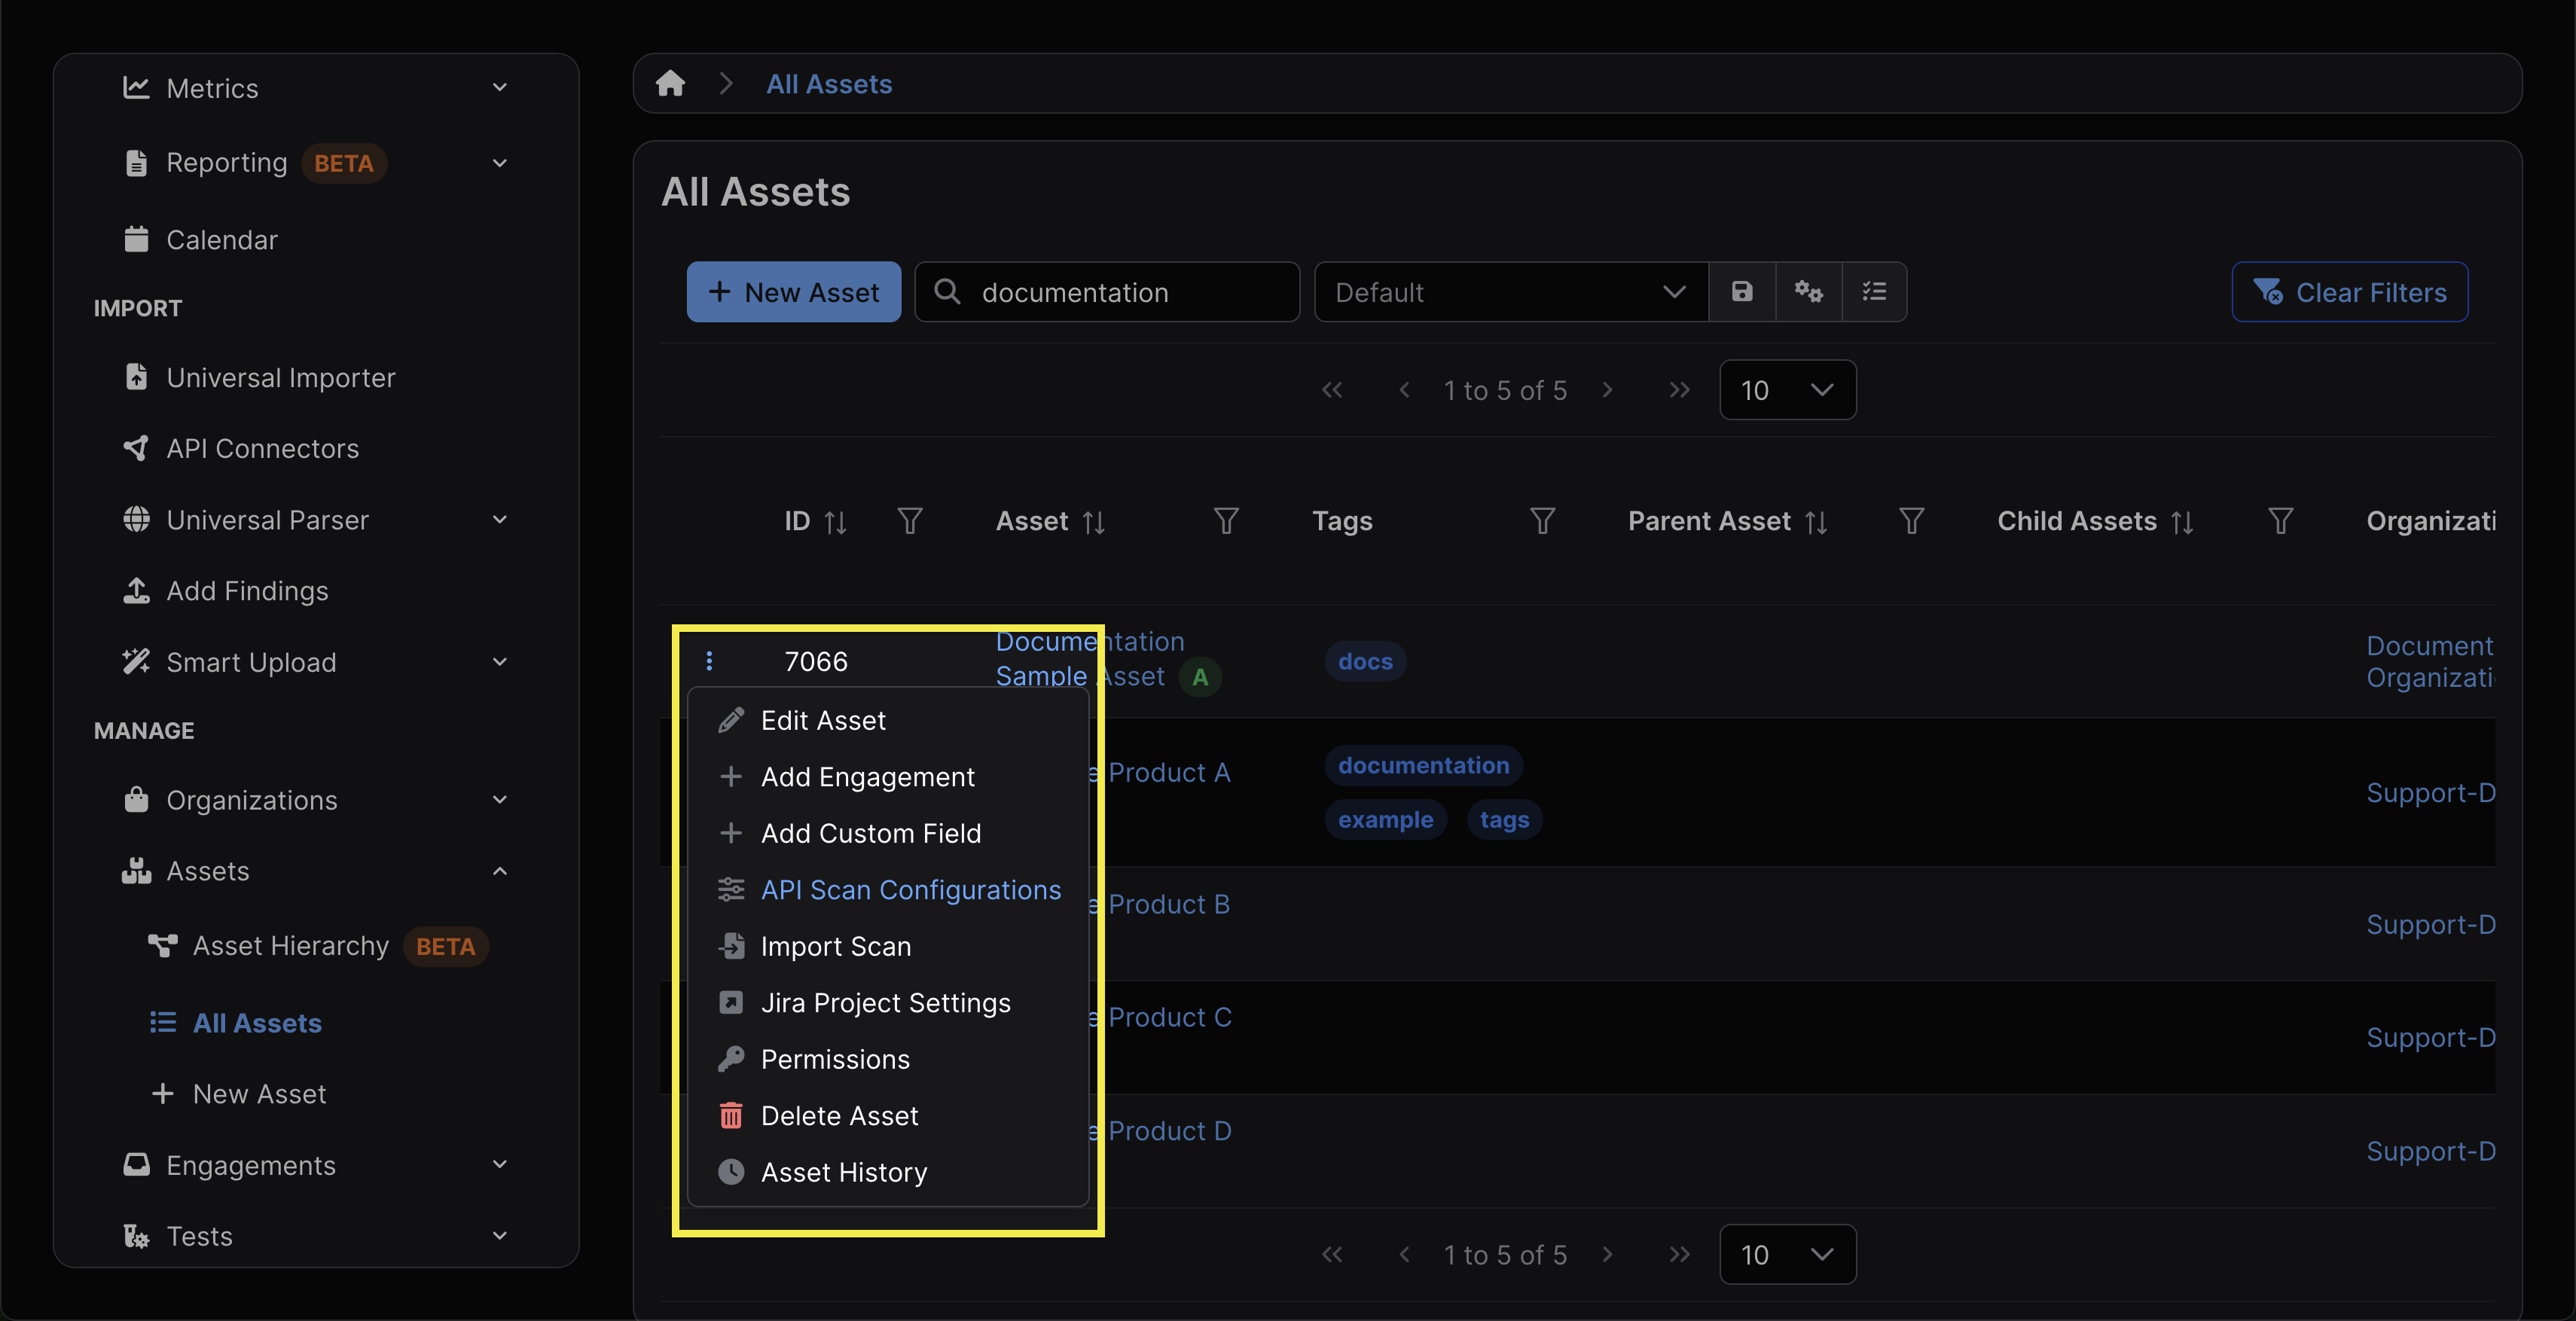
Assets can be edited by clicking Edit Asset from within the gear menu at the top right of the Asset’s view. The same menu can also be accessed by clicking the ⋮ kebab menu to the left of the Asset in the All Assets view.
All ensuing fields that can be edited are also available when the Asset is being created.
Bulk Edit Assets
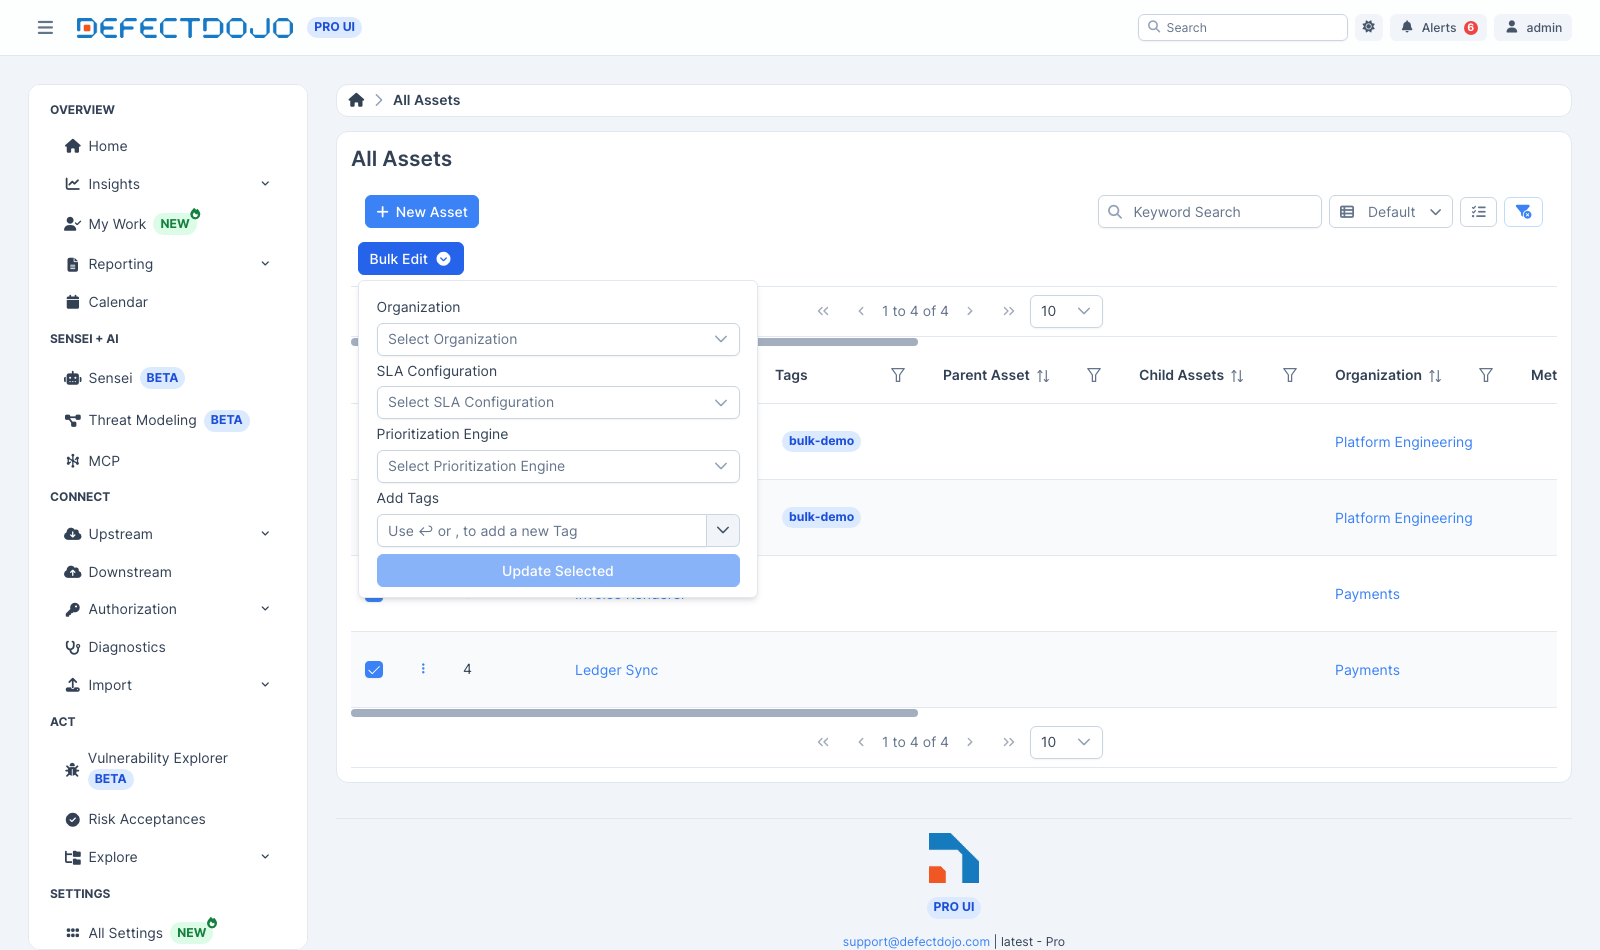
Several Assets can be edited in one action from the All Assets list. Select the Assets using the checkboxes on the left of the list, then click Bulk Edit in the bar that appears above the table.
The Bulk Edit form applies any combination of the following to every selected Asset:
- Organization: moves the selected Assets to a different Organization. You need permission to add Assets to the destination Organization.
- SLA Configuration
- Prioritization Engine
- Tags: added on top of each Asset’s existing tags — nothing is removed.
Leave a field empty to keep each Asset’s current value. Assets you don’t have edit permission for are skipped and counted in the result, as are Assets whose Findings are still being recalculated from an earlier SLA Configuration or Prioritization Engine change.
Export the Asset Inventory
The All Assets list can be exported from the dropdown menu in the top-right corner, as CSV, Excel or JSON. The All Organizations list exports the same way.
The export contains the Assets the list is currently showing, so any filter or search you have applied narrows what you get. You choose which columns to include and the order they appear in, and you can name the file before it downloads.
Alongside the identifying fields, the export carries the metadata that drives prioritization — business criticality, user records, revenue, external audience, internet accessible — together with platform, lifecycle, origin and the parent Asset. That makes an export a practical way to review the inventory in a spreadsheet, and to fill in the business context that only your team knows before bringing it back into DefectDojo.
Values are written so a spreadsheet displays them rather than evaluating them. A cell that begins with =, +, - or @ is treated as a formula by Excel, LibreOffice and Google Sheets, so DefectDojo prefixes such a value with an apostrophe when it writes the file. Numbers are left alone, so a revenue column still adds up.
Delete Assets
Deleting an Asset can be performed by selecting Delete Asset from the Asset’s settings. This action can’t be undone. Assets can’t be closed and reopened later.
Deleting an Asset will also delete the following:
- Any Engagements and Tests contained within the Asset
- All associated security history, including Findings and integrations
- Any linked Jira Epics
- All notes and file uploads associated with the Asset’s Engagements and Tests
Asset Boundaries
Deduplication
Assets are “walled-off” and do not interact with other Assets. DefectDojo’s Smart Features, such as Deduplication, only apply within the context of a single Asset. Findings across different Assets will not be automatically deduplicated.
Reporting and Metrics
Most reporting and metrics aggregate data at the Asset level, making Assets the primary unit for measuring and tracking risk.
As a result, many key metrics are calculated per Asset, including:
- Total number of Findings (by severity or status)
- Mean time to remediate (MTTR)
- SLA compliance and breach rates
- Risk trends over time
This means that how Assets are structured will directly impact the accuracy and usefulness of reports. For example, grouping multiple unrelated systems under a single Asset may obscure risk visibility, while overly granular Asset structures can fragment reporting, making it difficult to identify broader trends.
Connectors
In DefectDojo Pro, Connectors are mapped to different Assets in DefectDojo Pro, making them the primary integration point between DefectDojo and your broader security ecosystem.
Once a Connector has been attached to an Asset, it will import scan results and create or update Engagements, Tests, and Findings within that Asset.
For more information about Connectors, click here.
CI/CD Pipelines
CI/CD pipelines automate the import of scan results. Regardless of the integration method, all scan imports must be associated with an Asset, making the Asset the anchor point for pipeline-driven security data.
When a pipeline submits scan results, it must either:
- Specify an existing Asset (and optionally an Engagement), or
- Be configured in a way that consistently maps results to the correct Asset
All imported Findings will inherit the Asset’s context, including ownership, permissions, priority/risk configuration, and reporting scope.
In practice, Assets should be defined to reflect how systems are built and deployed within CI/CD to ensure that security results are consistently associated with the correct application or service.
SLAs, Priority, and Risk
In DefectDojo Pro, Findings inherit their SLA targets, Priority, and Risk from the Asset that contains them. Asset metadata (e.g., business criticality, revenue, etc.) are used to automatically calculate Priority and Risk values.
This means that the same vulnerability may receive a different Priority or Risk score depending on whether it affects an internal development system or a production asset supporting critical business operations.
Jira / Downstream Connector Relationships
Assets can be mapped directly to Jira or Integrators instances (e.g. GitHub, GitLab, ServiceNow, etc.), which push the Asset’s Findings outward into external ticketing/work-management systems.
Because Findings inherit risk, priority, and ownership from their parent Asset, the Asset effectively determines the remediation context that flows into Jira tickets and Downstream Connector workflows.
Importantly, Assets are also the primary determining factor in a Finding’s SLA characteristics. Therefore, the SLA of a Findings depends on the SLA configuration of its parent Asset. More information about SLA configurations can be found here.
Asset Types
An Asset can declare what sort of thing it is: a repository, a service, a host, a domain, a container image, a package, a cloud account, a device, or a branch. The type is optional — an Asset without one behaves exactly as it always has — and it is descriptive rather than functional: it does not change permissions, deduplication, SLAs, or reporting scope. What it does is make a long Asset list readable, by giving each Asset an icon and a label that says what you are looking at.
The list of types is data, not a fixed set. The types DefectDojo ships are marked as system types and cannot be deleted, but their wording and icons can be changed, and you can add your own types for anything your inventory contains that the shipped list does not cover.
Set an Asset’s type with the Type field on the Asset’s add and edit forms; leave it empty to leave the Asset unclassified. Once set, the type appears as a badge with its icon beside the Asset’s name at the top of the Asset page, and as an icon in front of each node’s name in the Asset Hierarchy view — where it tells you at a glance whether you are looking at a repository, the service built from it, or the host it runs on. The hierarchy view’s field picker (the eye control, top left) can also show the type’s label under each node’s name.
Asset types are available through the API at /api/v2/asset_types/ (read-only) and as the
asset_type field on /api/v2/assets/ and /api/v2/products/.
Asset Identity: Aliases
The same Asset is usually known by different names in different places: a repository id in GitHub, a project key in your scanner, a hostname in DNS, an image digest in a registry. An alias records one of those identifiers against the Asset it refers to, so DefectDojo can recognise the Asset from whichever name a source happens to use.
Each alias has three parts:
- a namespace, naming the system that issued the identifier —
dns,oci,purl,git, or a specific Connector configuration; - a type, saying what kind of identifier it is —
external_id,hostname,image_digest, and so on; - the value itself.
An identifier resolves to exactly one Asset. Two Assets cannot both claim api.example.com in
the dns namespace, which is what makes an alias a reliable answer to “which Asset is this?”
Aliases record where they came from. Ones you add yourself are marked as user-asserted and are never rewritten by automation; Connector sync maintains its own. That means you can correct a Connector’s idea of what an identifier means without the next sync undoing it.
Aliases are asserted or withdrawn, never edited: there is no update action on the API, because changing an identifier in place would silently re-point identity with no record of what it used to mean. To correct one, remove it and add the right one.
Connector-issued aliases are written by Connector sync rather than by hand, so the API refuses
writes to a connector: namespace. Everything else is yours to declare, through
/api/v2/asset_aliases/.
Managing aliases from the Asset page
The Asset Identity card on the Asset page lists every identifier that resolves to that Asset, with its type, its namespace, and where it came from — a Connector’s name for the ones its sync asserted, or User for the ones you added.
Use Add Identity to declare one. You pick the namespace first, then the type, because only
some pairings mean anything: a hostname belongs in dns, an image digest in oci. The
namespaces offered are the shared, semantic ones; a Connector’s own namespace is not offered,
because those belong to its sync.
Removing an alias withdraws it rather than editing it. Withdrawing one you added means sources that knew the Asset by that identifier fall back to matching it by name. Withdrawing one a Connector asserted only lasts until that Connector’s next sync, which will assert it again — to stop a Connector claiming an Asset, change its mapping rather than its aliases.
Adding and withdrawing an alias requires edit permission on the Asset.
Aliases require DD_V3_ASSET_ALIASES to be enabled before they can be created, and the Asset
Identity card and the Type field appear only when it is on; existing aliases stay readable
whether it is on or off.
Asset Versions
Most Assets ship in versions: releases, tags, image builds. A version records one of those against the Asset, so an SBOM can describe one release and a Finding can say which releases it applies to. Versions are metadata about an Asset, not more Assets — a Finding stays a single row however many versions mention it. The model, the per-version bill of materials, and how imports record claims are covered in Working with SBOMs. This section is about reaching them in the UI.
Versions require DD_V3_ASSET_VERSIONS to be enabled: set it on a self-hosted deployment, or
contact support on Cloud. While it is off, none of the surfaces below are offered. An Asset with
no versions behaves exactly as it does today.
The Versions table
Versions appear as an optional table on the Asset page. Add it from Page Layout → Edit Layout
→ Add Widget → Data Table, then choose Versions as the record set. Each row shows the
version, its optional release date, how many BOM snapshots it has, and how many Findings are
recorded as found in or fixed as of it.
Add Version declares one by hand, which is useful for a release you want to record claims
against before any SBOM has been uploaded for it. Name it the way its producer does — 5.2.0,
2026.08, a build tag — because that is the string imports match against. The release date is
optional and is a display hint: DefectDojo does not parse or order version names.
Removing a version removes the snapshots and claims bound to it. The Findings themselves are untouched; only the per-version claims about them go.
Uploading an SBOM for a version
Import SBOM on the Asset page takes an optional Version. Give it one and the upload is recorded as that version’s bill of materials; leave it blank and the document’s own subject version is used, or the upload stays on the unversioned stream if it declares none. A version named for the first time here is created then and there, so it does not have to be declared first.
Affected versions on a Finding
A Finding carries claims about the versions it applies to — found in a version, or fixed
as of one. Imports record these on their own; the Affected Versions table shows them and
lets you record one by hand. Add it to the Finding page the same way: Page Layout → Edit
Layout → Add Widget → Data Table, record set Affected Versions.
Each row names the version, whether the claim is Found In or Fixed In, and where it came from — an import or a person — so it is clear whether a scanner said it or someone recorded it. Use Record Claim to add one, and the row action to withdraw one. Claims are added and withdrawn rather than edited, and nothing is inferred between them: a Finding found in 5.0.0 and fixed in 5.2.0 says nothing on its own about 5.1.3.
Asset Nesting
DefectDojo supports parent-child relationship between two Assets within the same Organization. This can be configured during Asset creation or in the Asset’s settings.
You can visualize the structure of Assets in DefectDojo and change relationships using the Asset Hierarchy option in the sidebar.
After selecting the Assets to be visualized from the corresponding table, click View Asset Hierarchy to generate a flow chart of the relationship between the chosen Assets, if any.
Further information on the effect of nesting Assets on deduplication, RBAC, and other details, as well as example use cases, can be found here.