Tests (Open Source)
Organizations → Assets → Engagements → TESTS → Findings
Overview
A Test is a container for one or more scan executions, which are used to discover flaws in a Product. Tests are the final, most granular component of DefectDojo’s product hierarchy, serving as the container for the Findings that result from an execution of a security tool or manual assessment while also adding the context in which any such Findings were found (i.e., which tool reported it, when that tool was last run, etc.).
Examples of Tests include:
- Static Application Security Testing
- Dynamic Application Security Testing
- Software Composition Analysis
- Container Security Scans
- Infrastructure / Network Scans
- Manual Penetration Tests
- CI/CD Pipeline Scans
Test Types
There are two primary ways to create Tests in DefectDojo:
- Vendor-specific parsers (e.g., Burp, OWASP ZAP, Acunetix, Invicti)
- Generic Findings Import
Each method can create new Tests or reimport Findings into existing Tests depending on configuration and deduplication strategy.
While each method differs primarily in how scan data is parsed and ingested, they all ultimately result in Findings being associated with a Test.
Parsers
Parsers are components that process specific scan output formats (e.g., XML, JSON, CSV) and map it into DefectDojo’s internal Finding model. When scan results are imported, DefectDojo uses the selected parser to extract Findings and attach them to a newly created or existing Test.
Generic Findings Import
When no native parser exists for a given tool, Generic Findings Import allows you to import findings using a standardized JSON or CSV schema, regardless of the original source.
DefectDojo parses the provided data, creates a new Test (or imports into an existing one), and attaches the Findings. A corresponding Test Type is also created based on the report’s optional type field: when type is omitted (or equals the scan type) the Test Type is “Generic Findings Import”; when type is provided it becomes “{type} Scan (Generic Findings Import)” (a type that already ends with the “(Generic Findings Import)” suffix is used verbatim).
| Native Parsers | Generic Findings Import | |
|---|---|---|
| Primary purpose | Ingest supported tool outputs | Ingest unsupported/custom data via fixed schema |
| Input format | Tool-specific (e.g., ZAP XML, SARIF) | Strict JSON/CSV schema |
| Who handles normalization | DefectDojo (built-in parser) | User (must conform to schema) |
| Test creation trigger | Manual upload or API import | Manual upload or API import |
| Test Type | Predefined (e.g., “ZAP Scan”) | Auto-created “Generic” type |
| Setup effort | Low | Moderate (data transformation required) |
| Flexibility | Low (only supported tools) | Medium |
| Automation level | Low–Moderate | Low–Moderate |
| Typical use case | Standard scanners (SAST, DAST, SCA) | Custom scripts, unsupported tools |
Regardless of the ingestion method, all scan data in DefectDojo is ultimately represented as Findings attached to a Test, which serves as the unit of execution and lifecycle tracking.
Test Data
Tests store a variety of metadata that helps to document various components of each testing effort, such as:
- Test title / name
- Test type
- Test description / notes
- Start and end date
- The Environment in which the Test was run (e.g., Development, Staging, Pre-Production, Production, etc.)
- Version / Branch / Build ID / Commit Hash
- API scan configuration
- Additional files that can be used for later audits or re-imports
- The parent Engagement, Asset, and Organization
- Import and reimport history
Each Test maintains an import history, which records all scan imports and reimports associated with the Test. This includes metadata such as scan date, version, branch, commit hash, and build ID.
This history provides traceability across multiple scan executions within the same Test.
Permissions
Multiple Tests can be stored within a single Engagement, and Engagements are stored within Products. As such, access to a Product automatically grants access to all Tests (and Engagements) within that Product. Tests do not have independent access control lists.
Accessing Tests
While Tests exist as an independent object in DefectDojo OS, they do not have a specific section dedicated to them within the UI. As such, each Test is primarily accessible through the Product and/or Engagement that contains it.
Test View
The Test view hosts a variety of tables, including the parent Engagement, the import and reimport history, a list of Findings contained within the Test as well as any Finding Groups.
There are also tables for Potential Findings, Files, and Notes, all of which can be added manually.
Test Settings
The following settings are available within each Test view:
- Edit Test
- Permits the editing of Test data, such as title, schedule, environment, and other various details.
- Copy Test
- Duplicates a Test, along with all associated metadata and Findings, and allow it to be attributed to a different Engagement.
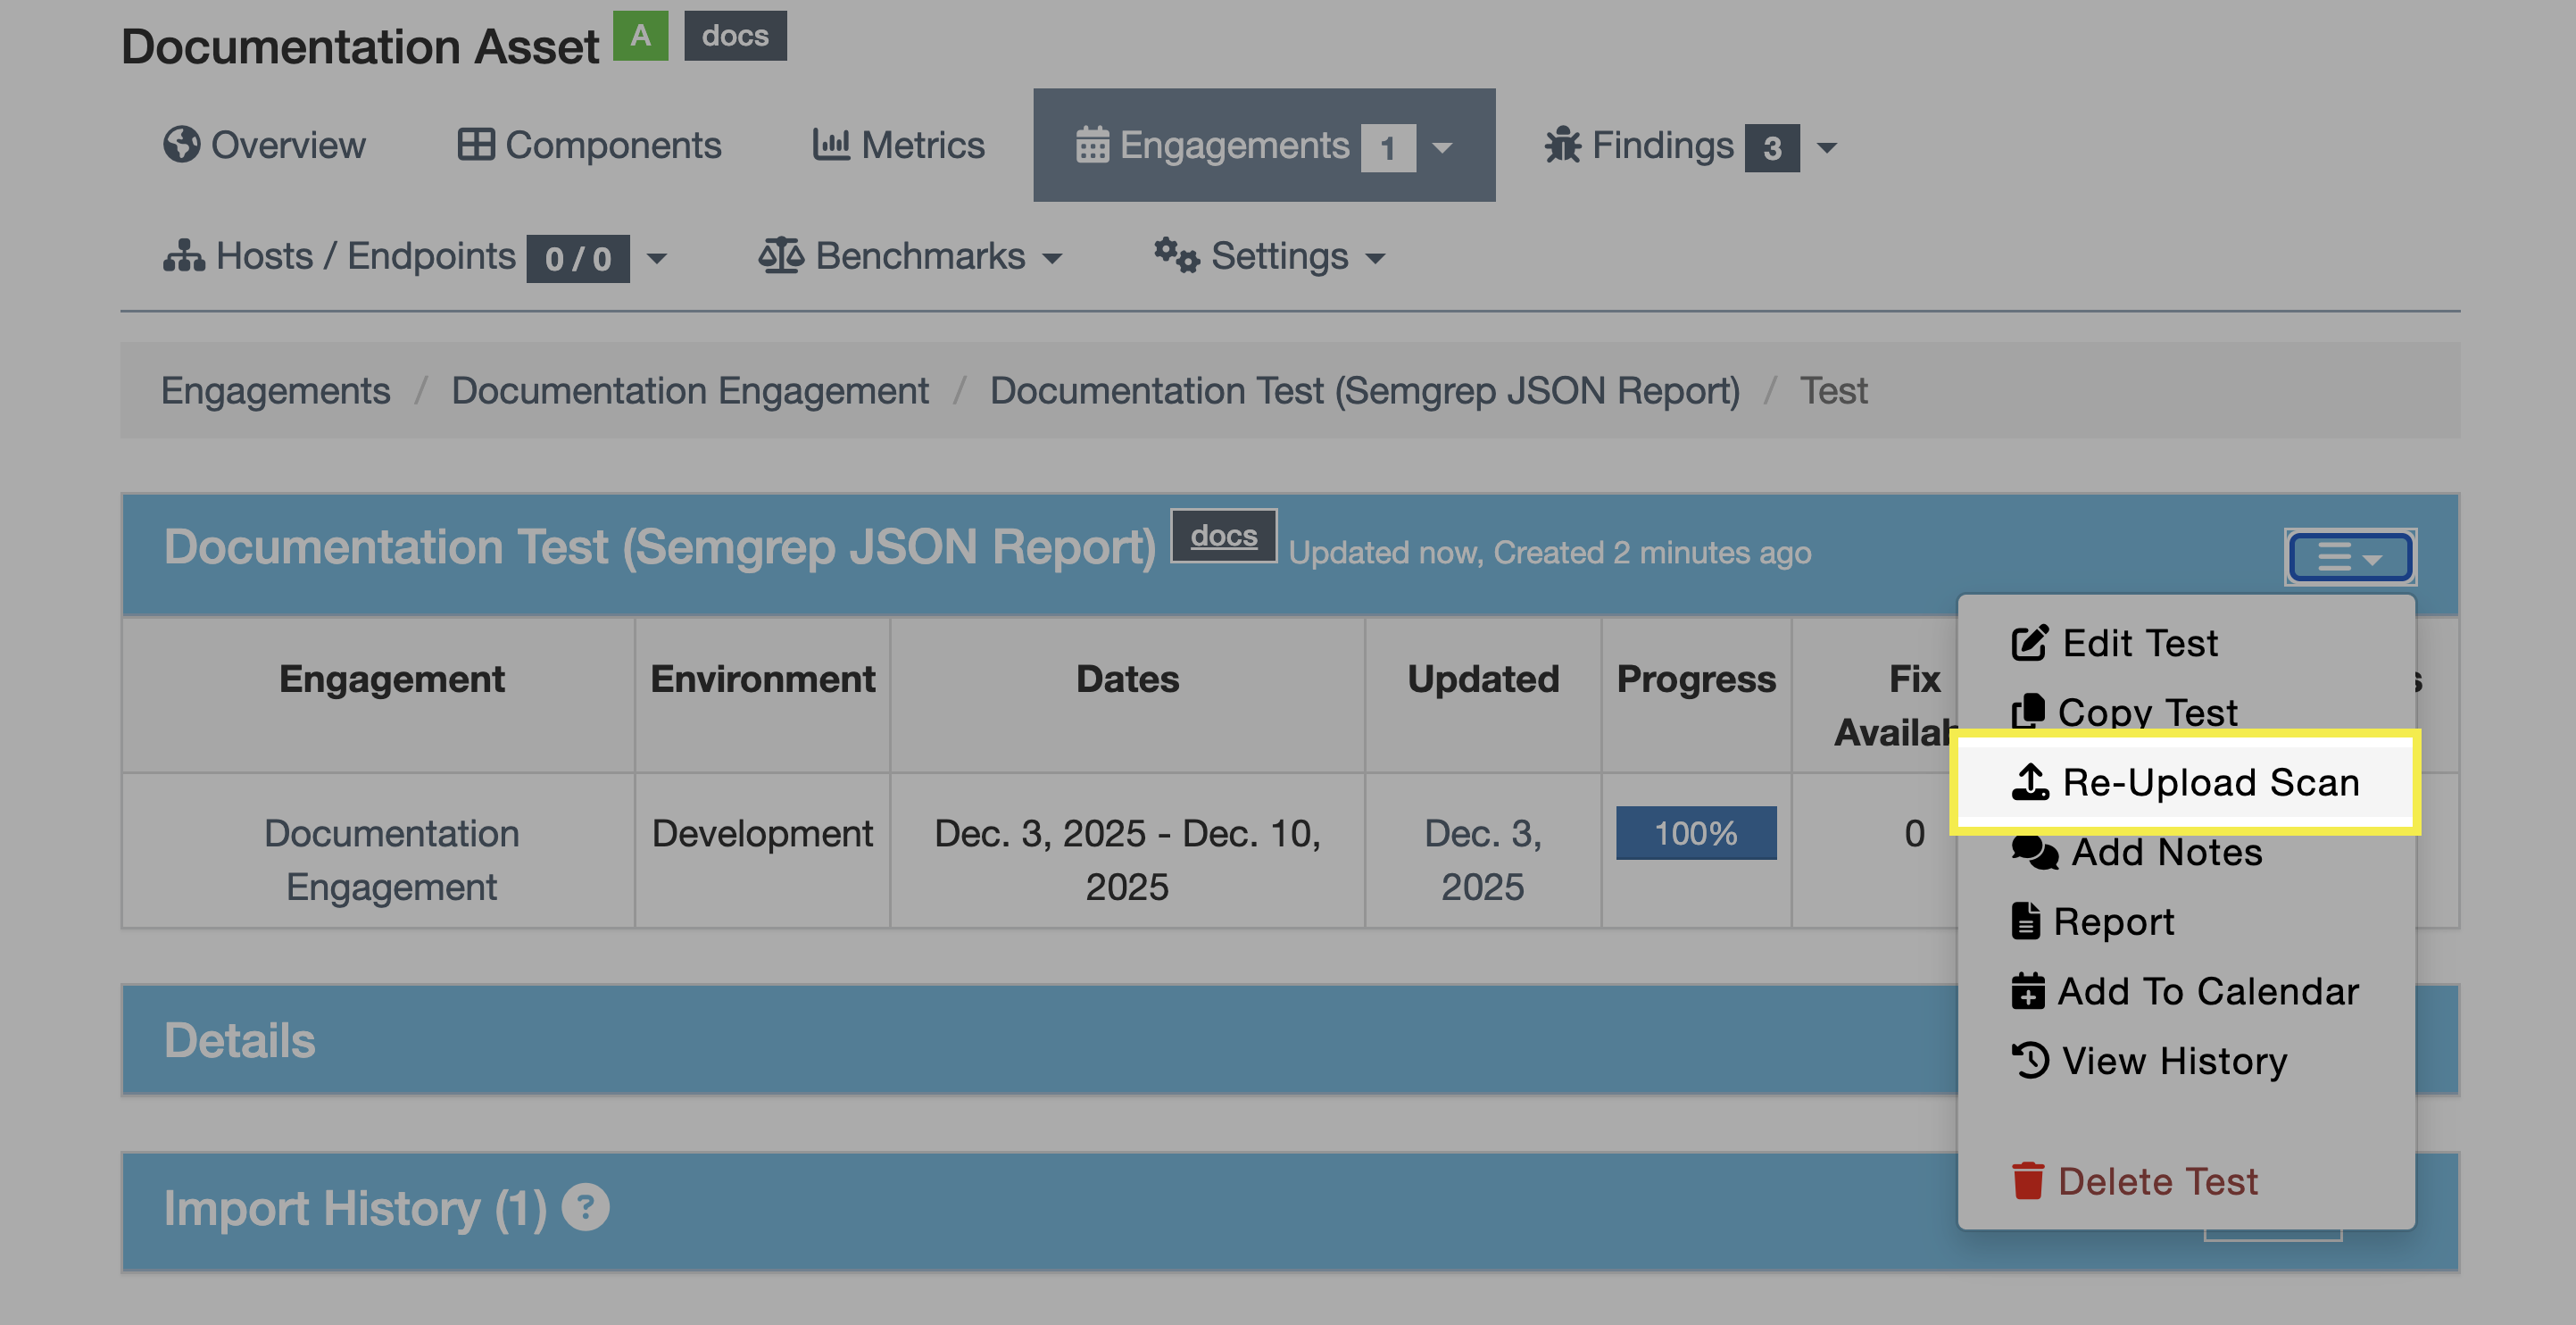
- Re-Upload Scan
- Initiates the reimport process. More information on Reimporting is contained later in this article.
- Add Notes
- Allows the user to add a Note. A Notes table is also present at the bottom of the page.
- A Note can be toggled as Private, in which case it is prevented from pushing to Jira, Reports, and exports of Findings.
- Allows the user to add a Note. A Notes table is also present at the bottom of the page.
- Report
- Initiates the process of generating a Report, in which myriad filters can be applied in order to create a report of only the filtered Findings.
- Add To Calendar
- Downloads an .ics file of the chosen Test that can be added to your third-party calendar application.
- View History
- Opens a history of edits made to the Test for tracking, reporting, and auditing purposes.
Working with Tests
Create Tests
Tests can be automatically created when scan data is imported directly into an Engagement, resulting in a new Test containing the scan data. Tests can also be created in anticipation of planning future Engagements, or for manually entered security findings requiring tracking and remediation.
Manual Workflows
There are several ways to create a Test in the OS version:
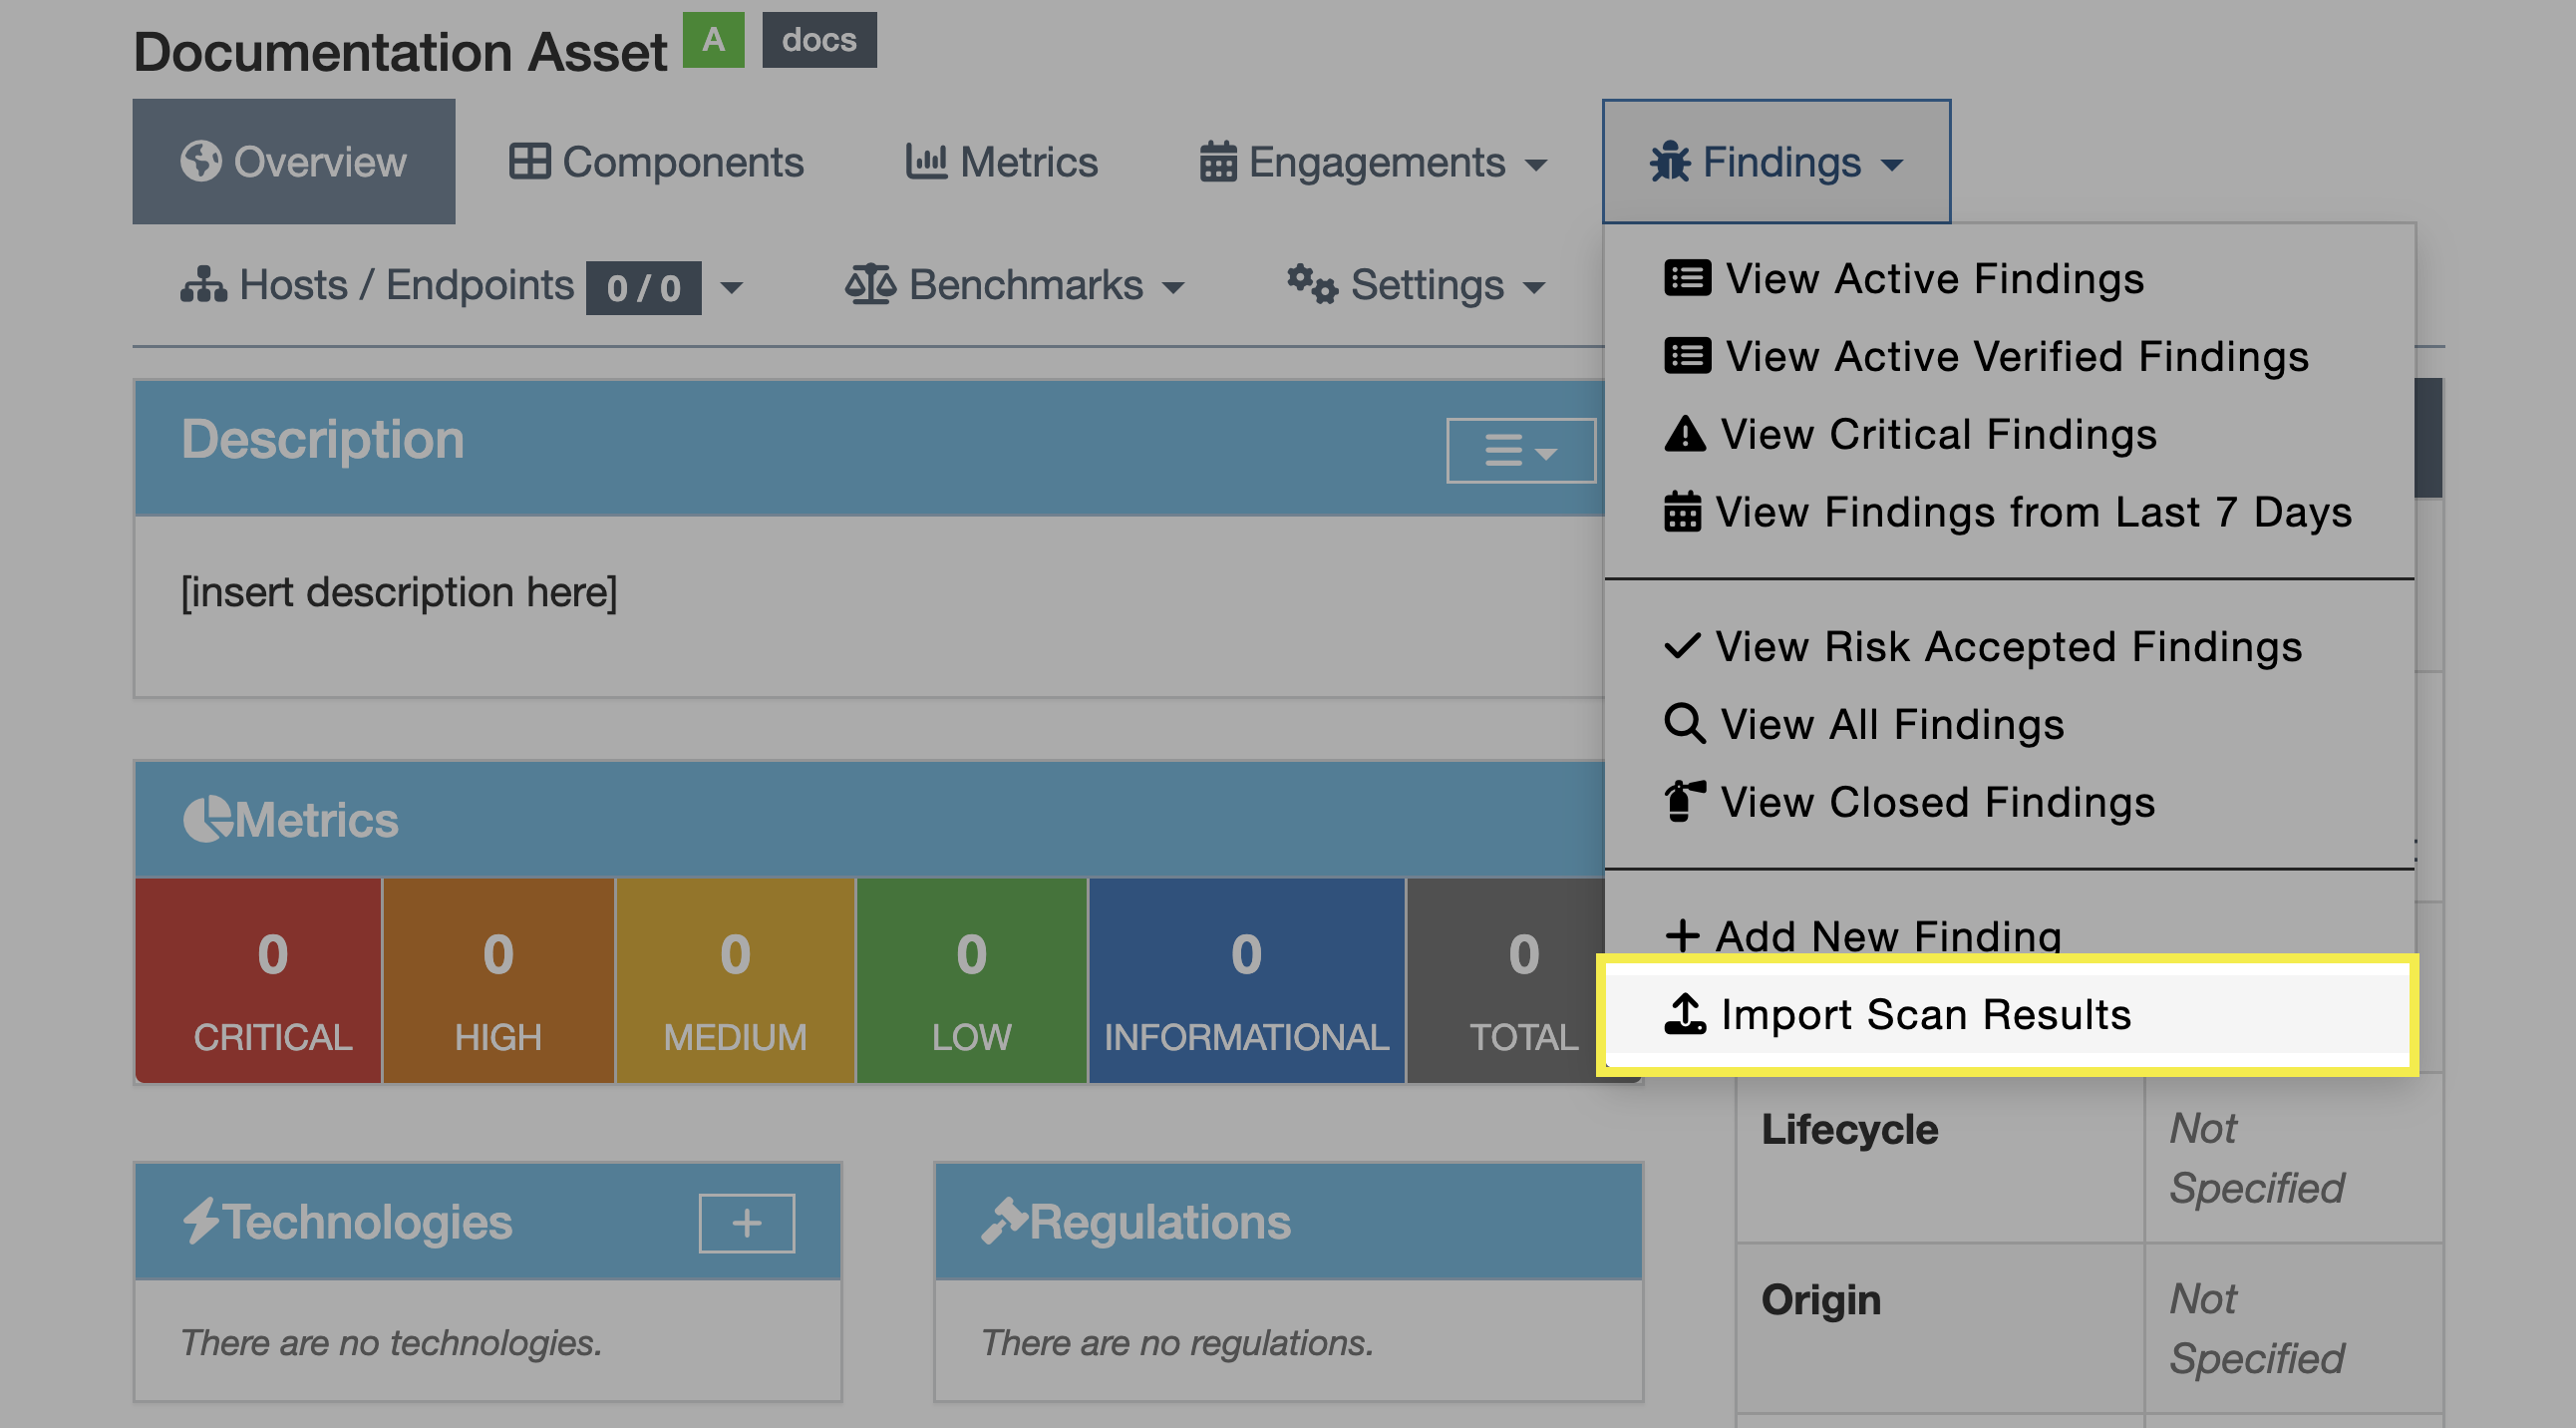
- Select a Product and click “Import Scan Results” from the Findings menu in the navigation bar
- This will create an ad hoc Engagement to contain the Test
- Select an Engagement within a Product, click the dropdown menu in the Tests subsection, and click either “Add Tests” or “Import Scan Results”
- This will create the ensuing Test directly within the chosen Engagement

- While creating an Engagement
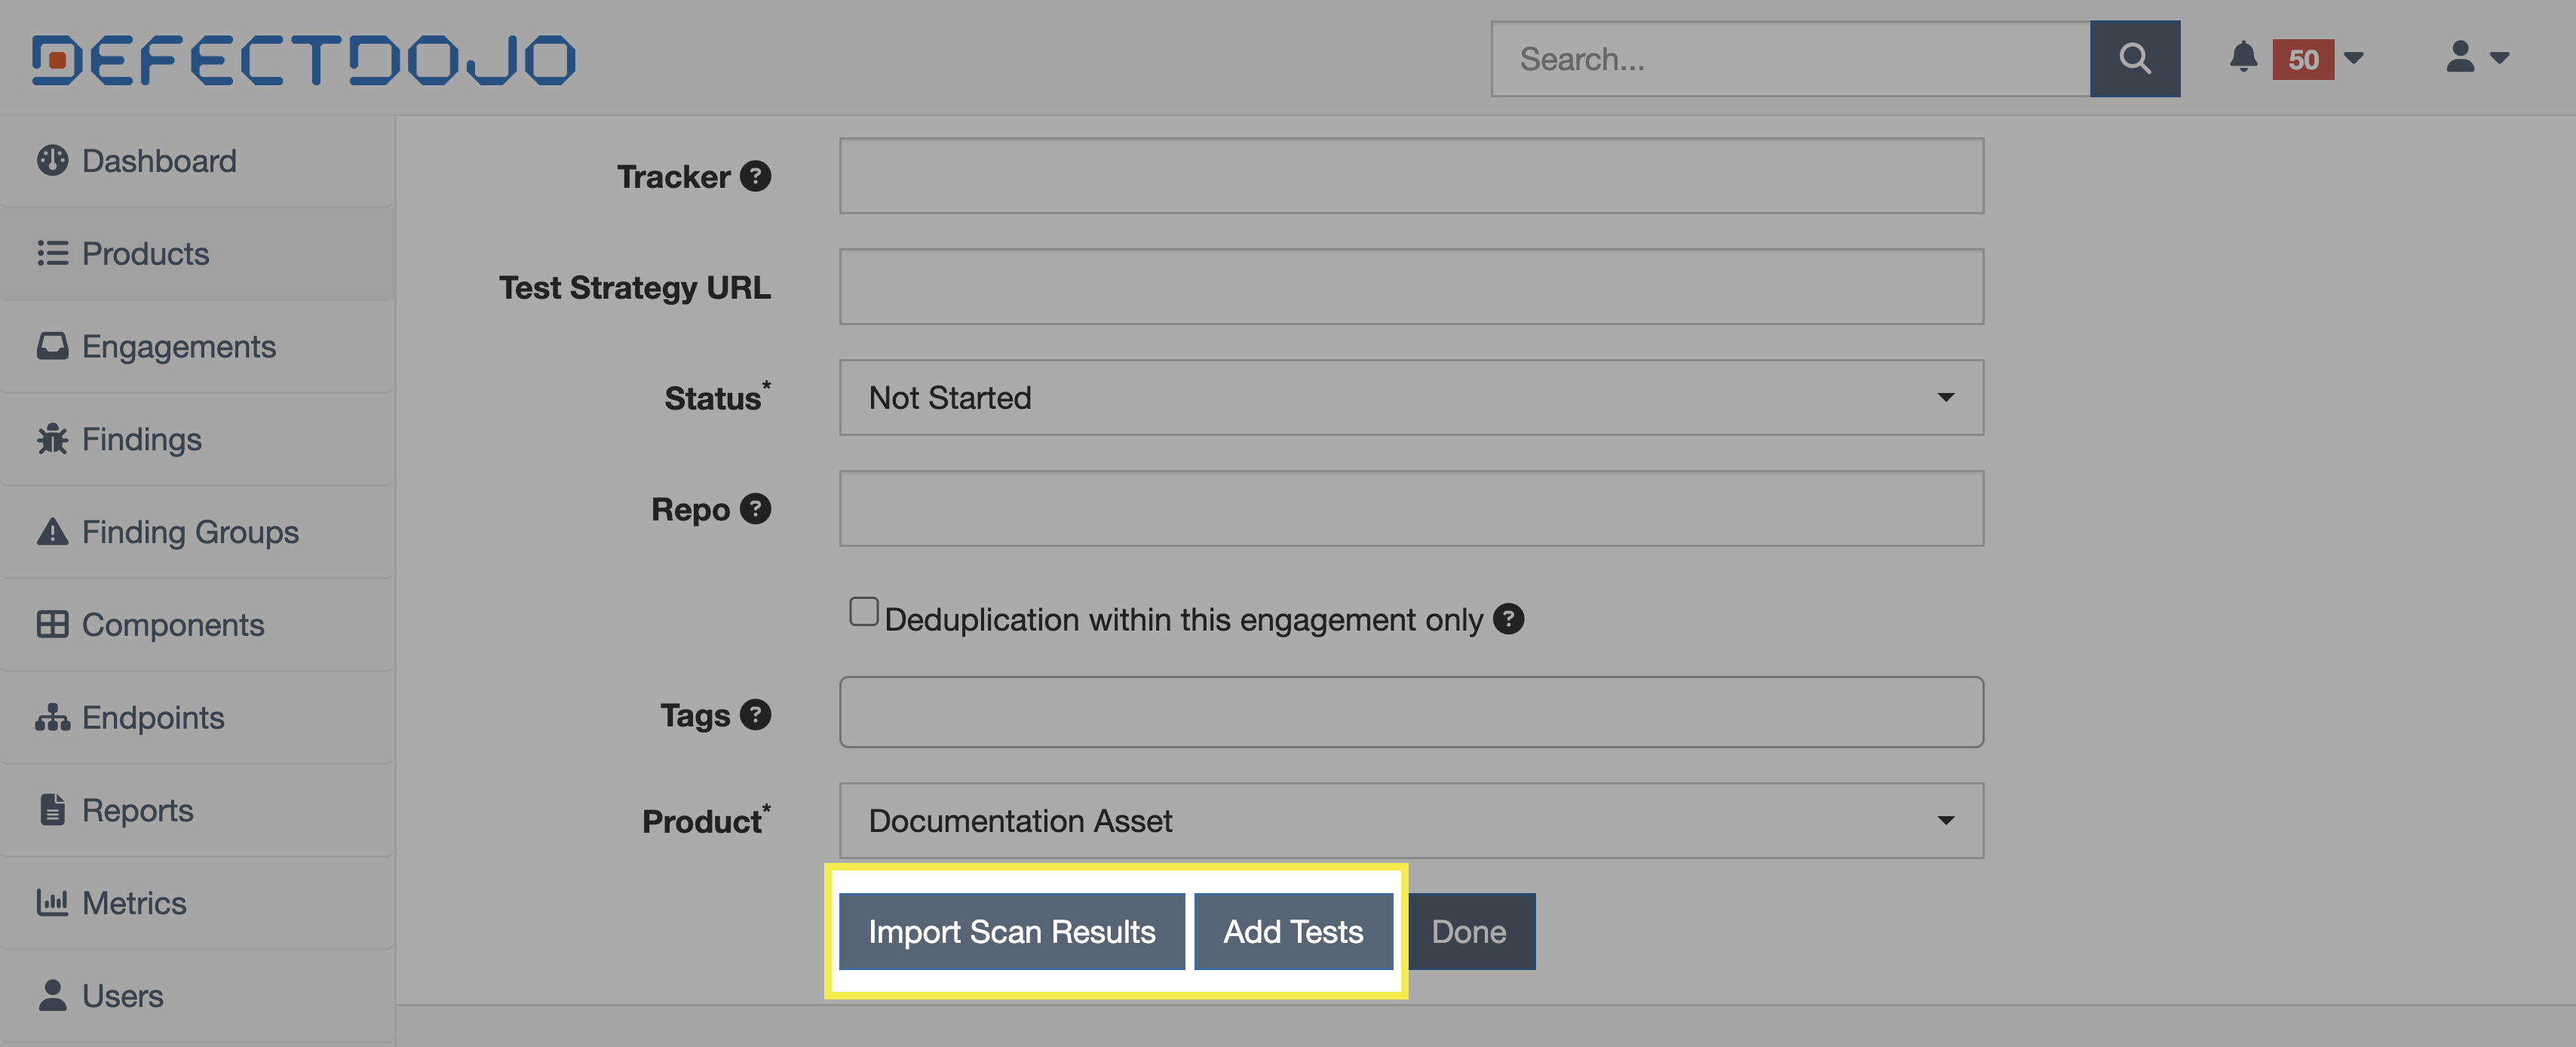
Using the third method above, you can do the following while creating an Engagement:
- Immediately import scan results
- Create a Test shell (into which you will later import a scan)
- Do neither and simply create the Engagement by clicking “Done”
You will have the opportunity to add metadata while either importing a scan or creating a Test shell. Any metadata will be reflected in the Import History section of the Test View.
Automated Workflows
In automated workflows, Tests can be created programmatically as part of the scan import process, allowing pipelines to upload results without requiring a Test to be created manually in advance.
When using the API to import scan results, a new Test can be created automatically by providing an engagement instead of a test.
API
curl -X POST "https://<your-instance>/api/v2/import-scan/"
-H "Authorization: Token <api_key>"
-F "engagement=45"
-F "scan_type=ZAP Scan"
-F "file=@report.xml"
Given the above, a new Test is created under the specified Engagement, and the scan results are attached to that Test.
If a test ID is provided instead, the scan results will be added to an existing Test, which is common in reimport workflows.
Edit Tests
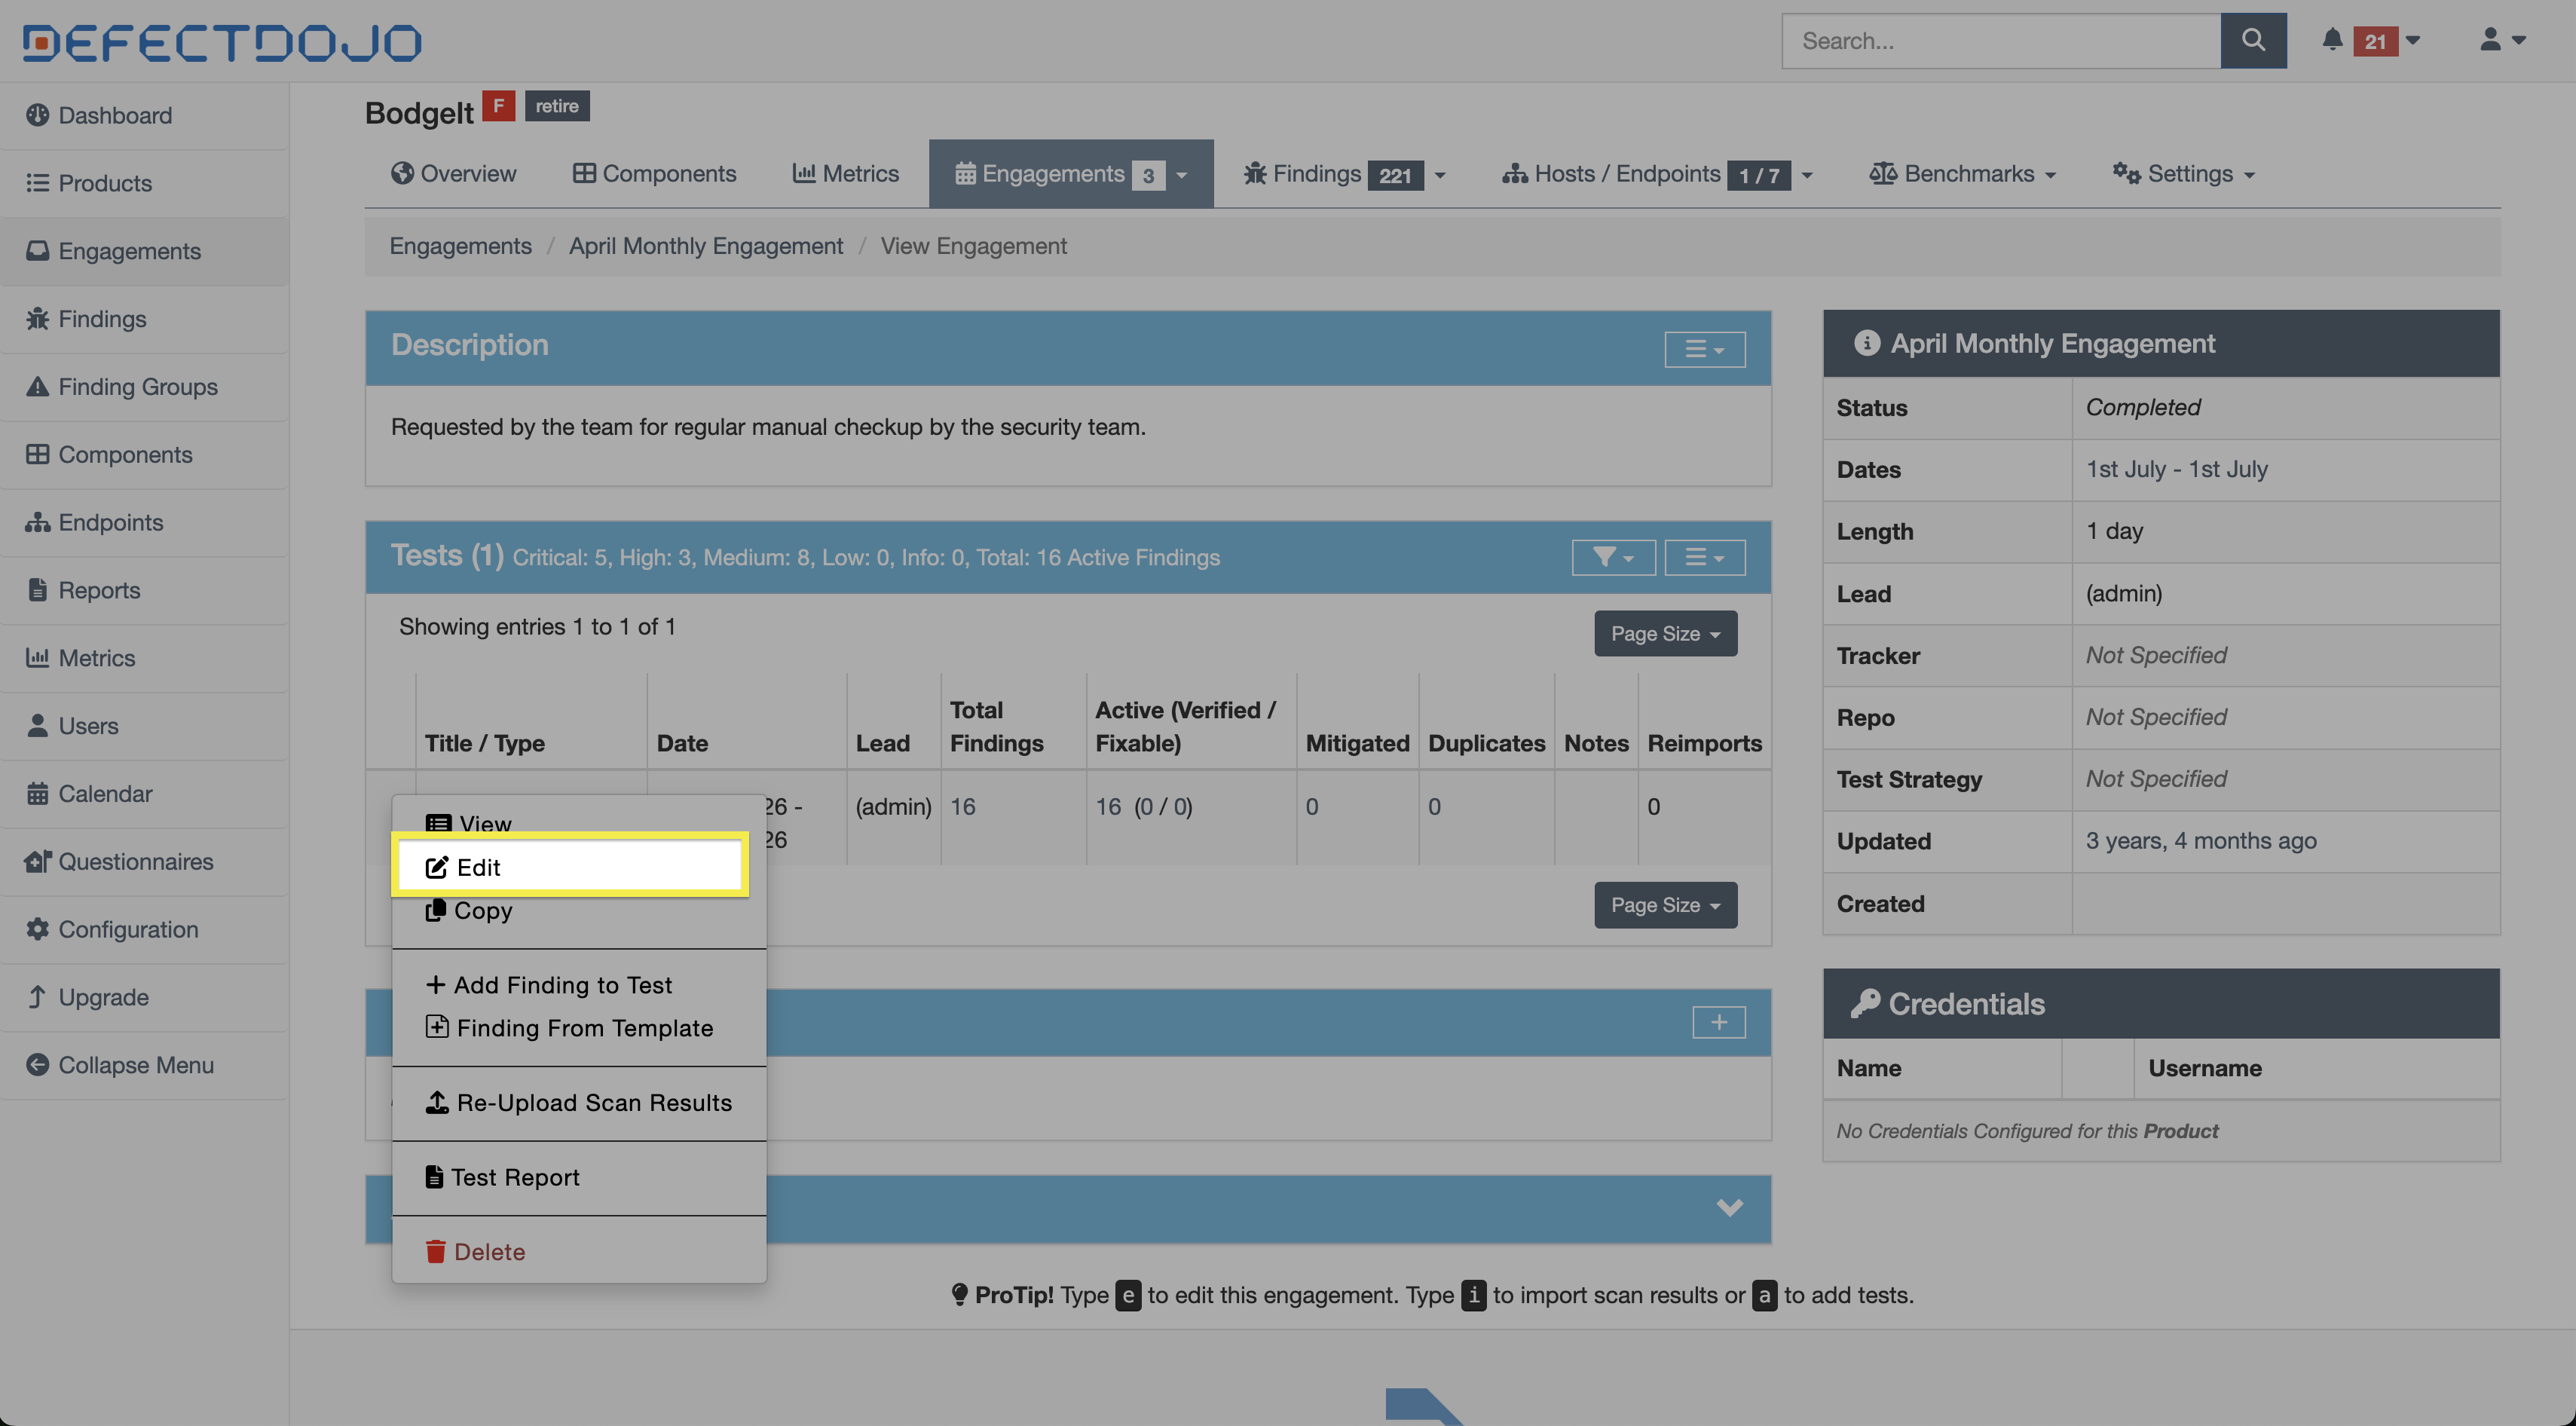
Tests can be edited by either clicking Edit Test from the ⋮ kebab menu in the Tests table within the parent Engagement’s view, or from the settings menu within the Test’s view. All ensuing fields that can be edited are also available when the Test is being created.
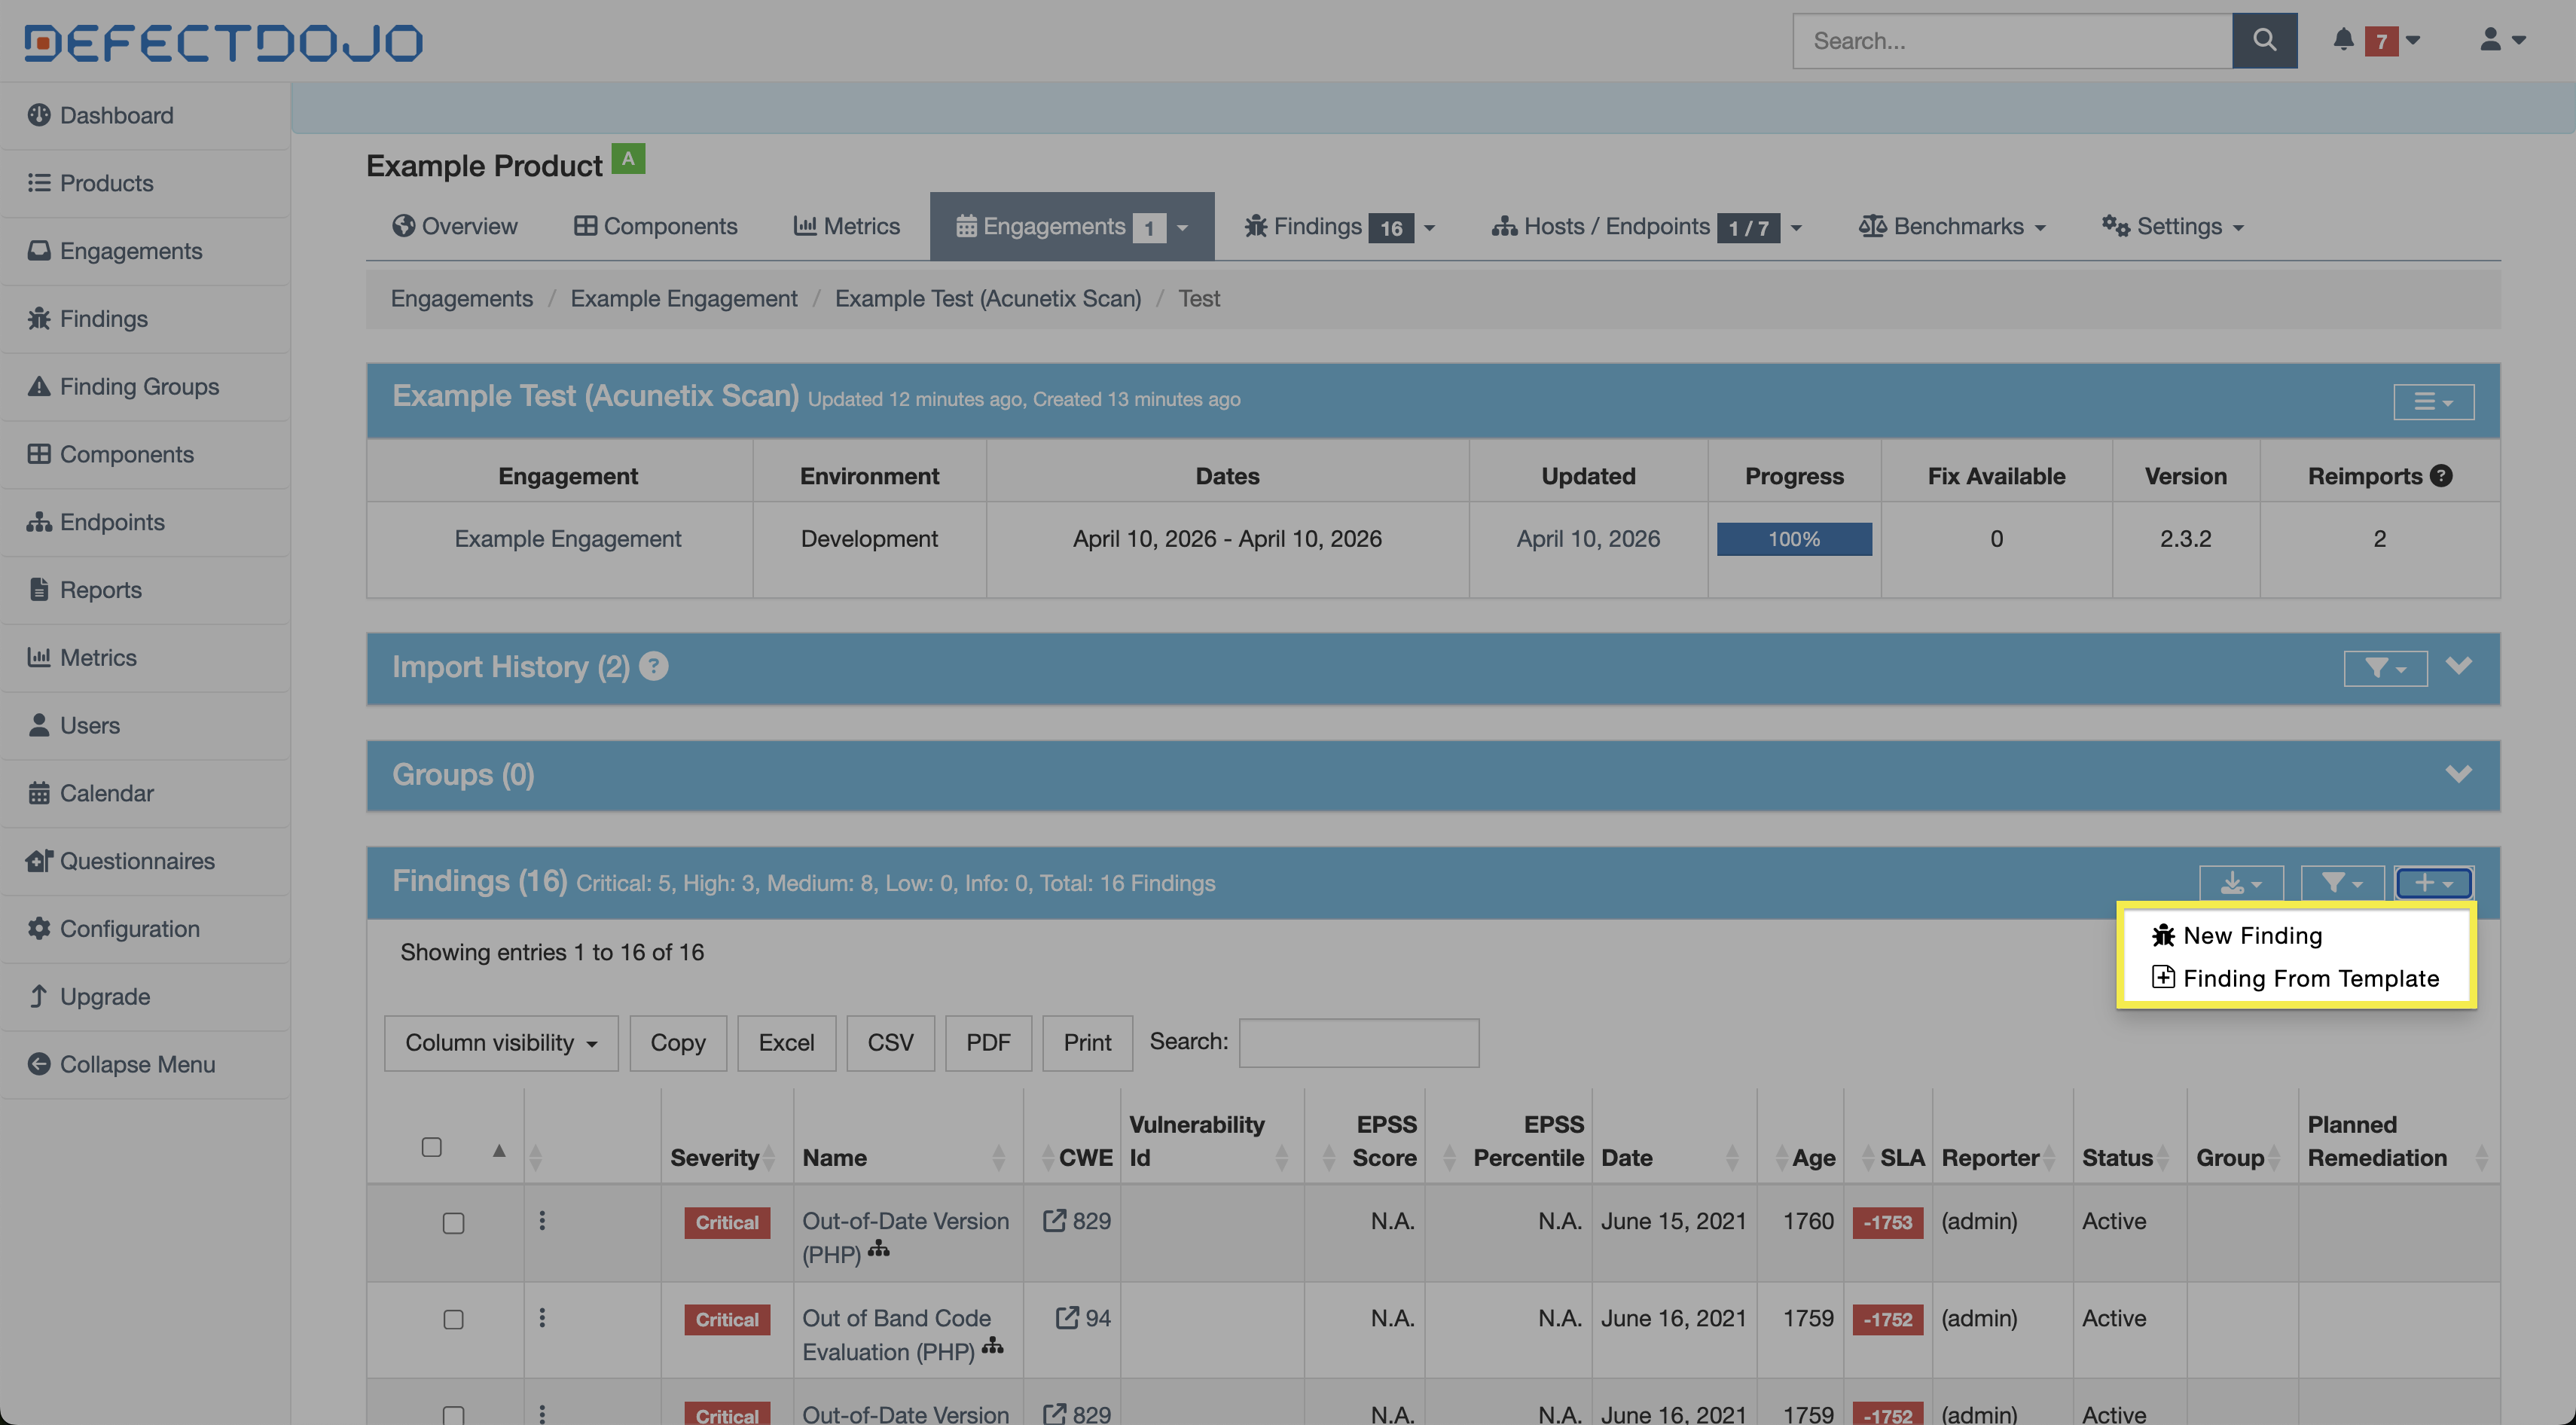
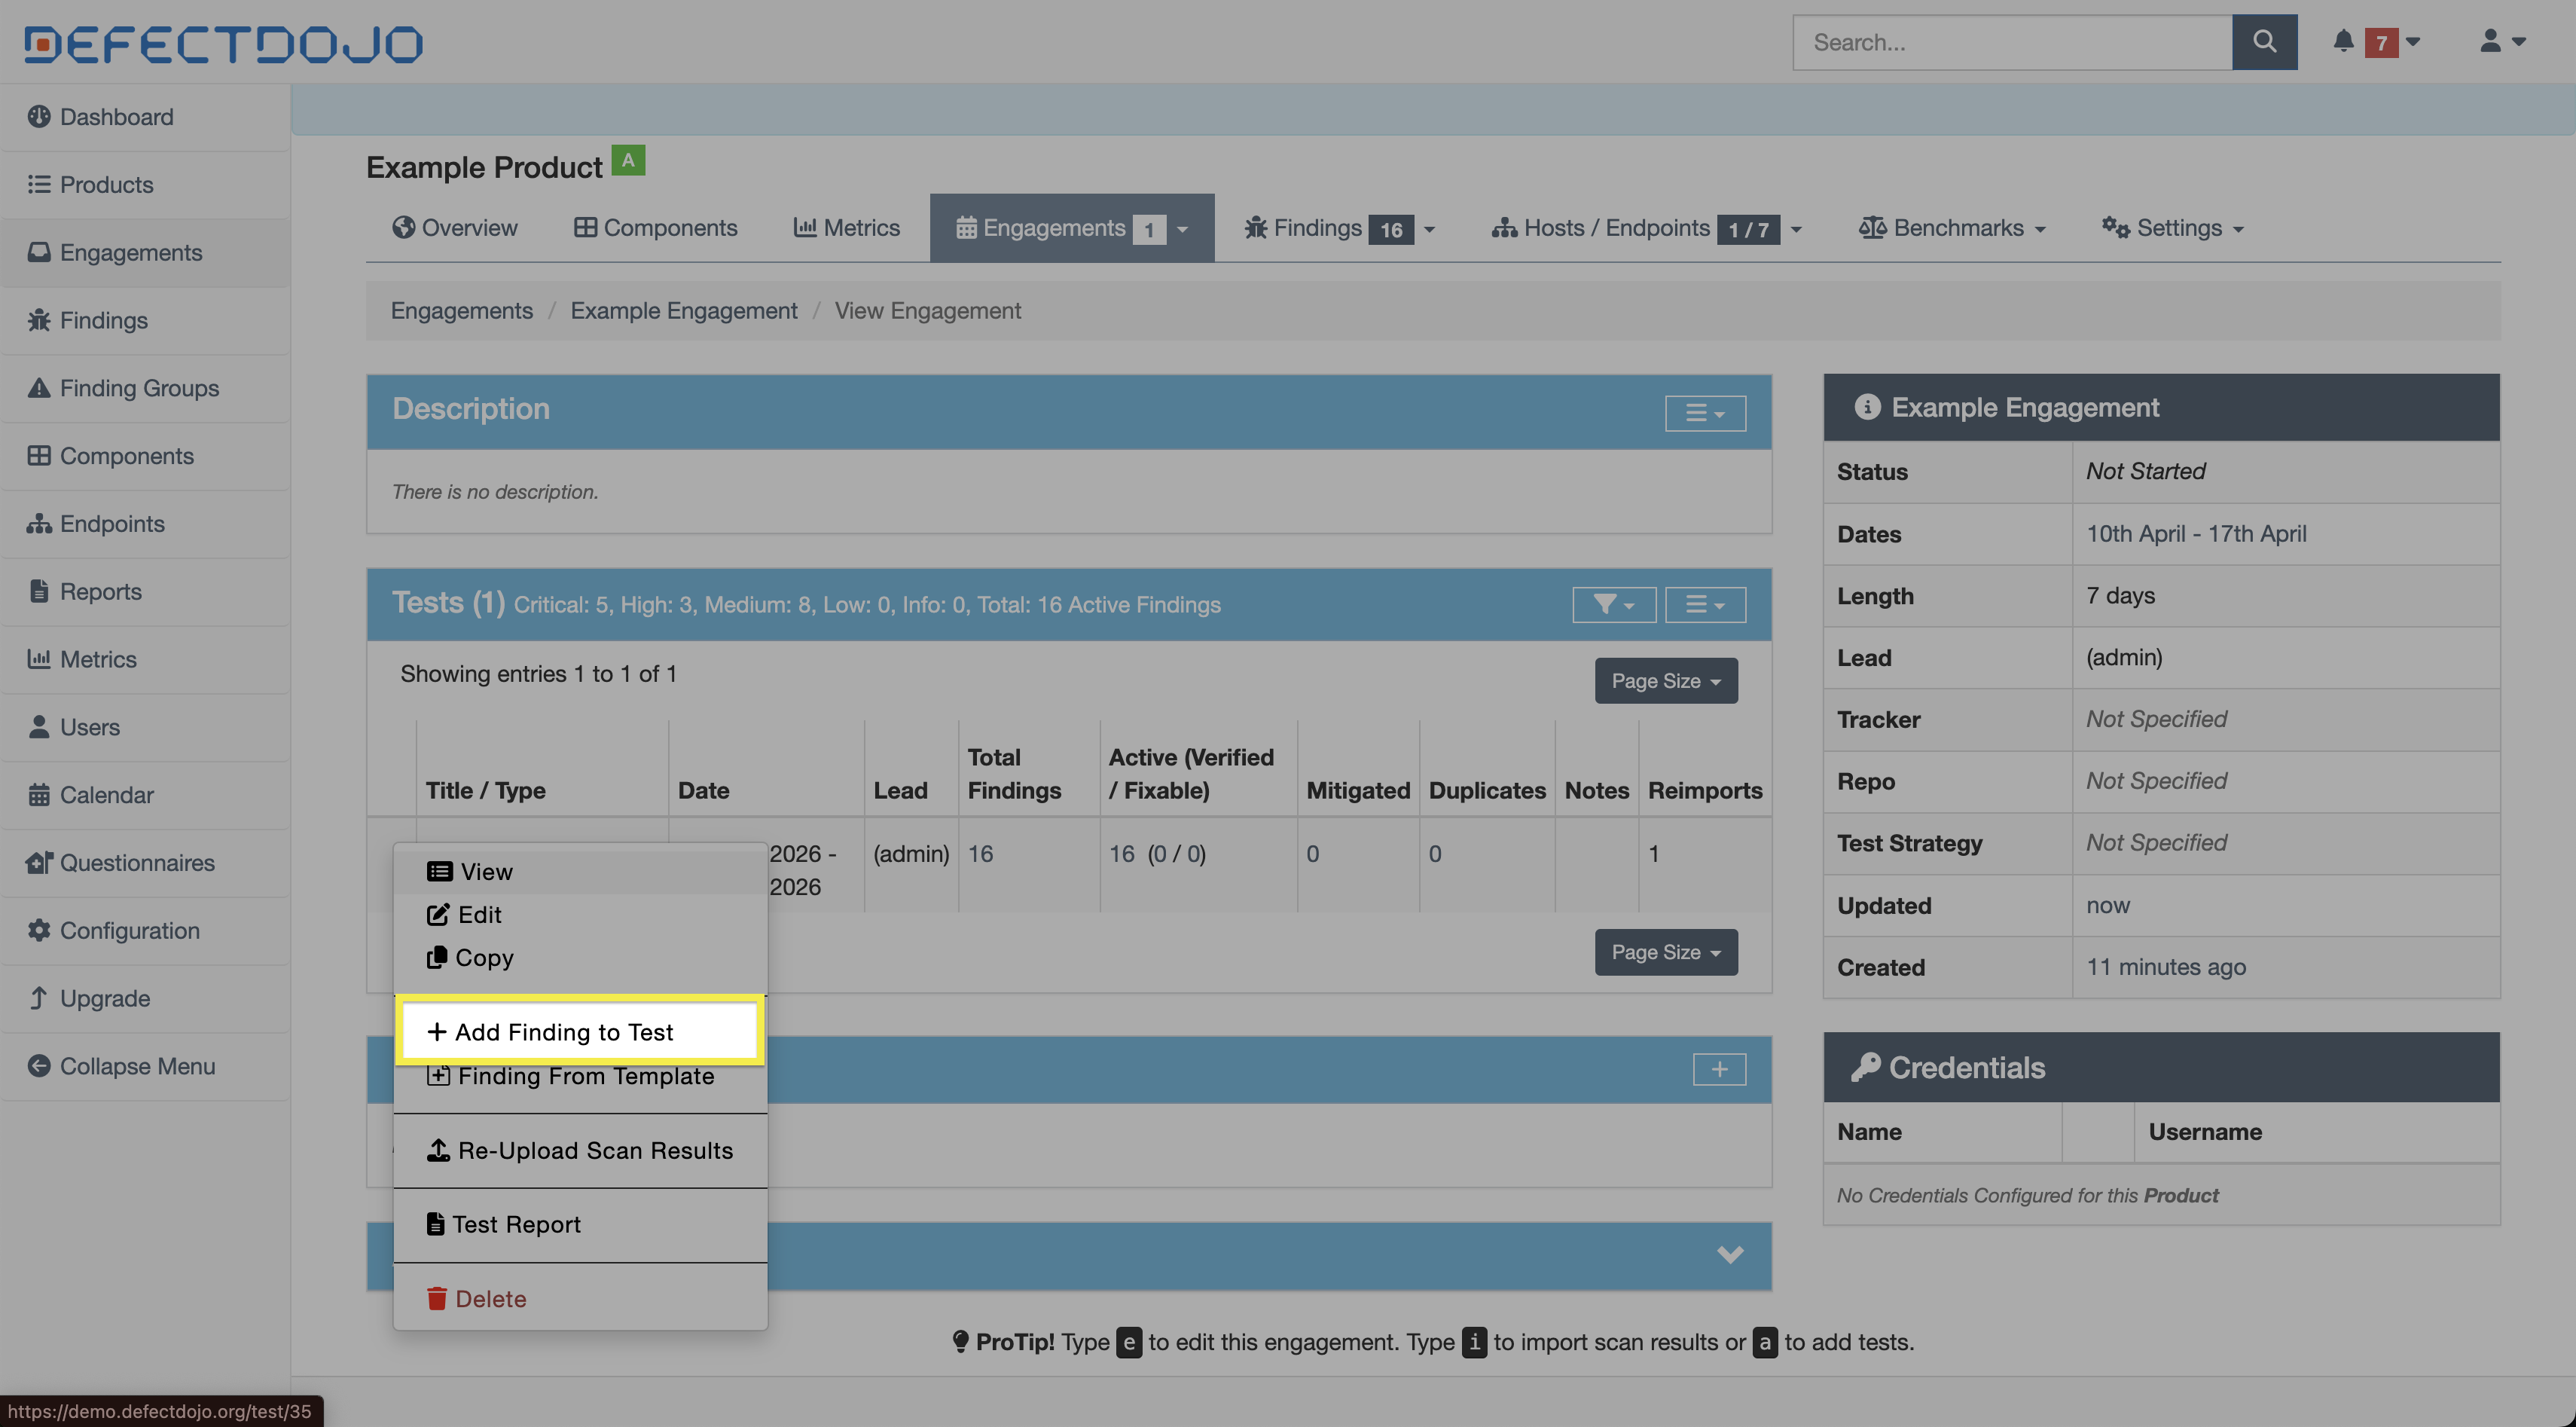
Manually Add Findings to a Test
A Finding can be manually added to a two by either clicking Add Finding to Test from the ⋮ kebab menu next to the Test in the parent Engagement’s view, or from within the settings of the Findings table in the Test’s view.
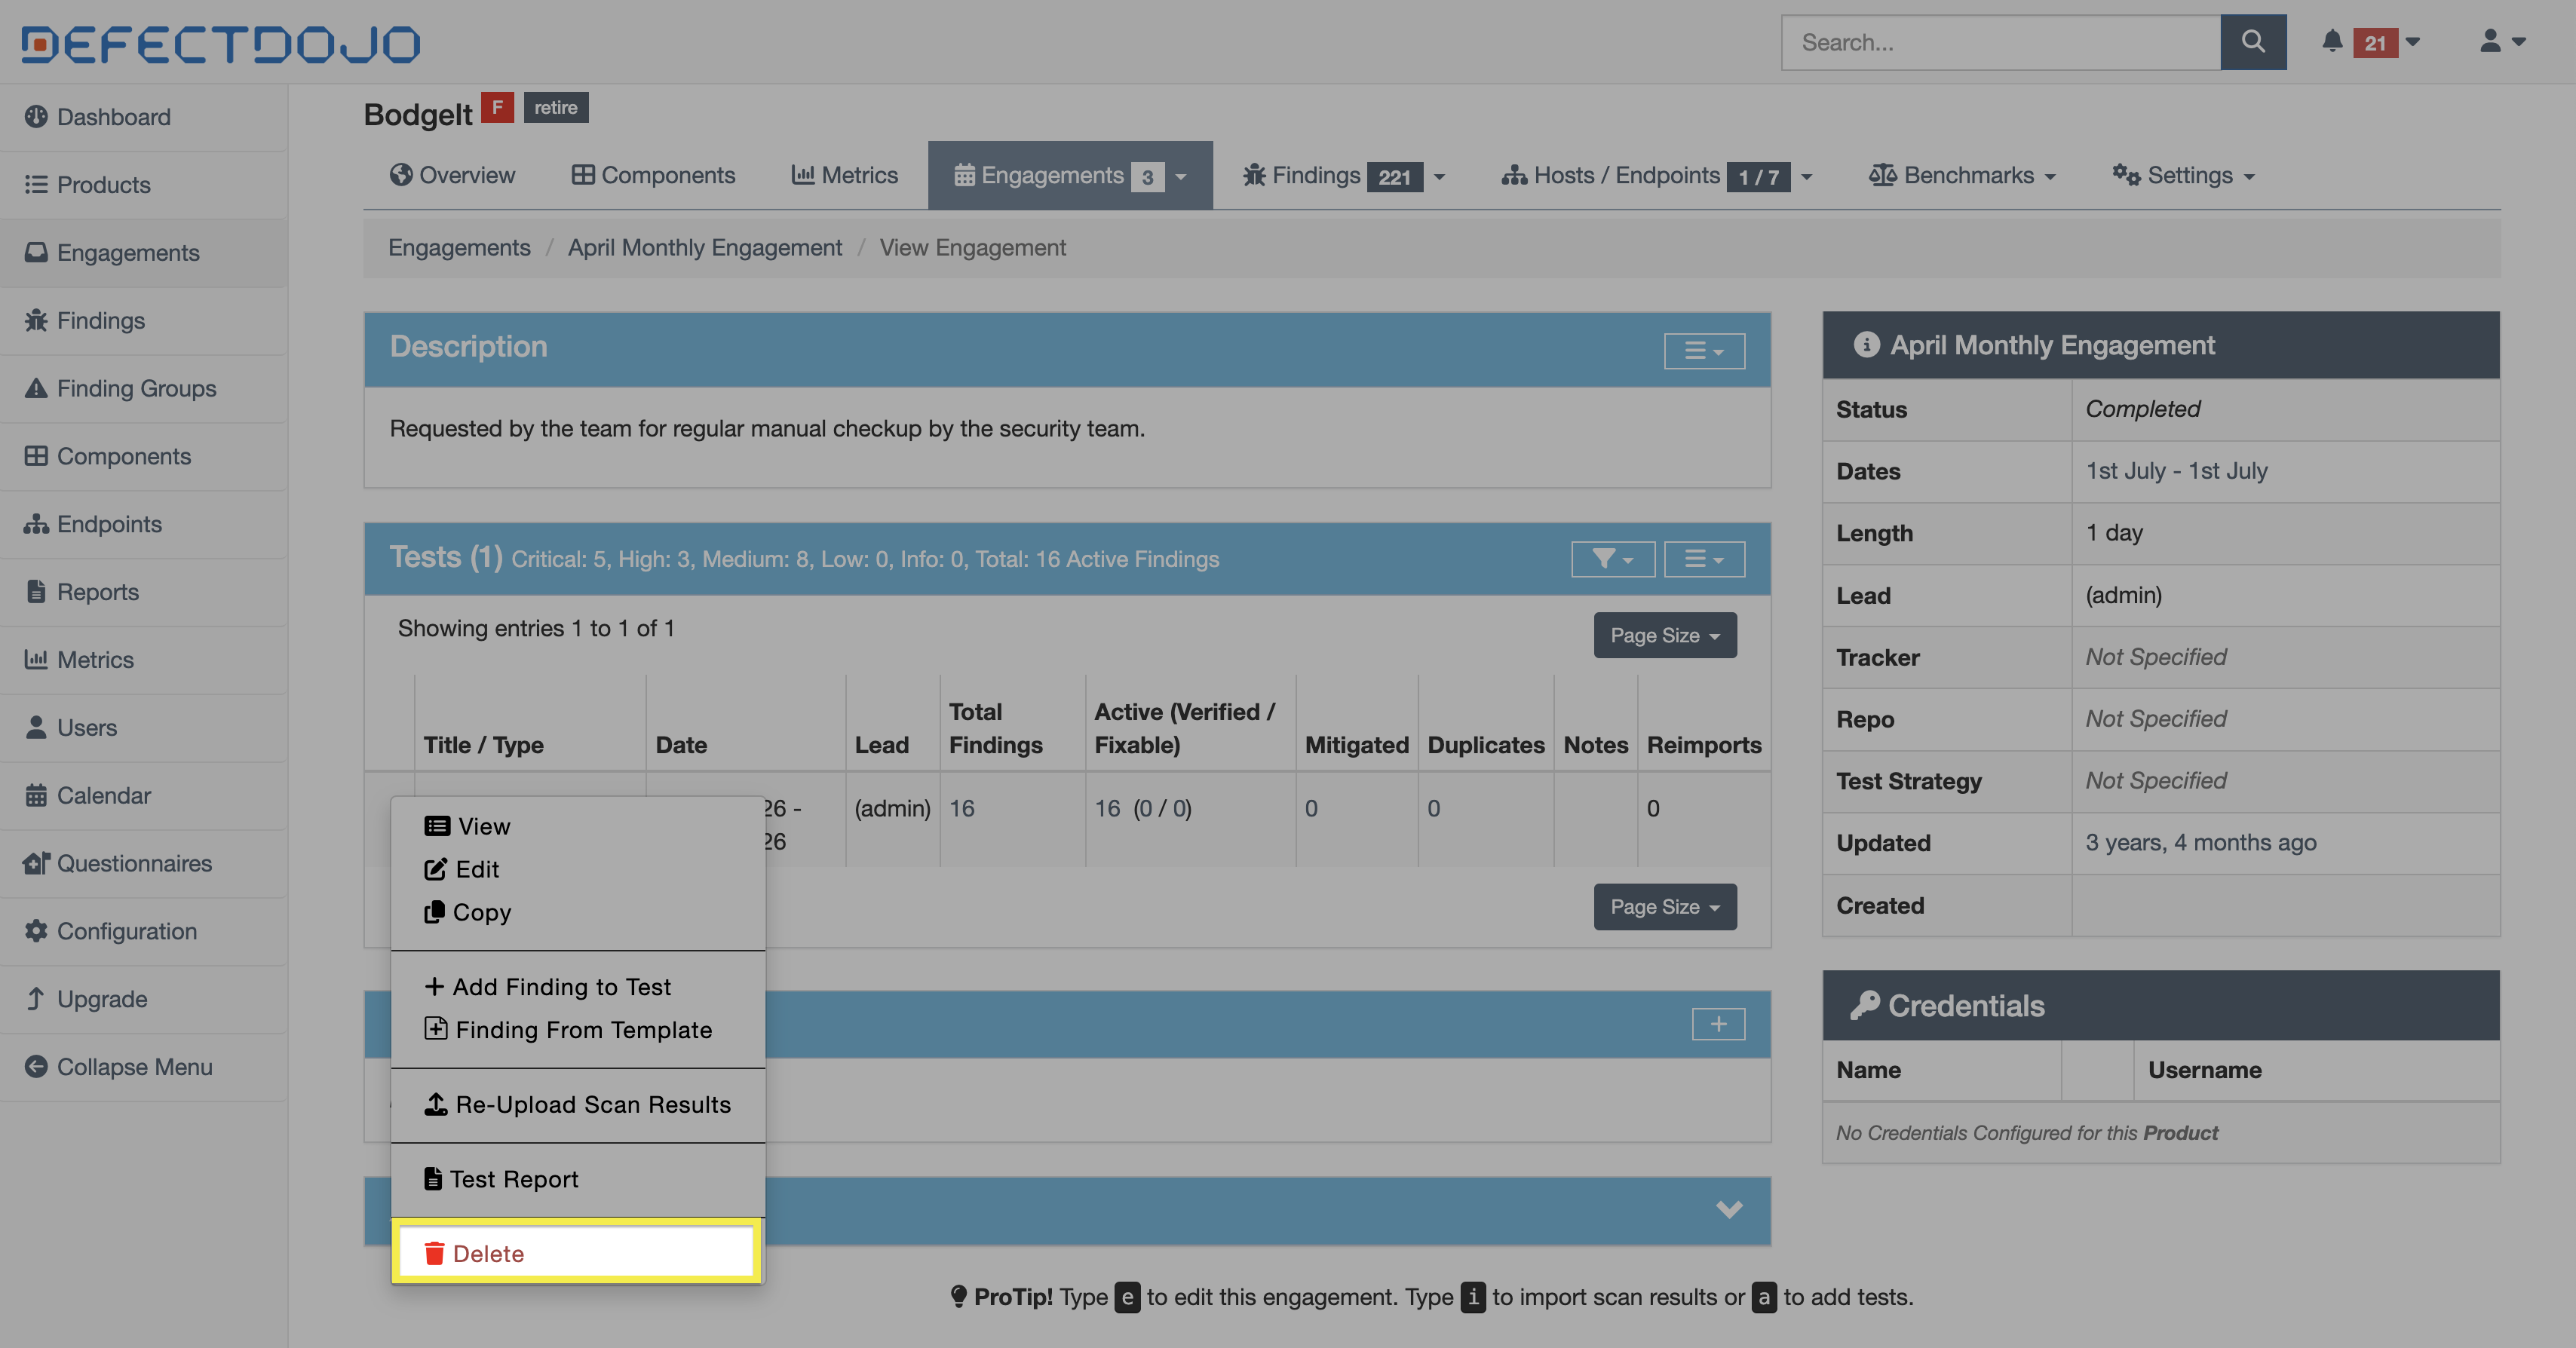
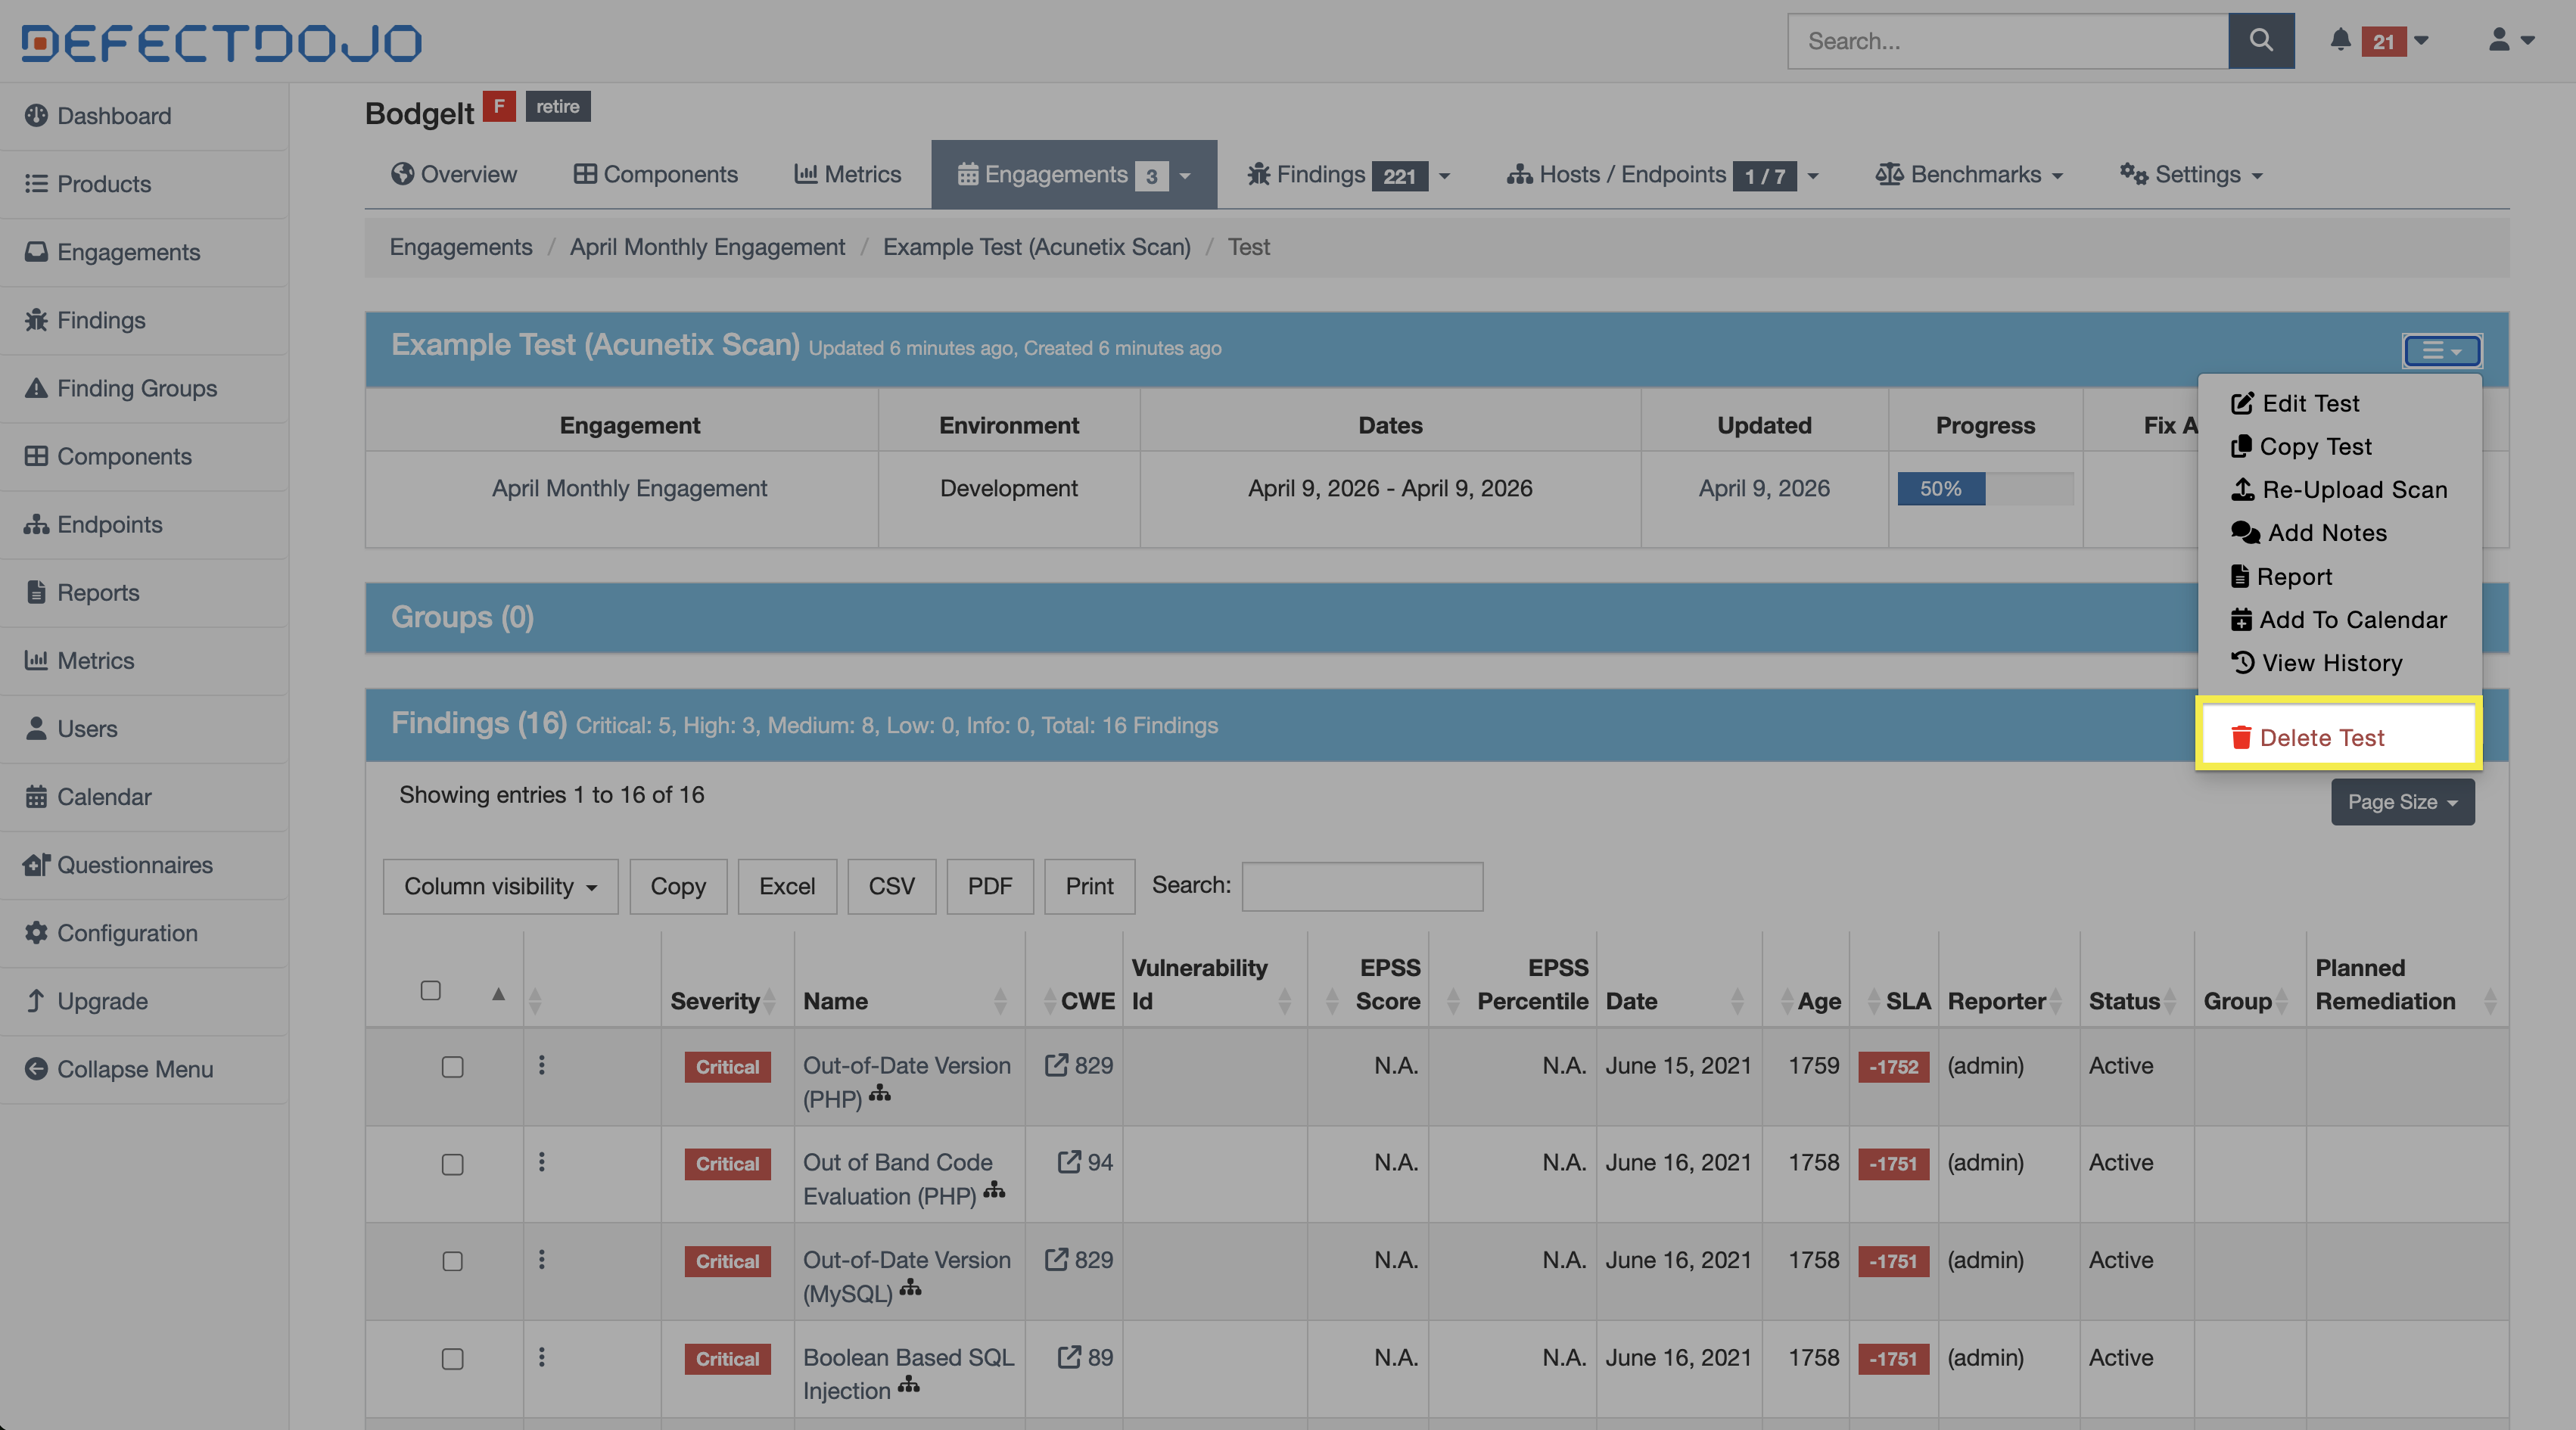
Delete Tests
Deleting a Test can be performed by selecting Delete Test from the ⋮ kebab menu next to the Test in the parent Engagement’s view, or from the settings menu within the Test’s view. This action can’t be undone.
Deleting a Test will also delete any Findings contained within that Test.
Reimport
Reimporting scans within Tests is fundamental to effective deduplication. When scan results are reimported into the same Test:
- Existing Findings may be updated
- Duplicate Findings may be suppressed
- New Findings may be created if no match is found
This behavior depends on the configured deduplication rules and the scan type.
Creating a new Test instead of reimporting into an existing one may result in duplicate Findings being created rather than updated.
Reimport vs. Import
Reimport is typically used when:
- Running recurring scans against the same target
- Tracking how Findings evolve over time
- Maintaining a continuous view of application security posture
In contrast, importing (creating a new Test) is more appropriate for one-time or independent scan executions.
Reimporting Scan Results (UI)
In order to add new data to an existing Test, you can either click Re-Upload Scan Results from the ⋮ kebab menu next to the Test in the parent Engagement’s view, or click Re-Upload Scan in the settings menu within the Test’s view.

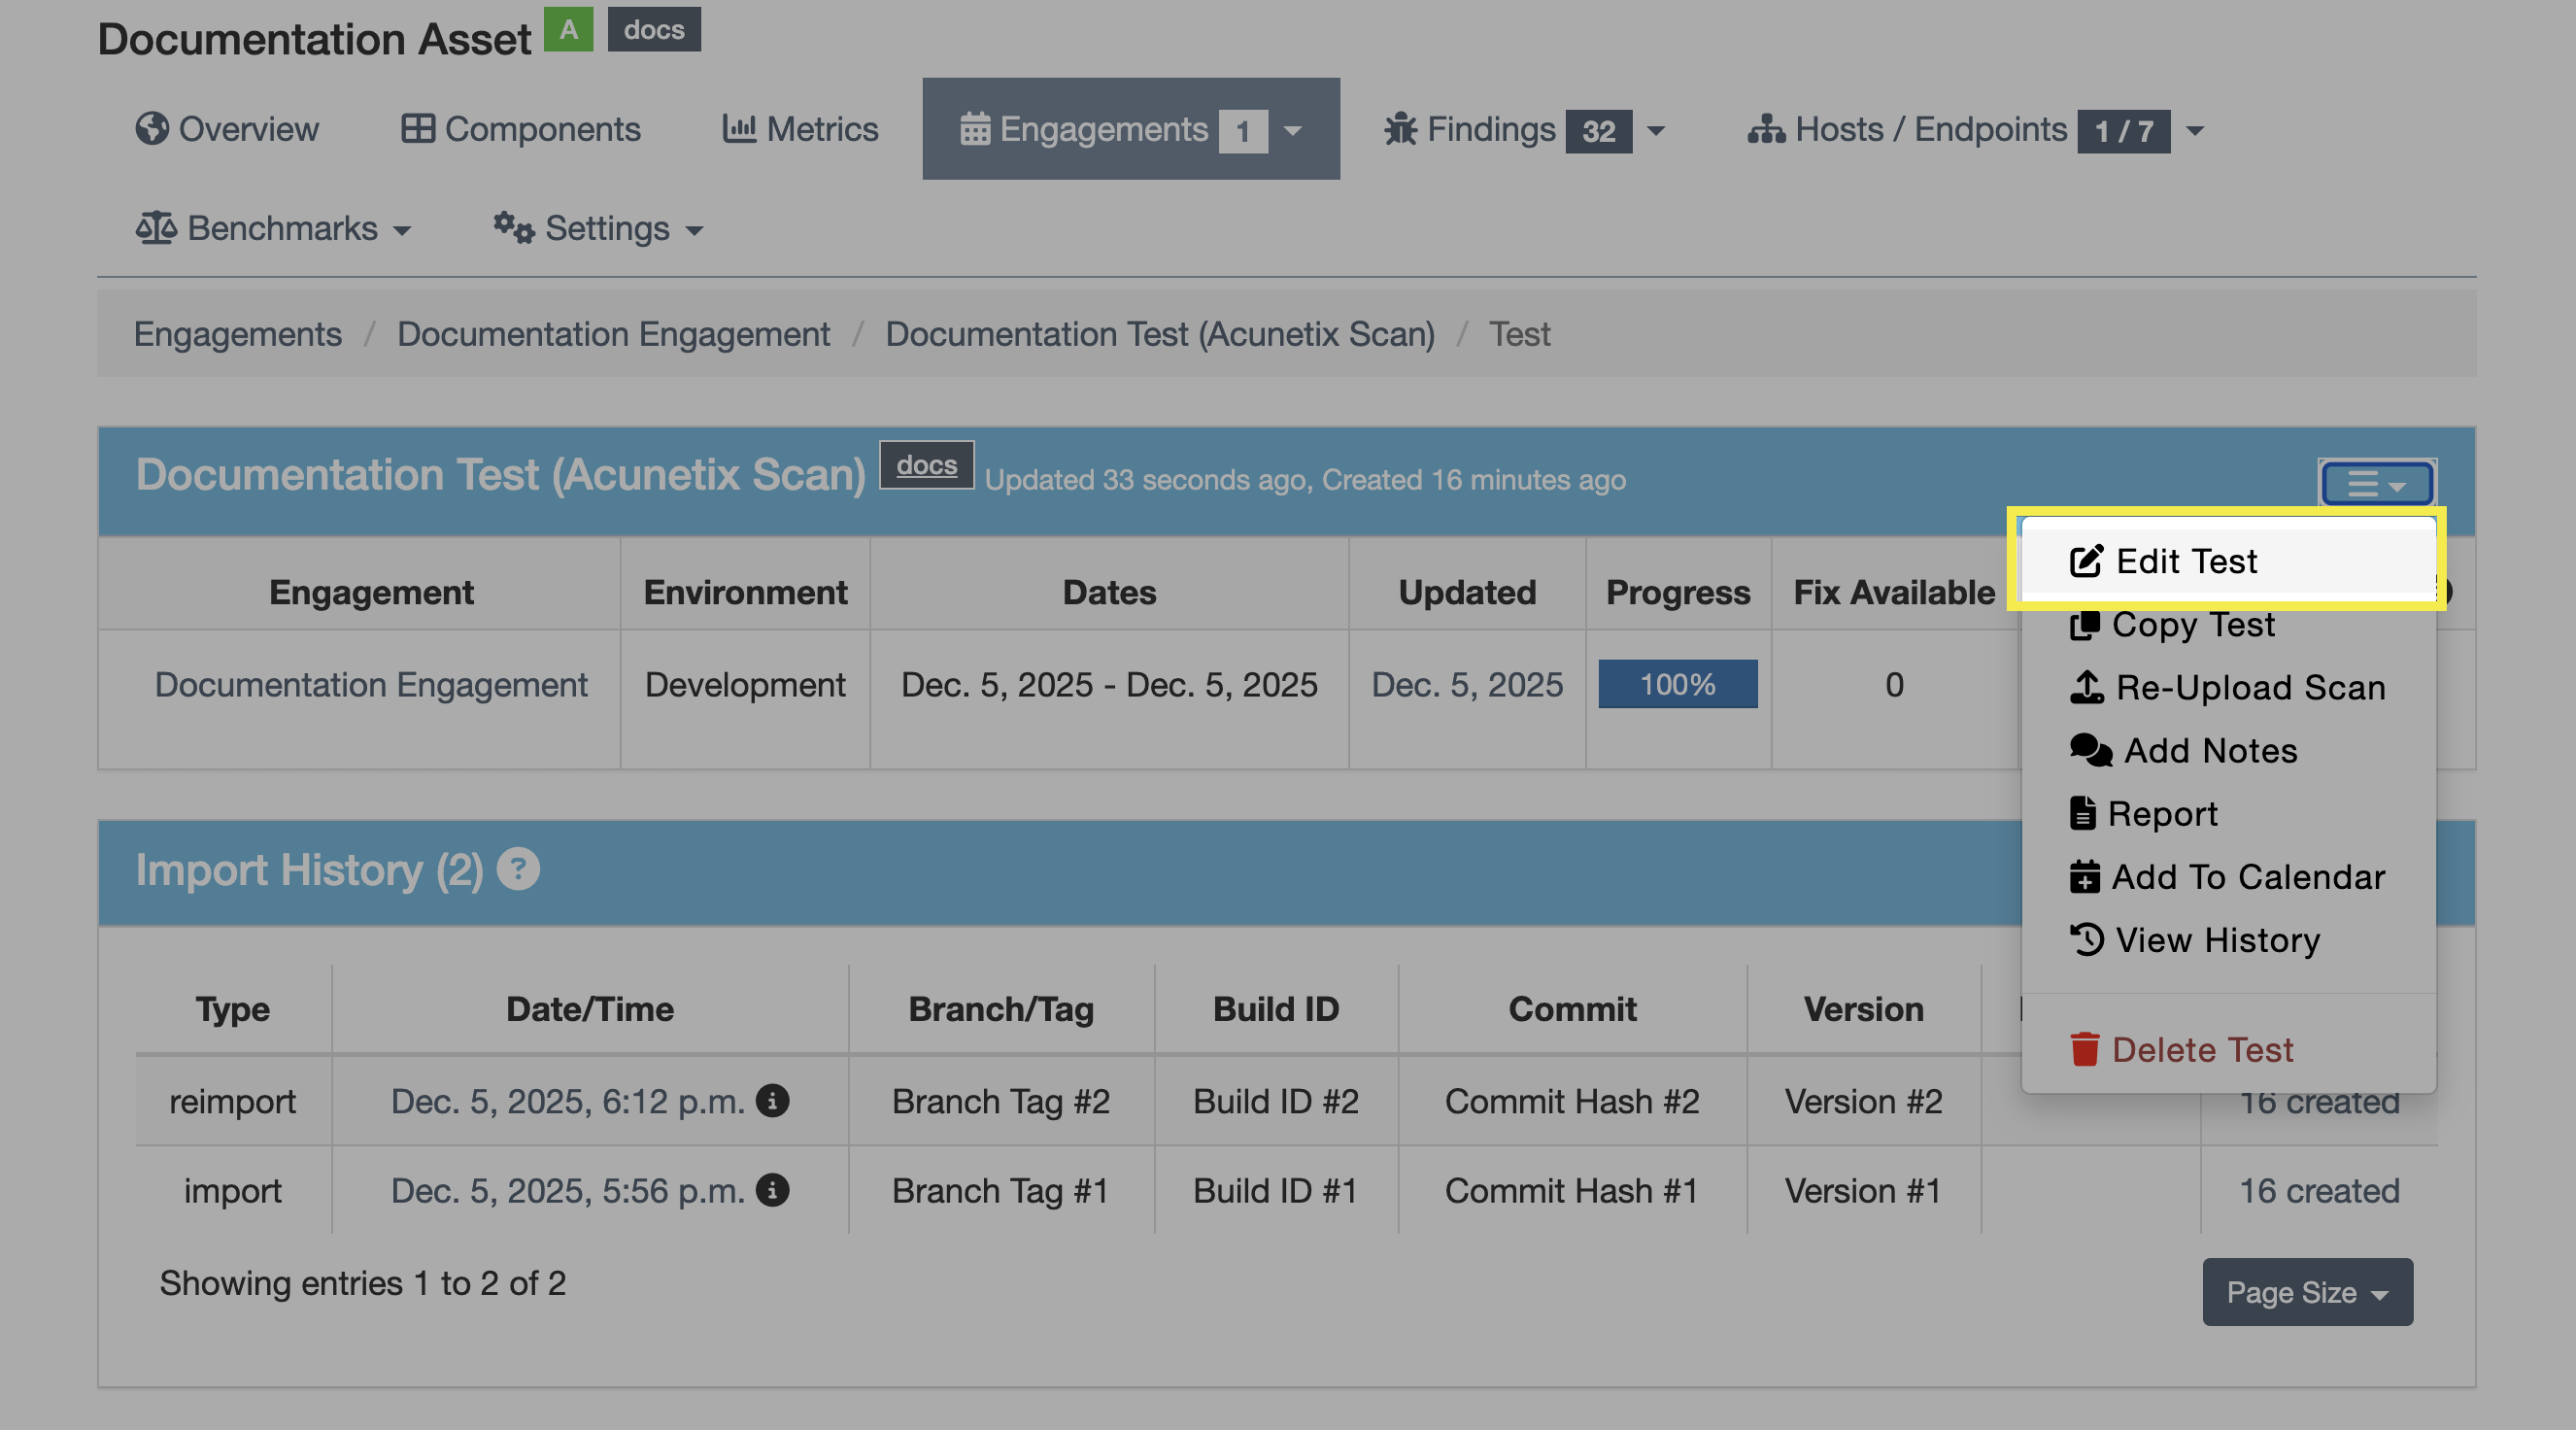
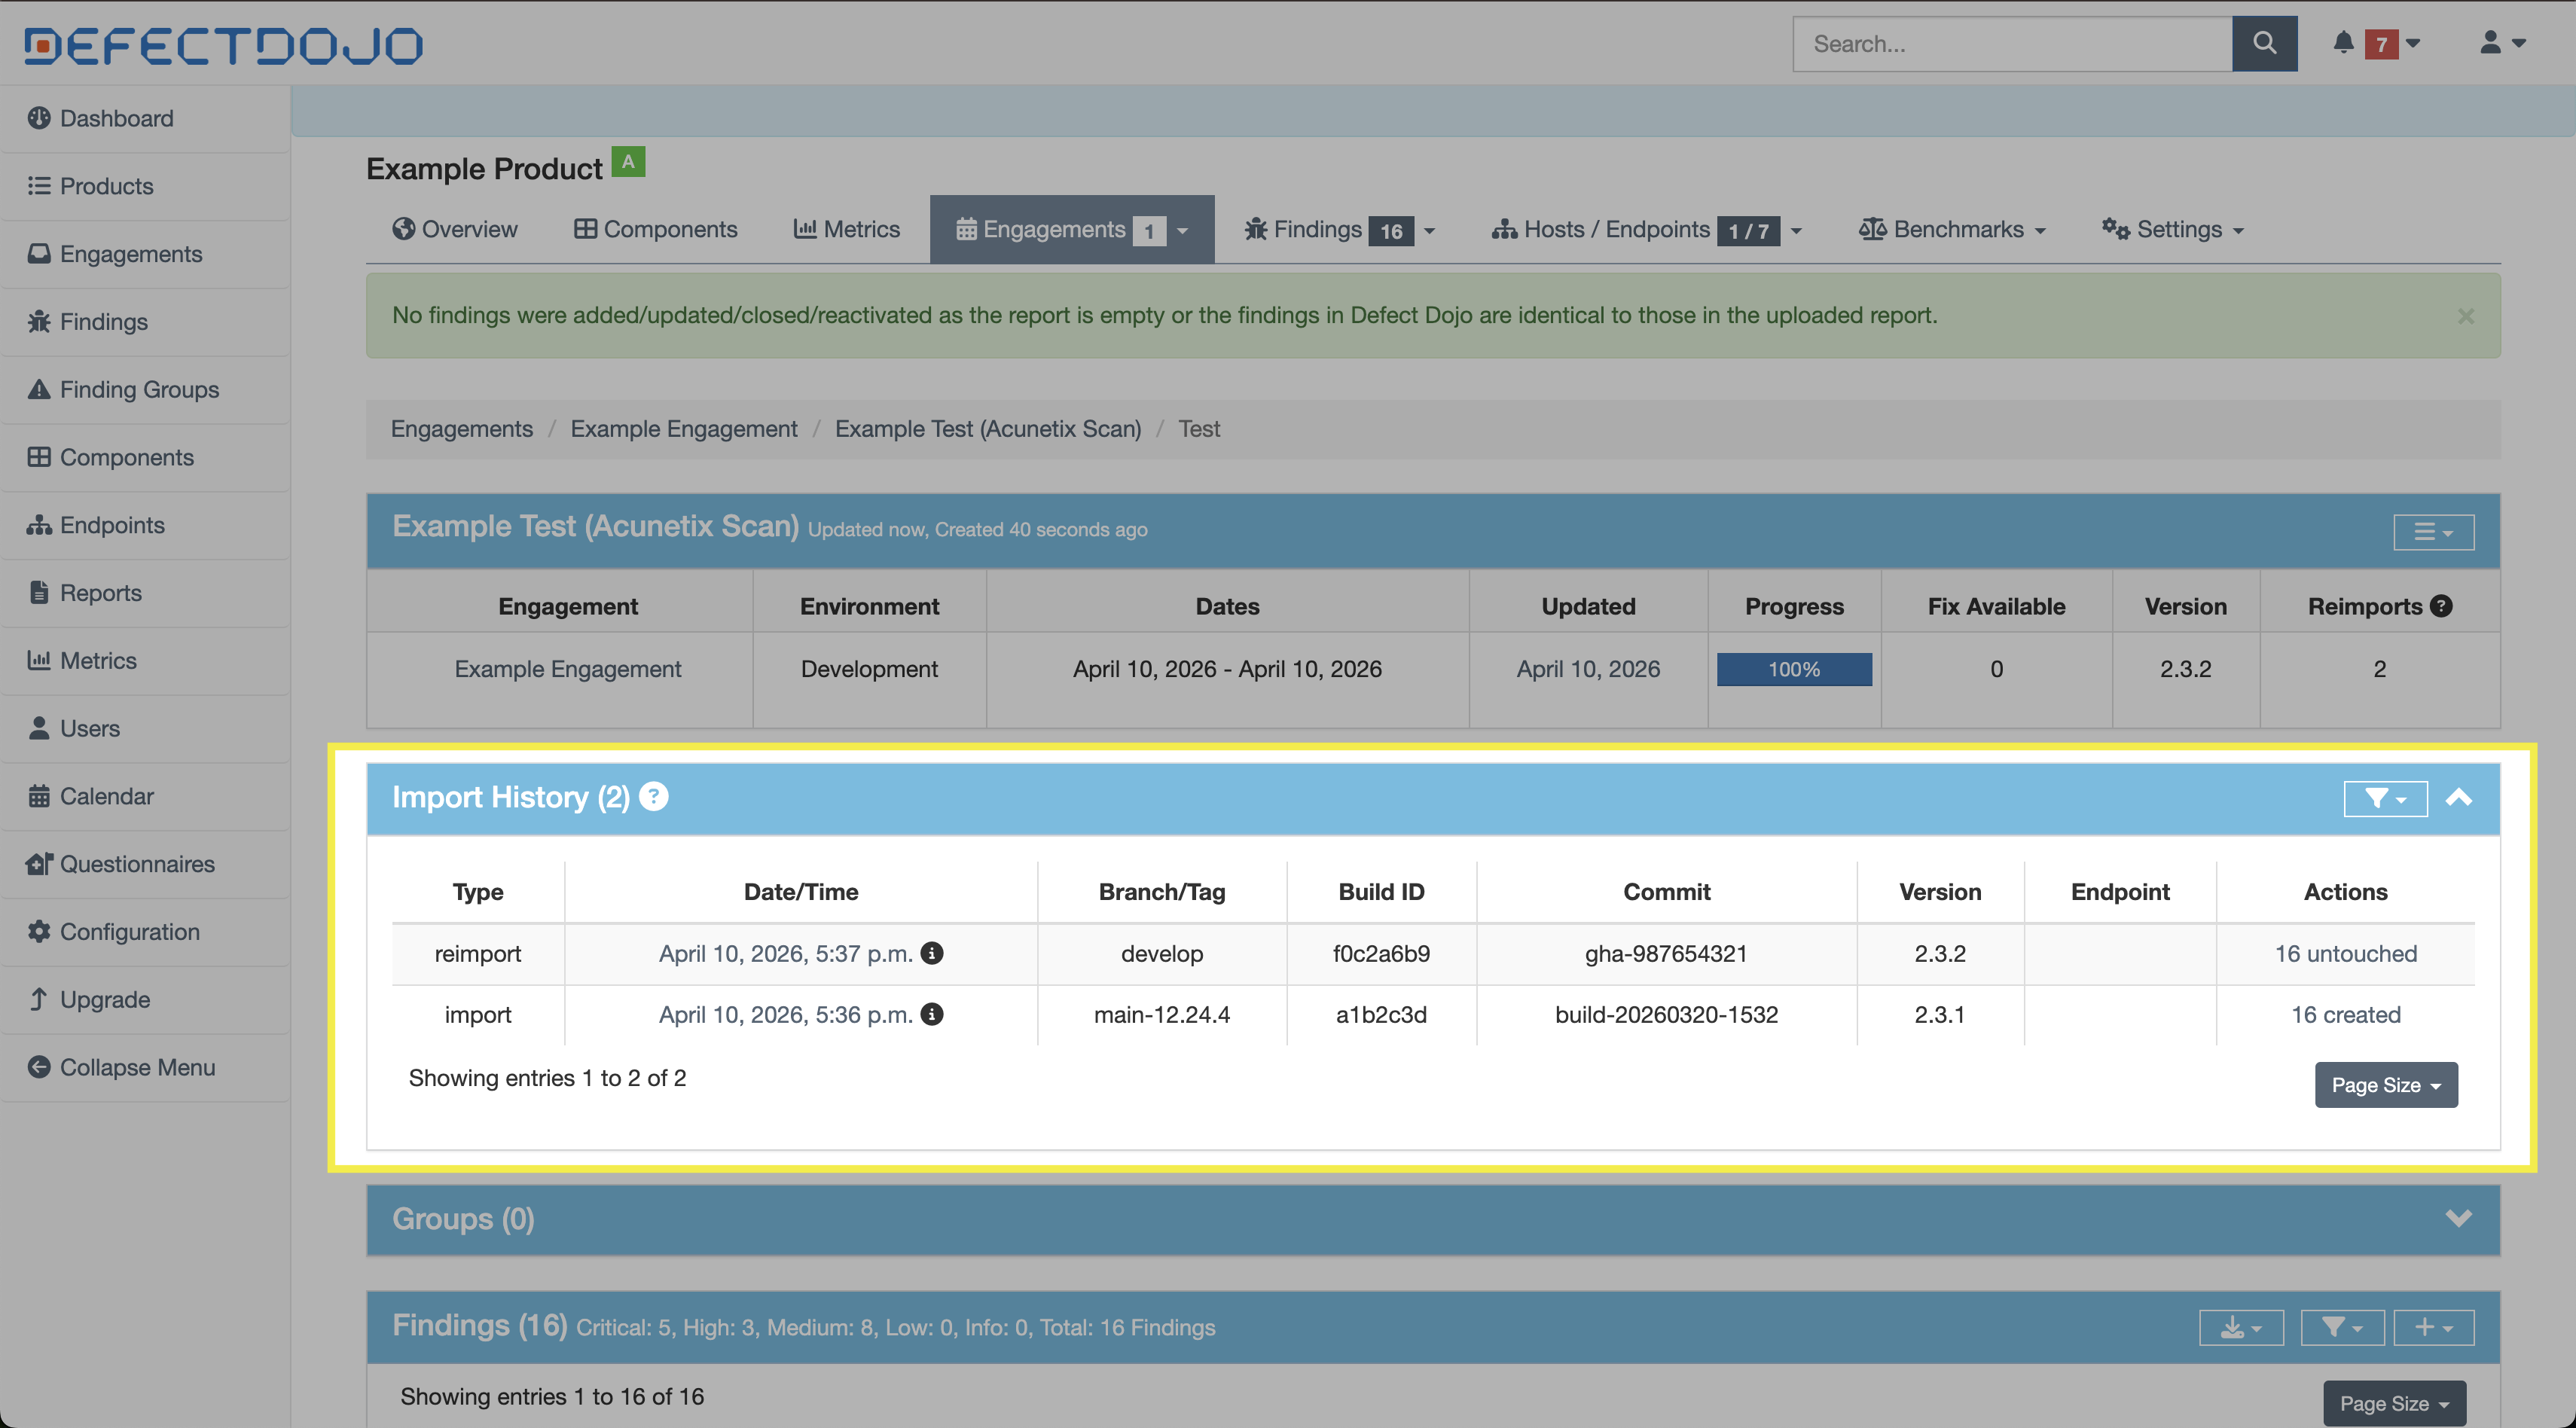
While completing the Reimport Scan form, you’ll have the option to update metadata for the scan being reimported, including the version, branch tag, commit hash, and build ID.
These changes are reflected in the Import History section of the Test View, which will also include the same metadata from prior scan imports.
For example, in the below screenshot, the branch tag, build ID, commit hash, and version were all manually updated between the initial import and the subsequent reimport.
To edit the metadata of the most recently reimported scan, follow the prior instructions in the Edit Tests section above and update the metadata as desired. Only the most recent import’s metadata can be edited.
Reimporting Scan Results (API)
When Tests are created or updated through a CI/CD pipeline, you’re able to include metadata from the pipeline run so that Tests can be properly linked to the code they scanned. This allows you to:
- Associate scan results with a specific commit or branch.
- Track how Findings evolve across code changes.
- Improve Deduplication by understanding when two scans apply to the same or different versions of the code.
- Support auditability by showing exactly what code was scanned and when.
DefectDojo’s API accepts these values during import or reimport so they can be stored as part of the scan import and reflected in the Test’s import history. This metadata can be used to identify commit hashes or anything associated with any relevant repository information associated with a CI/CD run.
Supported Metadata Fields
The API supports a defined set of metadata fields that can be included during reimport. These include:
tagsversionbuild_idbranch_tagcommit_hashscan_dateminimum_severityactive / verifiedflags
These fields represent the primary mechanism for attaching contextual metadata during a reimport operation.
In automated pipelines, the most commonly supplied metadata includes:
- build_id (CI job identifier)
- commit_hash (source control reference)
- branch_tag (branch or environment context)
- tags (e.g., nightly, staging, production)
These fields provide traceability across scans without requiring manual intervention.
Although metadata can be updated manually through the Reimport Scan form, most automated environments will handle this by calling the /api/v2/reimport-scan/ endpoint directly. This approach allows the pipeline to automatically attach metadata upon reimport.
API Reimport with Metadata
curl -X POST "https://<your-instance>/api/v2/reimport-scan/"
-H "Authorization: Token <api_key>"
-F "test=123"
-F "scan_type=ZAP Scan"
-F "file=@report.xml"
-F "tags=nightly,api-scan"
-F "version=1.4.2"
-F "build_id=jenkins-842"
-F "branch_tag=main"
-F "commit_hash=a1b2c3d4"
Metadata, Reimport, and Scheduled Scans
Scans may also be scheduled to run at routine intervals, such as those triggered by cron jobs. Scheduled scans are not tied to repository activity, making metadata like commit hashes or branch names irrelevant unless explicitly injected by the script itself. Nevertheless, using reimport may still be useful if you prefer to keep a rolling record of your security posture within a single Test.